In this tutorial, you will learn how to set up PXE boot server on Ubuntu 24.04. Setting up a PXE (Preboot Execution Environment) boot server is essential for system administrators managing multiple machines in enterprise environments. This comprehensive guide walks you through configuring a complete PXE boot infrastructure on Ubuntu 24.04 LTS hosted on KVM virtualization platform, enabling network-based installations and diskless workstations.
Table of Contents
How to Set Up PXE Boot Server on Ubuntu 24.04
Understanding PXE Boot Technology
PXE boot leverages network protocols to deliver operating system images to client machines without local storage requirements. This technology proves invaluable for:
- Enterprise deployments: Simultaneous OS installation across hundreds of machines
- Thin client environments: Diskless workstations with centralized management
- Disaster recovery: Network-based rescue environments
- Automated provisioning: Integration with configuration management systems
Prerequisites
- Ubuntu 24.04 LTS server (minimum 2 vcpus, 4GB RAM, 50GB storage). Note that these are not standard requirements but rather what I am using in my setup.
- Network interface with static IP configuration
- DHCP server to provide DHCP services
- Subnet isolation to prevent DHCP conflicts
- Firewall configuration allowing required service ports
- Sufficient bandwidth for concurrent installations
- User with sudo rights access.
Set Up PXE Boot Server on Ubuntu 24.04
Step 1: Create PXE Boot Network on KVM
We’re running our Ubuntu 24.04 server on a KVM virtualization platform.
Before we can proceed, we need to create a dedicated virtual network for PXE booting in KVM. While you can choose any subnet that fits your setup, we’ll use 10.184.10.0/24 for this guide.
- 10.184.10.0/24 for the Management Network
- 10.185.10.0/24 for the PXE Boot Network
There are two ways to create this network in KVM:
- Using the Virt-Manager graphical interface
- Using the
virshcommand-line tool
We’ll cover both methods so you can choose whichever works best for your environment.
To create a network on KVM virt-manager:
- Launch the virt-manager
- Click Edit option on the top menu and navigate to Connection Details > Virtual Networks.

- At the bottom of the Virtual Networks tab, click the
+button to create a new network. This will open the Network Configuration Wizard. - Enter the name of the network, e.g pxe-net
- You can leave Mode and Forward to with the default options.
- Expand the IPv4 Configuration option:
- Enable IPv4 and enter your network subnet (e.g.
10.189.10.0/24). - Enable DHCP and set the range (e.g.
10.189.10.100 - 10.189.10.250).
- Enable IPv4 and enter your network subnet (e.g.
- For IPv6 configuration and DNS domain name, the default settings are fine — no changes needed.
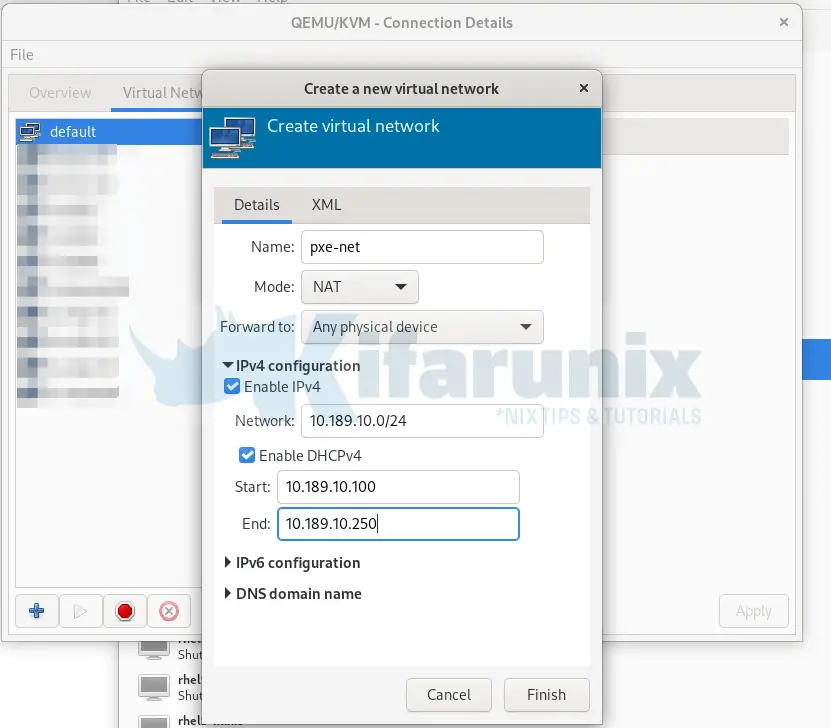
- Once everything is set, click Finish to create the network.
To create a network using virsh CLI tool, you must first pick a unique bridge name that is not already in use on your host. Each virtual network requires a dedicated Linux bridge interface (e.g., virbr0, virbr1, virbr2, etc.).
Run this command to list all existing virbrX bridges in ascending order:
ip -br link show type bridge | awk '{print $1}' | grep '^virbr[0-9]\+' | sort -V
Sample output;
virbr0
virbr1
virbr2
virbr3
virbr4
virbr5
virbr6
virbr7
virbr8
virbr9
virbr10
virbr11
From the output, look at the highest number in the existing bridge names (for example, virbr11). Choose the next number for your new bridge (virbr12 in this example).
Then, create an XML file to define your network.
vim pxe-network.xmlCopy and paste the content beloew into the file, while replacing the name of the network, the <bridge> name with the new unique bridge name you selected, as well the network subnets/DHCP ranges.
<network>
  <name>pxe-network</name>
  <forward mode='nat'/>
  <bridge name='virbr12' stp='on' delay='0'/>
  <domain name='pxe-network'/>
  <ip address='10.189.100.1' netmask='255.255.255.0'>
    <dhcp>
      <range start='10.189.100.100' end='10.189.100.250'/>
    </dhcp>
  </ip>
</network>
Next, create persistent network with virsh:
sudo virsh net-define pxe-network.xmlThe network will be created but it wont be activated by default.
sudo virsh net-list --inactiveSample output;
 Name          State      Autostart   Persistent
--------------------------------------------------
 pxe-network   inactive   no          yes
Activate the network next.
sudo virsh net-start pxe-networkEnable the network to come up on system boot:
sudo virsh net-autostart pxe-networkYour network should now be created.
Step 2: Attach PXE Boot Server to PXE Boot Network
To ensure reliable PXE boot server operation, we need to attach the PXE server to the virtual network created earlier and assign it a static IP address within the same subnet.
On a freshly installed Ubuntu 24.04 system, Ubuntu (via cloud-init) typically generates the file /etc/netplan/50-cloud-init.yaml. This file defines a default network configuration, usually using DHCP, to provide immediate network connectivity after installation.
Here is what the content of that file typically looks like:
cat /etc/netplan/50-cloud-init.yaml# This file is generated from information provided by the datasource. Changes
# to it will not persist across an instance reboot. To disable cloud-init's
# network configuration capabilities, write a file
# /etc/cloud/cloud.cfg.d/99-disable-network-config.cfg with the following:
# network: {config: disabled}
network:
ethernets:
enp1s0:
dhcp4: true
version: 2
So, we will create our own network configuration file and disable the one generated by cloud-init. This ensures that our PXE server gets a static IP address without conflicts, and avoids the risk of duplicate IP assignments from DHCP.
Create a new Netplan file for static IP configuration:
sudo vim /etc/netplan/01-netcfg.yamlCopy and paste the configuration below, updating the IP addresses, gateway, and DNS as needed for your setup:
network:
    version: 2
    renderer: networkd
    ethernets:
        enp1s0:
            dhcp4: false
            addresses:
              - 10.184.10.53/24
            routes:
              - to: default
                via: 10.184.10.10
            nameservers:
              addresses:
                - 192.168.122.110
                - 8.8.8.8
        enp7s0:
            dhcp4: false
            addresses:
              - 10.185.10.53/24
Replace interface names with your actual network interface names if they differ.
Save the changes and exit the file.
Next, tell cloud-init to stop managing network configuration:
echo "network: {config: disabled}" | sudo tee /etc/cloud/cloud.cfg.d/99-disable-network-config.cfgRename the default Netplan file generated by cloud-init to prevent it from applying:
sudo mv /etc/netplan/50-cloud-init.yaml{,.bak}Then apply the configuration:
sudo netplan applyNext, reboot the server to confirm if all is okay.
sudo rebootOnce the server is backup, login and check the network configuration status;
sudo netplan statusThis is how our configuration look like (note that our subnet is 10.184.10.0/24);
     Online state: online
    DNS Addresses: 127.0.0.53 (stub)
       DNS Search: .

●  1: lo ethernet UNKNOWN/UP (unmanaged)
      MAC Address: 00:00:00:00:00:00
        Addresses: 127.0.0.1/8
                   ::1/128

●  2: enp1s0 ethernet UP (networkd: enp1s0)
      MAC Address: 52:54:00:fc:43:4a (Red Hat, Inc.)
        Addresses: 10.184.10.53/24
                   fe80::5054:ff:fefc:434a/64 (link)
    DNS Addresses: 192.168.122.110
                   8.8.8.8
           Routes: default via 10.184.10.10 (static)
                   10.184.10.0/24 from 10.184.10.53 (link)
                   fe80::/64 metric 256

●  3: enp7s0 ethernet UP (networkd: enp7s0)
      MAC Address: 52:54:00:95:89:11 (Red Hat, Inc.)
        Addresses: 10.185.10.53/24
                   fe80::5054:ff:fe95:8911/64 (link)
           Routes: 10.185.10.0/24 from 10.185.10.53 (link)
                   fe80::/64 metric 256
Step 3: Run system update
Now that the network connection is fine, ensure your system is up-to-date.
sudo apt updateStep 4: Install Required Packages
The PXE boot server requires DHCP, TFTP, and HTTP services to function. We’ll use isc-dhcp-server, tftpd-hpa, and apache2 for this setup.
Thus, run the command below to install these packages and other required ones;
sudo apt install -y isc-dhcp-server \
	tftpd-hpa \
	apache2 \
	syslinux \
	pxelinux \
	syslinux-efi \
	grub-efi-amd64-signed \
shim-signed- isc-dhcp-server: Provides IP addresses and PXE boot information to clients.
- tftpd-hpa: Serves boot files via TFTP.
- apache2: Hosts the Ubuntu ISO and configuration files.
- syslinux and syslinux-efi: Provide BIOS bootloaders.
- grub-efi-amd64-signed and shi-.signed: Support UEFI booting.
Step 5: Configure the DHCP Server on Ubuntu 24.04
The DHCP server assigns IP addresses to clients and points them to the TFTP server for boot files.
The default DHCP server configuration file is /etc/dhcp/dhcpd.conf. This is how it looks by default;
cat /etc/dhcp/dhcpd.conf# dhcpd.conf
#
# Sample configuration file for ISC dhcpd
#
# Attention: If /etc/ltsp/dhcpd.conf exists, that will be used as
# configuration file instead of this file.
#
# option definitions common to all supported networks...
option domain-name "example.org";
option domain-name-servers ns1.example.org, ns2.example.org;
default-lease-time 600;
max-lease-time 7200;
# The ddns-updates-style parameter controls whether or not the server will
# attempt to do a DNS update when a lease is confirmed. We default to the
# behavior of the version 2 packages ('none', since DHCP v2 didn't
# have support for DDNS.)
ddns-update-style none;
# If this DHCP server is the official DHCP server for the local
# network, the authoritative directive should be uncommented.
#authoritative;
# Use this to send dhcp log messages to a different log file (you also
# have to hack syslog.conf to complete the redirection).
#log-facility local7;
# No service will be given on this subnet, but declaring it helps the
# DHCP server to understand the network topology.
#subnet 10.152.187.0 netmask 255.255.255.0 {
#}
# This is a very basic subnet declaration.
#subnet 10.254.239.0 netmask 255.255.255.224 {
# range 10.254.239.10 10.254.239.20;
# option routers rtr-239-0-1.example.org, rtr-239-0-2.example.org;
#}
# This declaration allows BOOTP clients to get dynamic addresses,
# which we don't really recommend.
#subnet 10.254.239.32 netmask 255.255.255.224 {
# range dynamic-bootp 10.254.239.40 10.254.239.60;
# option broadcast-address 10.254.239.31;
# option routers rtr-239-32-1.example.org;
#}
# A slightly different configuration for an internal subnet.
#subnet 10.5.5.0 netmask 255.255.255.224 {
# range 10.5.5.26 10.5.5.30;
# option domain-name-servers ns1.internal.example.org;
# option domain-name "internal.example.org";
# option subnet-mask 255.255.255.224;
# option routers 10.5.5.1;
# option broadcast-address 10.5.5.31;
# default-lease-time 600;
# max-lease-time 7200;
#}
# Hosts which require special configuration options can be listed in
# host statements. If no address is specified, the address will be
# allocated dynamically (if possible), but the host-specific information
# will still come from the host declaration.
#host passacaglia {
# hardware ethernet 0:0:c0:5d:bd:95;
# filename "vmunix.passacaglia";
# server-name "toccata.example.com";
#}
# Fixed IP addresses can also be specified for hosts. These addresses
# should not also be listed as being available for dynamic assignment.
# Hosts for which fixed IP addresses have been specified can boot using
# BOOTP or DHCP. Hosts for which no fixed address is specified can only
# be booted with DHCP, unless there is an address range on the subnet
# to which a BOOTP client is connected which has the dynamic-bootp flag
# set.
#host fantasia {
# hardware ethernet 08:00:07:26:c0:a5;
# fixed-address fantasia.example.com;
#}
# You can declare a class of clients and then do address allocation
# based on that. The example below shows a case where all clients
# in a certain class get addresses on the 10.17.224/24 subnet, and all
# other clients get addresses on the 10.0.29/24 subnet.
#class "foo" {
# match if substring (option vendor-class-identifier, 0, 4) = "SUNW";
#}
#shared-network 224-29 {
# subnet 10.17.224.0 netmask 255.255.255.0 {
# option routers rtr-224.example.org;
# }
# subnet 10.0.29.0 netmask 255.255.255.0 {
# option routers rtr-29.example.org;
# }
# pool {
# allow members of "foo";
# range 10.17.224.10 10.17.224.250;
# }
# pool {
# deny members of "foo";
# range 10.0.29.10 10.0.29.230;
# }
#}
We will highly modify this configuration. Therefore, let’s create a backup of it;
sudo cp /etc/dhcp/dhcpd.conf{,bak}Then, edit the DHCP configuration file:
sudo vim /etc/dhcp/dhcpd.confAnd modify it to suite your needs. Be sure to replace the networks accordingly as per your setup.
This is how our final configuration look like.
# Global DHCP Settings
option domain-name "kifarunix.com";
option domain-name-servers 192.168.122.110;
default-lease-time 3600;
max-lease-time 86400;
authoritative;

# PXE Boot Configuration
# allow booting; # Enabled by default on modern systems
# allow bootp; # Uncomment to support legacy systems using BOOTP
option pxe-arch code 93 = unsigned integer 16;

# Management network
subnet 10.184.10.0 netmask 255.255.255.0 {
    # No DHCP range for management subnet
}

# PXE Subnet
subnet 10.185.10.0 netmask 255.255.255.0 {
    range 10.185.10.100 10.185.10.200;
    option routers 10.185.10.10;
    option domain-name-servers 192.168.122.110;
    option domain-name "kifarunix.com";
    option subnet-mask 255.255.255.0;
    option broadcast-address 10.185.10.255;

    # PXE Boot server (TFTP)
    next-server 10.185.10.53;

    # Match PXE boot client type
    if option pxe-arch = 00:07 or option pxe-arch = 00:09 {
        # UEFI x64
        filename "grub/grubnetx64.efi";
    } else {
        # BIOS clients
        filename "pxelinux.0";
    }
}
And here is a summary of the configuration above:
- Global DHCP Settings:
- Domain name is set to “kifarunix.com”.
- DNS server is “192.168.122.110”.
- Default lease time is 3600 seconds (1 hour).
- Maximum lease time is 86400 seconds (24 hours).
- DHCP server is authoritative, meaning it takes responsibility for responding to requests as the primary DHCP server.
- PXE Boot Configuration:
- PXE support is implied (booting and BOOTP allowed, though commented out).
- Used for network booting via TFTP.
- Management Network (10.184.10.0/24):
- Defined as a subnet but has no DHCP range, so clients will not get IPs here.
- Subnet Configuration (10.185.10.0/24):
- DHCP IP range is from 10.185.10.100 to 10.185.10.200.
- Default gateway/router is 10.185.10.10.
- DNS server is again “192.168.122.110”.
- Domain name is “kifarunix.com”.
- Subnet mask is 255.255.255.0.
- Broadcast address is 10.185.10.255.
- PXE Boot Options within the client subnet:
- Next-server (TFTP server, PXE boot server itself) is set to 10.185.10.53.
- PXE boot filenames depend on client architecture:
- For BIOS clients: “pxelinux.0”
- For UEFI clients: “grub/grubnetx64.efi”
- Default fallback: “pxelinux.0” if architecture is not identified
Next, set DHCP server interface:
Let’s find out the interface name.
ip -br aSample output;
lo               UNKNOWN        127.0.0.1/8 ::1/128
enp1s0           UP             10.184.10.53/24 fe80::5054:ff:fefc:434a/64
enp7s0           UP             10.185.10.53/24 fe80::5054:ff:fe95:8911/64
So, my PXE boot server interface for PXE boot and DHCP is enp7s0. Hence, open the configuration file below;
sudo vim /etc/default/isc-dhcp-serverChange the value of this setting, INTERFACESv4, to your respective interface name.
INTERFACESv4="enp7s0"Save and exit the file.
Restart DHCP service:
sudo systemctl restart isc-dhcp-serverCheck service status:
systemctl status isc-dhcp-serverSample output;
● isc-dhcp-server.service - ISC DHCP IPv4 server
     Loaded: loaded (/usr/lib/systemd/system/isc-dhcp-server.service; enabled; preset: enabled)
     Active: active (running) since Tue 2025-07-22 21:02:48 UTC; 27s ago
       Docs: man:dhcpd(8)
   Main PID: 3384 (dhcpd)
      Tasks: 1 (limit: 4605)
     Memory: 3.7M (peak: 4.0M)
        CPU: 7ms
     CGroup: /system.slice/isc-dhcp-server.service
             └─3384 dhcpd -user dhcpd -group dhcpd -f -4 -pf /run/dhcp-server/dhcpd.pid -cf /etc/dhcp/dhcpd.conf enp7s0

Jul 22 21:02:48 pxe-server dhcpd[3384]: PID file: /run/dhcp-server/dhcpd.pid
Jul 22 21:02:48 pxe-server dhcpd[3384]: Wrote 3 leases to leases file.
Jul 22 21:02:48 pxe-server sh[3384]: Wrote 3 leases to leases file.
Jul 22 21:02:48 pxe-server dhcpd[3384]: Listening on LPF/enp7s0/52:54:00:95:89:11/10.185.10.0/24
Jul 22 21:02:48 pxe-server sh[3384]: Listening on LPF/enp7s0/52:54:00:95:89:11/10.185.10.0/24
Jul 22 21:02:48 pxe-server sh[3384]: Sending on   LPF/enp7s0/52:54:00:95:89:11/10.185.10.0/24
Jul 22 21:02:48 pxe-server sh[3384]: Sending on   Socket/fallback/fallback-net
Jul 22 21:02:48 pxe-server dhcpd[3384]: Sending on   LPF/enp7s0/52:54:00:95:89:11/10.185.10.0/24
Jul 22 21:02:48 pxe-server dhcpd[3384]: Sending on   Socket/fallback/fallback-net
Jul 22 21:02:48 pxe-server dhcpd[3384]: Server starting service.
Step 6: Configure TFTP Server
To boot systems over the network using PXE, we need to prepare the TFTP server with the necessary boot files. In this guide, we’ll demonstrate how to set up PXE boot for two operating systems:
- Ubuntu 24.04 LTS
- AlmaLinux 10
We’ll organize our TFTP directory so that each OS has its own folder. This makes it easy to maintain and extend the setup in the future.
See our TFTP directory structure:
tree /var/lib/tftp//var/lib/tftp/
├── almalinux
│ └── 10
│ ├── initrd.img
│ └── vmlinuz
├── bootx64.efi
├── grub
│ ├── grub.cfg
│ ├── grubnetx64.efi
│ └── grubx64.efi
├── ldlinux.c32
├── libcom32.c32
├── libutil.c32
├── memdisk
├── menu.c32
├── pxelinux.0
├── pxelinux.cfg
│ └── default
├── ubuntu
│ ├── desktop
│ │ └── noble
│ │ └── casper
│ │ ├── initrd
│ │ └── vmlinuz
│ └── server
│ └── noble
│ └── casper
│ ├── initrd
│ └── vmlinuz
└── vesamenu.c32
12 directories, 18 files
In that case, let’s create the required directories as per our structure above:
sudo mkdir -p /var/lib/tftp/{pxelinux.cfg,ubuntu/{server/noble,desktop/noble}/casper,almalinux/10,grub}Each of these directories will hold:
- vmlinuz (Linux kernel)
- initrd.img (initial RAM disk)
- Additional boot-related files (e.g., GRUB, PXELINUX config)
We’ll populate the directories above with the correct boot files in the next step.
So, we need to copy BIOS and UEFI bootloader files to the TFTP root directory. These are required to initiate the boot process on client machines depending on their firmware type.
For BIOS clients:
Copy the PXELINUX BIOS bootloader file (pxelinux.0) into the TFTP root directory:
sudo cp /usr/lib/PXELINUX/pxelinux.0 /var/lib/tftp/Copy the bootloader modules:
sudo cp /usr/lib/syslinux/modules/bios/{ldlinux.c32,libcom32.c32,libutil.c32,vesamenu.c32} /var/lib/tftp/This command selectively copies only the essential modules needed to:
- Render a graphical/text PXE boot menu (vesamenu.c32)
- Handle menu interaction (libcom32.c32, libutil.c32)
- Boot the selected option (ldlinux.c32 is mandatory for pxelinux.0 to work)
For UEFI Boot Support, copy the following files:
sudo cp /usr/lib/shim/shimx64.efi.signed /var/lib/tftp/grub/grubx64.efisudo cp /usr/lib/grub/x86_64-efi-signed/grubnetx64.efi.signed /var/lib/tftp/grub/grubnetx64.efisudo cp /usr/lib/SYSLINUX.EFI/efi64/syslinux.efi /var/lib/tftp/bootx64.efiNext, you need to copy the Linux distribution-specific boot files (vmlinuz and initrd) into their appropriate TFTP directory paths.
The easiest way to do this is by mounting the ISO image of the distribution you want to boot via the PXE server, and then copying the required boot files into the corresponding TFTP directories created earlier.
In our environment, the ISO files are hosted on an NFS server. To access them from the PXE server, we first need to mount the NFS share that contains the ISO files. Once the share is mounted, we can then mount the specific ISO image locally, for example, to a directory like /mnt in order to extract the necessary boot files.
sudo apt install nfs-commonsudo mkdir /mnt/isosudo mount 192.168.122.1:/home/kifarunix/Downloads/iso /mnt/isoAnd this is how the /mnt/iso mount point now looks like;
tree /mnt/iso/mnt/iso/
├── almalinux
│ └── AlmaLinux-10.0-x86_64-dvd.iso
├── centos
│ ├── CentOS-7.5-x86_64-DVD-2009.iso
│ ├── CentOS-7-x86_64-DVD-1804.iso
│ ├── CentOS-7-x86_64-DVD-2009.iso
│ └── CentOS-7-x86_64-DVD-2207-02.iso
├── debian
├── fedora
│ ├── fedora-coreos-41.20250117.3.0-live.x86_64.iso
│ └── Fedora-Server-dvd-x86_64-39-1.5.iso
├── freebsd
├── kali
│ └── kali-linux-2024.2-installer-amd64.iso
├── misc
│ ├── 17763.3650.221105-1748.rs5_release_svc_refresh_SERVER_EVAL_x64FRE_en-us.iso
│ ├── day0.iso
│ ├── DVWA-1.0.7.iso
│ ├── proxmox-ve_8.2-1.iso
│ ├── SERVER_EVAL_x64FRE_en-us.iso
│ └── systemrescue-11.00-amd64.iso
├── oracle
│ ├── OracleLinux-R7-U0-Server-x86_64-dvd.iso
│ └── OracleLinux-R7-U5-Server-x86_64-dvd.iso
├── rhel
│ ├── rhel-10.0-x86_64-dvd.iso
│ ├── rhel-8.2-x86_64-dvd.iso
│ ├── rhel-8.8-x86_64-dvd.iso
│ ├── rhel-9.4-x86_64-boot.iso
│ ├── rhel-9.4-x86_64-dvd.iso
│ ├── rhel-9.5-x86_64-boot.iso
│ ├── rhel-server-6.9-x86_64-dvd.iso
│ └── rhel-server-7.9-x86_64-dvd.iso
├── rocky
│ ├── Rocky-10.0-x86_64-dvd1.iso
│ ├── Rocky-8.8-x86_64-minimal.iso
│ └── Rocky-x86_64-minimal.iso
├── solaris
│ ├── sol-11_4-text-sparc.iso
│ └── sol-11_4-text-x86.iso
├── ubuntu
│ ├── ubuntu-20.04.6-live-server-amd64.iso
│ ├── ubuntu-22.04.4-desktop-amd64.iso
│ ├── ubuntu-22.04.4-live-server-amd64.iso
│ ├── ubuntu-24.04-desktop-amd64.iso
│ └── ubuntu-24.04-live-server-amd64.iso
├── windows
│ ├── en-us_windows_server_2019_updated_aug_2021_x64_dvd_a6431a28.iso
│ ├── SW_DVD9_Win_Pro_11_23H2_64BIT_Eng_Intl_Pro_Ent_EDU_N_MLF_X23-59559.ISO
│ ├── SW_DVD9_Win_Server_STD_CORE_2016_64Bit_English_-4_DC_STD_MLF_X21-70526.ISO
│ ├── SW_DVD9_Win_Server_STD_CORE_2022_2108.44_64Bit_English_DC_STD_MLF_X24-01803.ISO
│ ├── SW_DVD9_Win_Server_STD_CORE_2025_24H2.6_64Bit_English_DC_STD_MLF_X24-02024.ISO
│ └── windows-ubuntu-11.4.4-copilot-win11-plasma-amd64.iso
Now, let’s mount Ubuntu 24.04 and AlmaLinux 10 ISO files to access their boot files.
sudo mkdir /mnt/{u24-{desktop,server},alma10}sudo mount /mnt/iso/ubuntu/ubuntu-24.04-desktop-amd64.iso /mnt/u24-desktop/sudo mount /mnt/iso/ubuntu/ubuntu-24.04-live-server-amd64.iso /mnt/u24-server/sudo mount /mnt/iso/almalinux/AlmaLinux-10.0-x86_64-dvd.iso /mnt/alma10/Now that the ISO files are mounted, copy the boot files to the respective directories.
sudo cp /mnt/u24-desktop/casper/{vmlinuz,initrd} /var/lib/tftp/ubuntu/desktop/noble/casper/sudo cp /mnt/u24-server/casper/{vmlinuz,initrd} /var/lib/tftp/ubuntu/server/noble/casper/sudo cp /mnt/alma10/images/pxeboot/{initrd.img,vmlinuz} /var/lib/tftp/almalinux/10/Unmount the ISO files when done;
sudo umount /mnt/u24-server /mnt/u24-desktop /mnt/alma10sudo umount /mnt/isoNext, configure TFTP to use the correct boot files directory. By default, many TFTP servers (like tftpd-hpa) use /srv/tftp as the root directory. However, in our setup, we are using /var/lib/tftp as the TFTP root directory, You are at your own discretion to use the default path or change it as you wish. Ensure your TFTP server configuration reflects this path so that clients can properly access the required boot files.
sudo vim /etc/default/tftpd-hpaThis is how our updated TFTP configuration is like:
# /etc/default/tftpd-hpa

TFTP_USERNAME="tftp"
TFTP_DIRECTORY="/var/lib/tftp"
TFTP_ADDRESS=":69"
TFTP_OPTIONS="--secure"
Restart the TFTP service after making the changes;
sudo systemctl restart tftpd-hpaCheck the status;
sudo systemctl status tftpd-hpaStep 7: Prepare ISO Files for PXE Boot
To make operating system images available for PXE boot, you have two main options:
- Direct ISO Boot (without extraction):
Some Linux distributions support booting directly from ISO images without extracting their contents by mounting the ISO as a virtual device during boot. However, successful booting also depends on whether the operating system is designed to support loopback ISO booting. Note that the entire ISO may need to be loaded into memory, making this method practical only on systems with sufficient RAM (at least equal to the size of the ISO). - Extracting ISO Files:
Instead of booting directly from an ISO image, another common method is to extract its contents and boot from the extracted files. This is often used in network boot scenarios or when customizing a live environment. After extraction, key files such as the kernel (vmlinuz) and initial RAM disk (initrd) are loaded by the bootloader, and the remaining filesystem is accessed as needed. This method generally uses less RAM and offers more flexibility for modifying or integrating additional files.
So, if you choose option 1 of using direct ISO file, you can just make the ISO files accessible via a simple web server. Same applies for option 2, you can use an NFS share or a simple web server.
For example, like already mentioned, our ISO files are available organization wide via an NFS share. Hence, if we need to make them accessible to PXE boot server via HTTP, then we can mount them on the PXE boot server itself or any other server that can be accessed by PXE boot server.
In this example, I will create ISO files directory on the default Apache document root and mount the ISO NFS share.
sudo mkdir /var/www/html/isosudo mount 192.168.122.1:/home/kifarunix/Downloads/iso /var/www/html/isoTo ensure permanent mounting, update the FSTAB entry. For example, for the above mount, you would simply add this line to the FSTAB;
192.168.122.1:/home/kifarunix/Downloads/iso /var/www/html/iso nfs defaults,_netdev 0 0Then, let’s configure Apache to server the ISO files. We will override the default configuration file with the content below:
sudo tee /etc/apache2/sites-available/000-default.conf << 'EOL'
<VirtualHost *:80>
	ServerAdmin webmaster@localhost
	DocumentRoot /var/www/html/iso

	<Directory /var/www/html/iso>
		Options +Indexes
		AllowOverride None
		Require all granted
	</Directory>

	ErrorLog ${APACHE_LOG_DIR}/error.log
	CustomLog ${APACHE_LOG_DIR}/access.log combined
</VirtualHost>
EOL
Ensure Apache has no configuration issue:
sudo apache2ctl -tRestart the service;
sudo systemctl restart apache2Enable to run on system boot;
sudo systemctl enable apache2You can then run this command on the terminal to verify that Apache directory index is working as expected.
curl -s http://localhost/ | grep -Po '(?<=href=")[^"]*' | grep -vE '^\?C=|^/' | sortIf you want to avoid RAM limitations when working with large ISO files, you can mount each ISO image individually on the PXE server. By doing so, you can serve the installation files efficiently via TFTP, HTTP, or NFS without loading the entire ISO into memory.
We will use the method of extracting ISO files to PXE boot AlmaLinux 10. This should also apply to similar RHEL distros.
Now that I have already mounted the NFS share on the PXE server;
df -hT -P /var/www/html/isoFilesystem Type Size Used Avail Use% Mounted on
192.168.122.1:/home/kifarunix/Downloads/iso nfs4 845G 484G 362G 58% /var/www/html/iso
So, let’s mount AlmaLinux 10 ISO and copy the ISO files to a path that is accessible via HTTP server.
sudo mkdir /mnt/alma10sudo mount /var/www/html/iso/almalinux/AlmaLinux-10.0-x86_64-dvd.iso /mnt/alma10/Then let’s copy the ISO files to Apache web root directory;
sudo mkdir /var/www/html/iso/almalinux/10.0-x86_64/sudo rsync -avP /mnt/alma10/ /var/www/html/iso/almalinux/10.0-x86_64/Then unmount the ISO;
sudo umount /mnt/alma10Next, ensure Apache or whatever the web server that you are using is able to server the files.
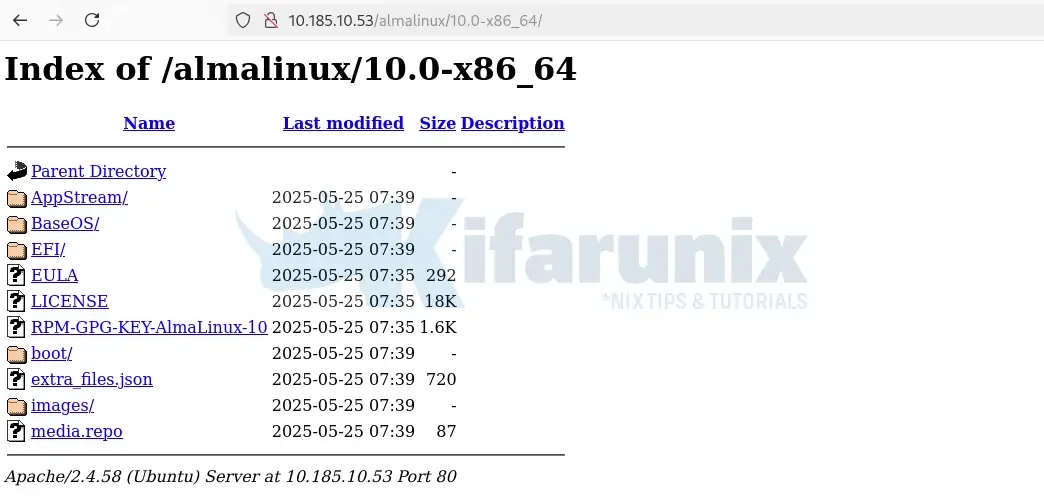
Be sure to update your FSTAB entries to auto-mount the ISO files on system reboot.
Step 8: Configure PXE Boot Menus
Once the ISO files and required boot files are accessible via TFTP or HTTP, the next step is to configure the PXE boot menu that clients will see when they boot over the network.
PXE clients can boot in one of two modes:
- BIOS (Legacy PXE Boot): Uses SYSLINUX bootloaders (e.g.,
pxelinux.0) and typically reads configuration files from/var/lib/tftp/pxelinux.cfg/. - UEFI PXE Boot: Requires GRUB2 or shim+grubx64.efi for secure boot environments. UEFI clients typically look for bootloader files like
grubx64.efiorbootx64.efi, and configuration files are usually stored under paths like/var/lib/tftp/grub/grub.cfg.
Create a BIOS PXE boot menu:
sudo vim /var/lib/tftp/pxelinux.cfg/defaultThis is my BIOS PXE boot menu content. You can copy, modify it to suit your needs and paste into the default configuration file.
DEFAULT menu.c32
PROMPT 0
TIMEOUT 300
ONTIMEOUT local

MENU TITLE Enterprise Multi-Distribution PXE Boot Menu
MENU AUTOBOOT Starting local boot in # seconds

LABEL ubuntu24_server
    MENU LABEL ^1) Install Ubuntu 24.04 Server
    KERNEL ubuntu/server/noble/casper/vmlinuz
    APPEND initrd=ubuntu/server/noble/casper/initrd ip=dhcp url=http://10.185.10.53/ubuntu/ubuntu-24.04-live-server-amd64.iso

LABEL ubuntu24_desktop
    MENU LABEL ^2) Install Ubuntu 24.04 Desktop
    KERNEL ubuntu/desktop/noble/casper/vmlinuz
    APPEND initrd=ubuntu/desktop/noble/casper/initrd ip=dhcp cloud-config-url=/dev/null cloud-init=disabled url=http://10.185.10.53/ubuntu/ubuntu-24.04-desktop-amd64.iso

MENU SEPARATOR

LABEL almalinux10_install
    MENU LABEL ^3) Install AlmaLinux 10.0
    KERNEL almalinux/10/vmlinuz
    APPEND initrd=almalinux/10/initrd.img ip=dhcp  inst.repo=http://10.185.10.53/almalinux/10.0-x86_64

MENU SEPARATOR

LABEL local
    MENU LABEL Boot from local drive
    LOCALBOOT 0
In summary, the configuration defines:
- Bootloader:
menu.c32 - Prompt: Disabled (
PROMPT 0) - Timeout: 30 seconds (
TIMEOUT 300) - Default on timeout: Boot from local drive (
ONTIMEOUT local) - Menu Title: Enterprise Multi-Distribution PXE Boot Menu
- Autoboot message: “Starting local boot in # seconds”
- Boot Menu options:
- 1) Ubuntu 24.04 Server
- Kernel:
ubuntu/server/noble/casper/vmlinuz - Initrd:
ubuntu/server/noble/casper/initrd - ISO URL:
http://10.185.10.53/ubuntu/ubuntu-24.04-live-server-amd64.iso - Network: DHCP
- Kernel:
- 2) Ubuntu 24.04 Desktop
- Kernel:
ubuntu/desktop/noble/casper/vmlinuz - Initrd:
ubuntu/desktop/noble/casper/initrd - ISO URL:
http://10.185.10.53/ubuntu/ubuntu-24.04-desktop-amd64.iso - Cloud-init: Disabled
- Network: DHCP
- Kernel:
- 3) AlmaLinux 10.0
- Kernel:
almalinux/10/vmlinuz - Initrd:
almalinux/10/initrd.img - Repo URL:
http://10.185.10.53/almalinux/10.0-x86_64 - Network: DHCP
- Kernel:
- 4) Boot from local drive
- Action:
LOCALBOOT 0(boots from local disk)
- Action:
- 1) Ubuntu 24.04 Server
Once you are done with the configuration, restart the relevant services;
sudo systemctl restart isc-dhcp-server tftpd-hpa.service Create a UEFI PXE boot menu:
sudo vim /var/lib/tftp/grub/grub.cfgHere is how my UEFI menu is configured:
set timeout=30
set default=3
set gfxpayload=keep

menuentry '1) Install Ubuntu 24.04 Server' {
    linux /ubuntu/server/noble/casper/vmlinuz ip=dhcp cloud-config-url=/dev/null cloud-init=disabled url=http://10.185.10.53/ubuntu/ubuntu-24.04-live-server-amd64.iso
    initrd /ubuntu/server/noble/casper/initrd
}

menuentry '2) Install Ubuntu 24.04 Desktop' {
    linux /ubuntu/desktop/noble/casper/vmlinuz ip=dhcp cloud-config-url=/dev/null cloud-init=disabled url=http://10.185.10.53/ubuntu/ubuntu-24.04-desktop-amd64.iso
    initrd /ubuntu/desktop/noble/casper/initrd
}

menuentry '3) Install AlmaLinux 10.0' {
    linux /almalinux/10/vmlinuz ip=dhcp inst.repo=http://10.185.10.53/almalinux/10.0-x86_64
    initrd /almalinux/10/initrd.img
}

menuentry '4) Boot from local drive' {
    exit
}
In summary, the UEFI boot menu is configured with the options:
set timeout=30: Waits 30 seconds for user input before auto-boot.set default=3: Boots the 4th entry (local drive) by default.set gfxpayload=keep: Keeps current graphics resolution during boot.- Menuentry 1: Install Ubuntu 24.04 Server
- Kernel/initrd from
/ubuntu/server/noble/casper/ - Uses DHCP
- Disables cloud-init
- Loads ISO from local HTTP server
- Kernel/initrd from
- Menuentry 2: Install Ubuntu 24.04 Desktop
- Same as Server, but uses Desktop ISO and path
- Menuentry 3: Install AlmaLinux 10.0
- Kernel/initrd from
/almalinux/10/ - Uses DHCP
- Installs from HTTP repo
- Kernel/initrd from
- Menuentry 4: Boot from local drive
- Exits GRUB and boots from internal disk
- Now set as default boot option (set default=3)
Step 9: Test the PXE Boot
The PXE boot server is now set up and ready. To verify the setup, test it using a client machine.
Configure the Client Machine
- Make sure the client’s NIC supports PXE (Preboot Execution Environment).
- Enable network booting in the BIOS/UEFI settings.
- Set the boot order to prioritize Network Boot above the hard drive.
In my setup, as already mentioned, we are running the PXE boot server as a VM on KVM. Hence, we will create virtual machines to test the PXE booting.
In that case, if you are using KVM like we do here, get the network that is used by the PXE boot server. Remember, in our network setting above, our PXE network subnet is 10.185.10.0/24.
You will need to the VM that you want to PXE boot into the same network.
You can get the network from CLI (sudo virsh net-list) or from the virt-manager.
So, to create VM from CLI using virt-install command (Remember, if you are booting from ISO file, ensure that the RAM assigned is a little bit higher than the size of ISO file):
sudo virt-install \
    --name pxe-test-vm \
    --network network=demo-02,model=virtio \
    --pxe \
    --ram 4096 \
    --vcpus 4 \
    --os-variant ubuntu-lts-latest \
    --disk size=20 \
  --noautoconsole
Be sure to replace pxe-test-vm with your VM name and demo-02 with your PXE network name, adjust RAM, CPU, disk size, and OS variant as needed to suit your setup.
To create the VM from Virt-manager;
- Launch the Virt-manager
- Choose Manual Install and select the OS type.
- Set RAM and CPU.
- Enable storage and create a disk of your preferred size.
- On step 5:
- Set the VM name.
- Enable Customize configuration before install.
- Under Network selection, choose the PXE boot network for the VM.
- Click Finish to proceed to customize the VM before installation.
- On the customization wizard:
- Go to Boot Options > Boot device order and ensure both both the virtio disk and PXE boot NIC are selected.
- To enable UEFI boot:
- Click Overview.
- Under Hypervisor Details, select the Q35 chipset.
- For firmware, choose UEFI x86_64: /usr/share/OVMF/OVMF_CODE_4M.fd.
- Click Begin Installation to start the VM installation.
Boot the PXE boot VM
- Power on the client machine. If you created the VM from CLI, it should already be powered on. Just access the console either from CLI or from Virt-manager
- The VM should:
- Obtain an IP address from the DHCP server.
- Download the PXE bootloader via TFTP.
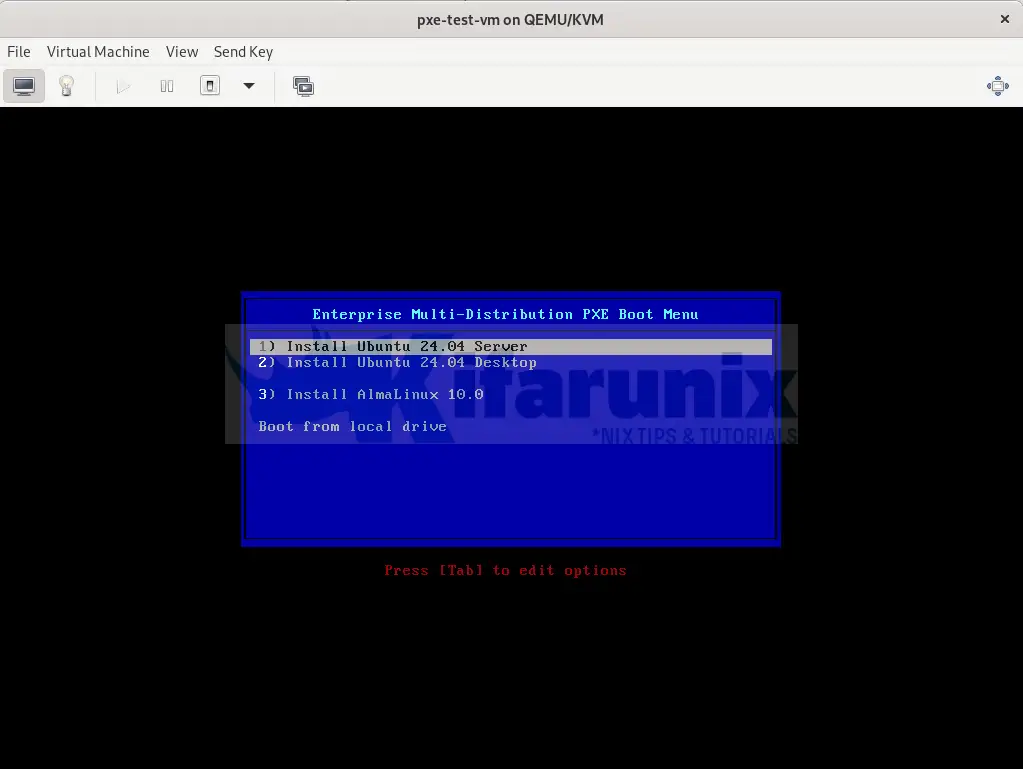
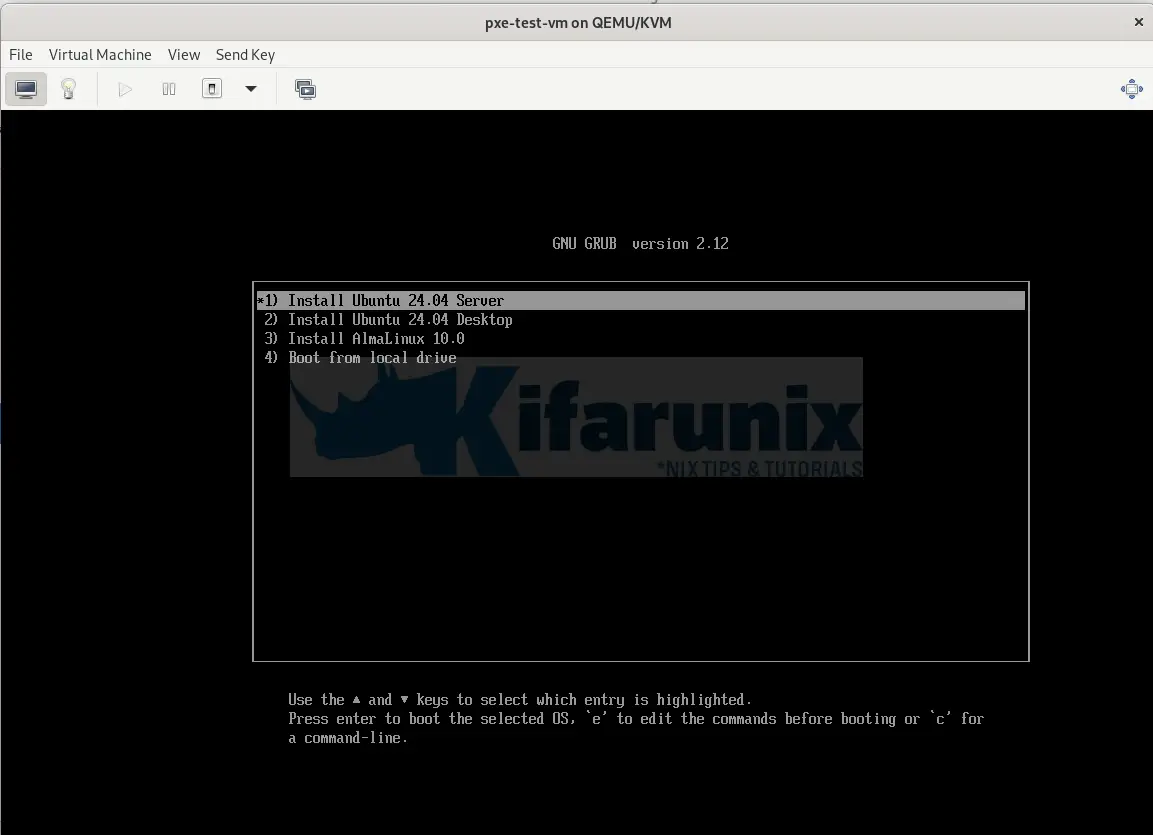
- Display the PXE boot menu you configured.
- From the menu, you can select any OS from the list to proceed with installation.
Sample BIOS based PXE boot menu:
UEFI PXE boot menu:
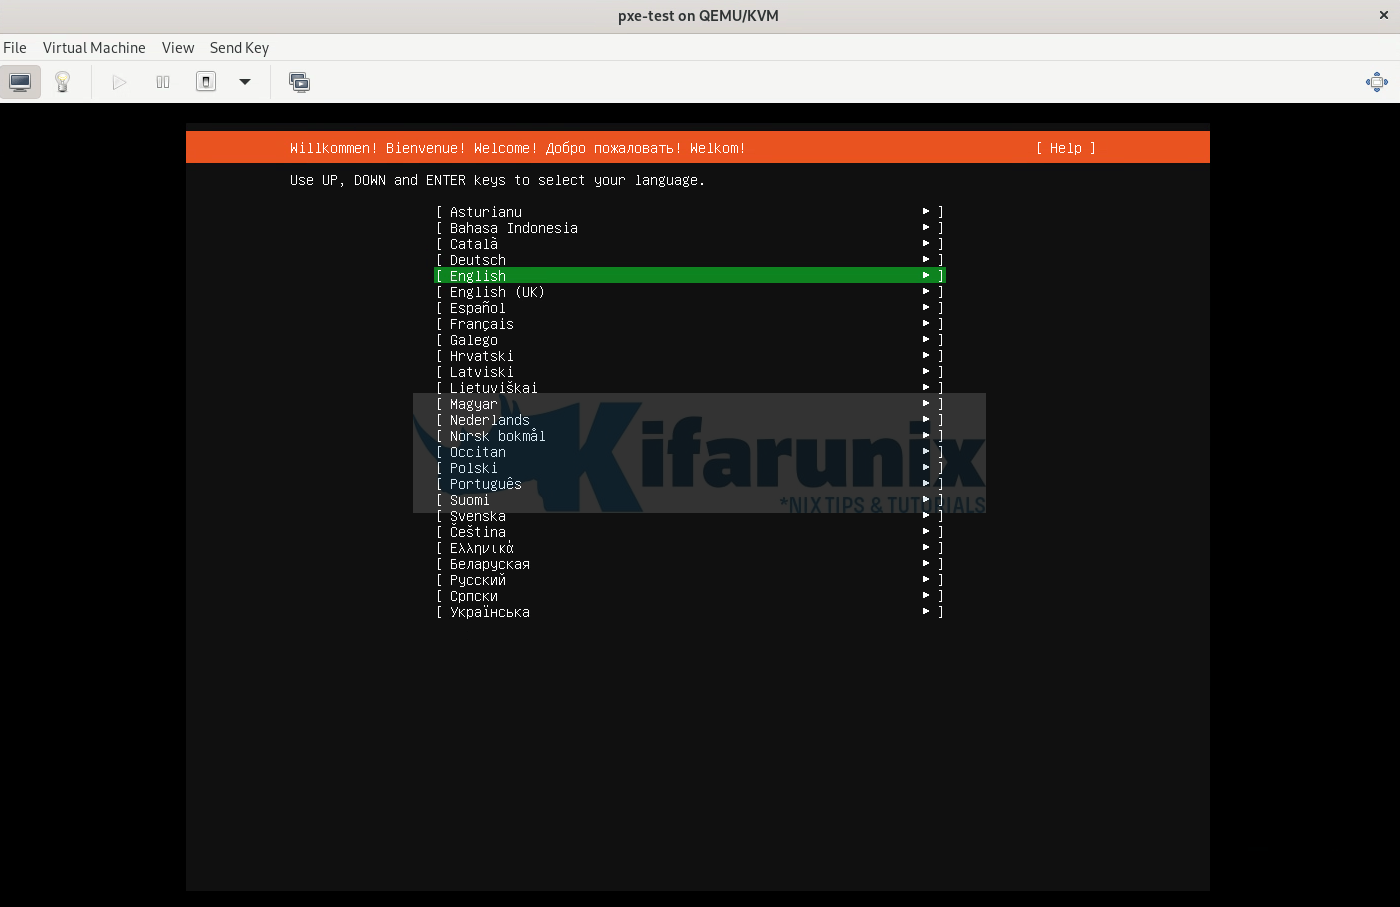
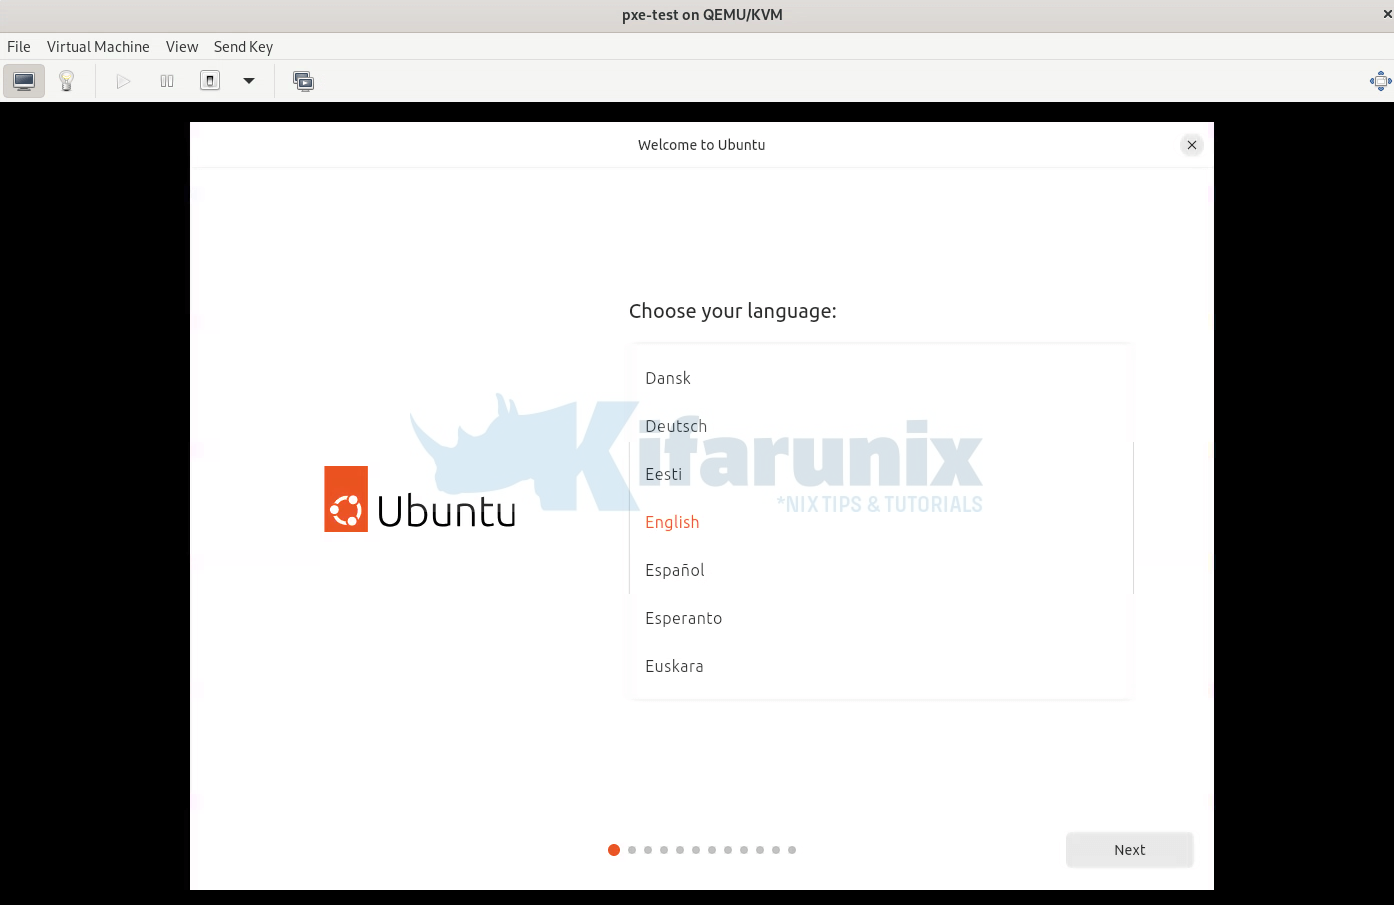
And you can now proceed with installation.
Ubuntu server:
Ubuntu desktop
AlmaLinux;
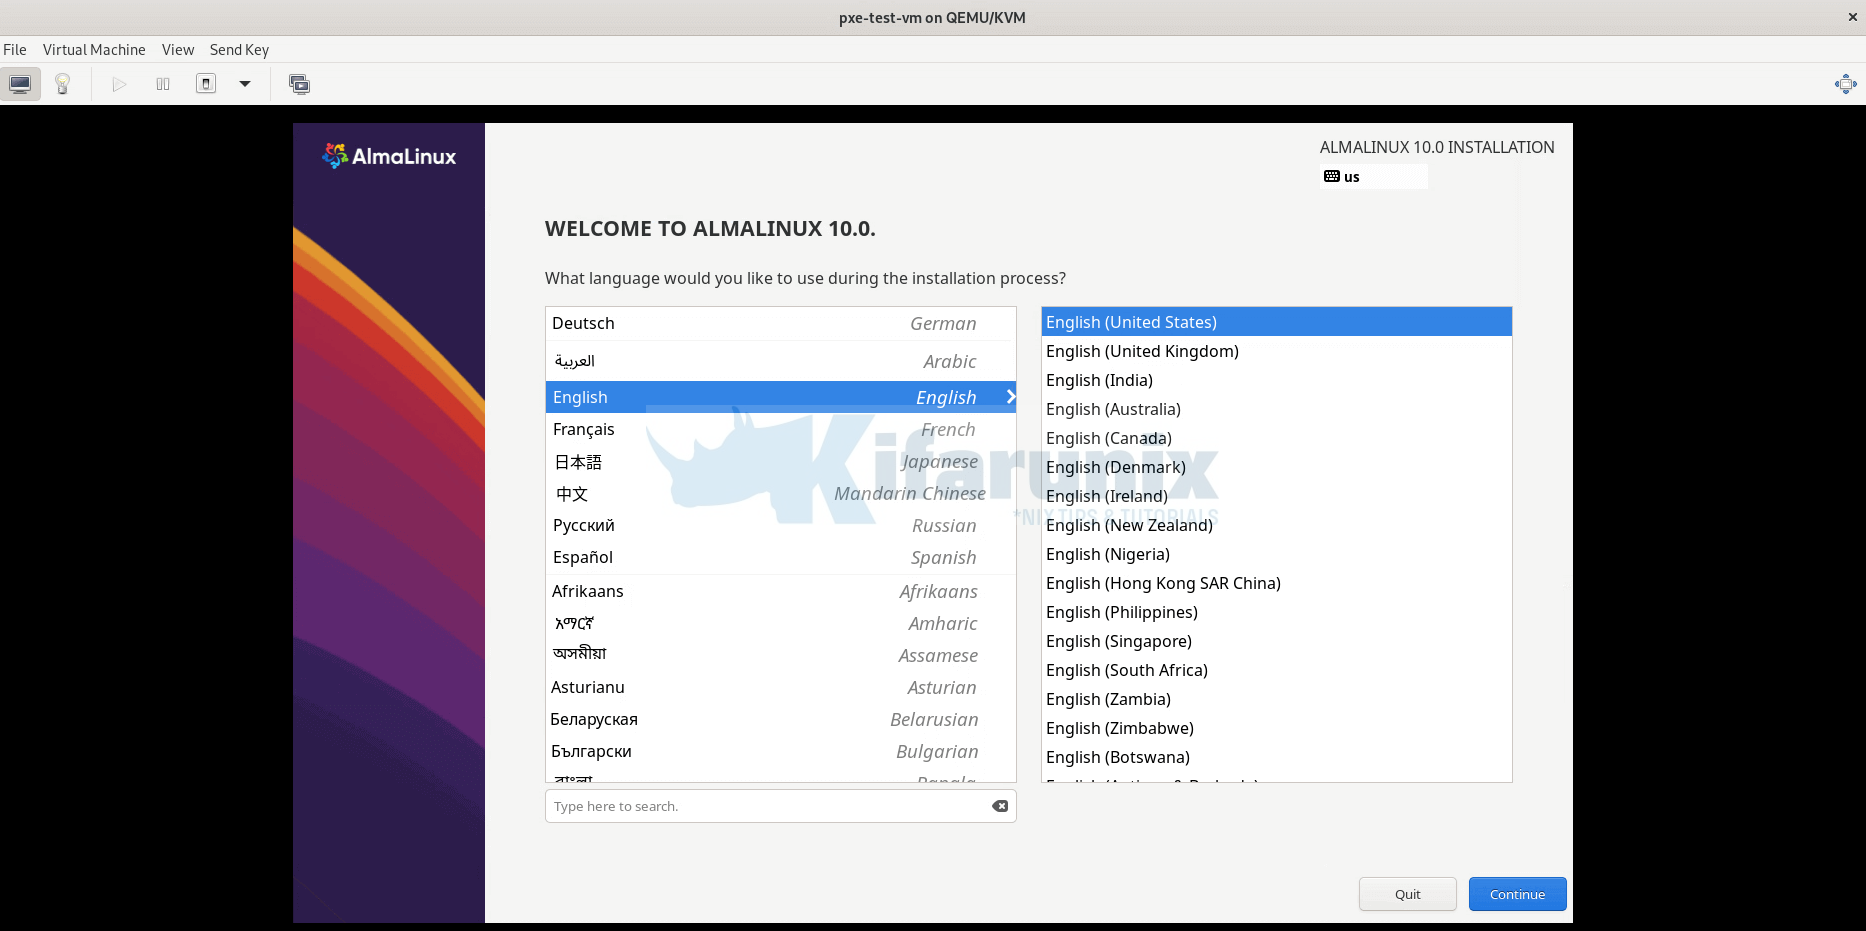
You can proceed with the installation as usual.
Step 10: Optional – Automate Installation (Cloud-Init or Kickstart)
Automated installation is particularly useful in environments where multiple systems must be deployed consistently and efficiently. Using PXE boot in combination with automation tools such as Cloud-Init (for Ubuntu) or Kickstart (for RHEL), you can fully automate the OS installation process.
In summary, you can automate the process using one of the following methods:
- For Ubuntu/Debian-based systems:
- Use a cloud-init configuration file (
user-data). - You can serve the file via HTTP or embed it into the ISO/netboot config.
- Pass it using boot parameters:
cloud-config-url=http://<your-server>/user-data cloud-init=enabled
- Use a cloud-init configuration file (
- For RHEL/CentOS/AlmaLinux/Rocky:
- Use a Kickstart file (
ks.cfg) to automate the install. - Serve it via HTTP, NFS, or FTP.
- Reference it using the
inst.ks=kernel parameter:inst.ks=http://<your-server>/ks.cfg
- Use a Kickstart file (
Both methods allow you to automate partitioning, user creation, package installation, and system configuration.
PXE Boot Automated Installation for Ubuntu Server (Cloud-Init)
TTo automate the installation of Ubuntu 24.04 Server (and compatible derivatives) using PXE boot, you can leverage Cloud-Init with Autoinstall. This approach allows you to provide a predefined configuration file (user-data) that answers all installer prompts, resulting in a fully unattended installation.
The installer retrieves this configuration over the network—typically via HTTP—using the nocloud or http data source. For simplicity, in this example, we place the user-data file in the root of our web server (/var/www/html/iso/autoinstall/) so it’s accessible to PXE-booted clients.
Sample: Displaying the user-data file
cat /var/www/html/iso/autoinstall/ubuntu-server-user-dataExample user-data content.
Be sure to update the network interface name, password hash, hostname, and any other environment-specific settings in the configuration file to match your deployment requirements.
#cloud-config
autoinstall:
  version: 1
  locale: en_US.UTF-8
  keyboard:
    layout: us
  network:
    version: 2
    ethernets:
      enp1s0:
        dhcp4: yes
  identity:
    hostname: ubuntu24-server
    username: kifarunix
    password: "$6$ogCNbdysdMtz9jLg$Vz2viLcHMbVP5/BPrVSvVEeVg.V6Tcs8WyxXI.OPsxbZmocUbeiNJTaNP/dIPSZ6DzUr89yps2IYKyfWtVigB0"  # Generate: openssl passwd -6
  ssh:
    install-server: yes
    allow-pw: yes
  storage:
    layout:
      name: lvm
  packages:
    - openssh-server
    - curl
    - vim
  user-data:
    timezone: America/New_York
    ssh_pwauth: true
    chpasswd:
      expire: false
  late-commands:
    - curtin in-target --target=/target -- apt update
    - curtin in-target --target=/target -- apt upgrade -y
    - reboot
Once your user-data file is ready and served over HTTP, you need to configure your PXE environment to boot the Ubuntu installer and point it to your autoinstall configuration.
Depending on the system firmware, you’ll configure either a GRUB menu (for UEFI clients) or a PXELINUX menu (for BIOS/legacy clients).
For systems booting via UEFI, add the following entry to your GRUB PXE configuration file (e.g. grub.cfg):
menuentry '1) Install Ubuntu 24.04 Server' {
    linux /ubuntu/server/noble/casper/vmlinuz ip=dhcp cloud-config-url=http://10.185.10.53/autoinstall/ubuntu-server-user-data autoinstall url=http://10.185.10.53/ubuntu/ubuntu-24.04-live-server-amd64.iso
    initrd /ubuntu/server/noble/casper/initrd
}
Update the configuration accordingly.
For systems using legacy BIOS boot, add the following entry to your PXE configuration file (e.g. pxelinux.cfg/default):
LABEL ubuntu24_server
    MENU LABEL ^1) Install Ubuntu 24.04 Server
    KERNEL ubuntu/server/noble/casper/vmlinuz
    APPEND initrd=ubuntu/server/noble/casper/initrd ip=dhcp url=http://10.185.10.53/ubuntu/ubuntu-24.04-live-server-amd64.iso cloud-config-url=http://10.185.10.53/autoinstall/ubuntu-server-user-data autoinstall
PXE Boot Automated Installation for Ubuntu Desktop (UEFI Required)
Unlike the server variant, Ubuntu Desktop does not support full automated installation via PXE boot in legacy BIOS mode. Therefore, UEFI mode is mandatory for PXE-based automated installs to work correctly (This is what I found out as I tried BIOS based booting and it never worked!).
Important: Ensure your PXE boot environment supports UEFI, and your DHCP server is configured to serve the correct bootloader for UEFI clients.
Sample user-data for the Ubuntu Desktop:
cat /var/www/html/iso/autoinstall/ubuntu-desktop-user-data#cloud-config
autoinstall:
version: 1
refresh-installer:
update: true
locale: en_US.UTF-8
keyboard:
layout: us
variant: ''
source:
id: ubuntu-desktop-minimal
search_drivers: false
network:
version: 2
renderer: NetworkManager
identity:
hostname: ubuntu24-desktop
username: kifarunix
password: "$6$ogCNbdysdMtz9jLg$Vz2viLcHMbVP5/BPrVSvVEeVg.V6Tcs8WyxXI.OPsxbZmocUbeiNJTaNP/dIPSZ6DzUr89yps2IYKyfWtVigB0"
ssh:
install-server: true
allow-pw: true
storage:
layout:
name: lvm
timezone: America/New_York
packages:
- vim
- curl
late-commands:
- curtin in-target --target=/target -- apt update
- curtin in-target --target=/target -- apt upgrade -y
And here is the entry to our UEFI GRUB PXE configuration (e.g., grub.cfg) to boot and autoinstall Ubuntu 24.04 Desktop:
menuentry '2) Install Ubuntu 24.04 Desktop' {
    linux /ubuntu/desktop/noble/casper/vmlinuz ip=dhcp cloud-config-url=http://10.185.10.53/autoinstall/ubuntu-desktop-user-data url=http://10.185.10.53/ubuntu/ubuntu-24.04.2-desktop-amd64.iso autoinstall
    initrd /ubuntu/desktop/noble/casper/initrd
}
PXE Boot Automated Installation for RHEL (Kickstart)
Red Hat Enterprise Linux (RHEL) supports automated installations via Kickstart files, which contain all the instructions needed to perform a non-interactive setup.
Here is a sample Kickstart File to automate installation of AlmaLinux 10 desktop.
cat /var/www/html/iso/autoinstall/ks.cfgSample configuration:
# Kickstart file for AlmaLinux 10 Server with GUI (PXE Boot)

# Language and keyboard settings
lang en_US.UTF-8  # Sets system language to US English
keyboard us       # Sets keyboard layout to US

# Timezone configuration
timezone America/New_York --utc  # Sets timezone to Eastern Time (New York), uses UTC for hardware clock

# Root password (encrypted with openssl passwd -6)
rootpw --iscrypted $6$JIOywnwnQv7drAfw$x87x82L8gA1qJ.35zvJImKJE13aaXp1wHn/qevPLfk6FXVYtY3H49du2c8Py18grc77z2jqzkgXxjudEIzX1m0  # Replace with your own hash

# Admin user with sudo privileges
user --name=kifarunix --password=$6$JIOywnwnQv7drAfw$x87x82L8gA1qJ.35zvJImKJE13aaXp1wHn/qevPLfk6FXVYtY3H49du2c8Py18grc77z2jqzkgXxjudEIzX1m0 --iscrypted --groups=wheel  # Encrypted password, wheel group for sudo

# Installation source for PXE
repo --name="BaseOS" --baseurl=http://10.185.10.53/almalinux/10.0-x86_64/BaseOS

# Network configuration for PXE
network --bootproto=dhcp --device=link --onboot=on --activate  # Uses DHCP, activates network during installation

# Disk partitioning
zerombr                          # Clears all partition tables
clearpart --all --initlabel      # Removes all existing partitions and initializes disk label
autopart --type=lvm              # Automatic LVM partitioning (creates /boot, root, swap)

# Security settings
selinux --enforcing    # Enforces SELinux for security
firewall --enabled --service=ssh  # Enables firewall, allows SSH

# Package selection (minimal with vim and curl)
%packages
@^Server with GUI  # Installs server environment with GNOME GUI
@core              # Core system packages (mandatory)
vim                # Text editor
curl               # Command-line URL tool
%end

# Post-installation script
%post --log=/root/ks-post.log
%end

# Reboot after installation
reboot
For the headless server without GUI, here is a sample Kickstart configuration file;
cat /var/www/html/iso/autoinstall/ks-headless.cfg# Kickstart file for AlmaLinux 10 Server (PXE Boot, No GUI)
# Language and keyboard settings
lang en_US.UTF-8
keyboard us
# Timezone configuration
timezone America/New_York --utc
# Root password (encrypted with openssl passwd -6)
rootpw --iscrypted $6$JIOywnwnQv7drAfw$x87x82L8gA1qJ.35zvJImKJE13aaXp1wHn/qevPLfk6FXVYtY3H49du2c8Py18grc77z2jqzkgXxjudEIzX1m0
# Admin user with sudo privileges
user --name=kifarunix --password=$6$JIOywnwnQv7drAfw$x87x82L8gA1qJ.35zvJImKJE13aaXp1wHn/qevPLfk6FXVYtY3H49du2c8Py18grc77z2jqzkgXxjudEIzX1m0 --iscrypted --groups=wheel
# Installation source for PXE
repo --name="BaseOS" --baseurl=http://10.185.10.53/almalinux/10.0-x86_64/BaseOS
repo --name="AppStream" --baseurl=http://10.185.10.53/almalinux/10.0-x86_64/AppStream
# Network configuration for PXE
network --bootproto=dhcp --device=link --onboot=on --activate
# Disk partitioning
zerombr
clearpart --all --initlabel
autopart --type=lvm
# Security settings
selinux --enforcing
firewall --enabled --service=ssh
# Package selection (minimal server)
%packages
@core # Minimal headless system
vim # Text editor
curl # Command-line download tool
%end
# Post-installation script
%post --log=/root/ks-post.log
# Optional: Add post-setup commands here
%end
# Reboot after installation
reboot
Once your Kickstart configuration file is prepared and hosted (e.g., via HTTP), the final step is to update your PXE boot menu to reference the Kickstart file during installation. The boot menu format depends on whether the client system is using BIOS or UEFI firmware.
Add the following sample entry to your pxelinux.cfg/default file for systems using legacy BIOS boot:
Replace the path to the respective Kickstart configuration file.
LABEL almalinux10_install
    MENU LABEL ^3) Install AlmaLinux 10.0
    KERNEL almalinux/10/vmlinuz
    APPEND initrd=almalinux/10/initrd.img ip=dhcp  inst.repo=http://10.185.10.53/almalinux/10.0-x86_64 inst.ks=http://10.185.10.53/autoinstall/ks-headless.cfg
For systems booting via UEFI, add the following sample entry to your GRUB configuration file (e.g., grub.cfg):
menuentry '3) Install AlmaLinux 10.0' {
    linux /almalinux/10/vmlinuz ip=dhcp inst.repo=http://10.185.10.53/almalinux/10.0-x86_64 inst.ks=http://10.185.10.53/autoinstall/ks-headless.cfg
    initrd /almalinux/10/initrd.img
}
With your PXE server fully configured and your autoinstall/Kickstart files ready and hosted:
- Power on the client machine (virtual or physical).
- Ensure the client is set to boot from the network (PXE).
- Depending on the firmware:
- BIOS systems will load the PXELINUX menu.
- UEFI systems will load the GRUB PXE menu.
- From the PXE boot menu, select the desired OS and installation type:
- Ubuntu Server or Desktop (Cloud-Init)
- AlmaLinux/RHEL Server (Kickstart, GUI or headless)
If everything is configured correctly, installation will proceed automatically and unattended. Sit back and let it install!
That brings us to the end of our guide on how to set up PXE boot server on Ubuntu 24.04.
Conclusion
You’ve now completed the full setup for a PXE Boot Server on Ubuntu 24.04, supporting automated installations of:
- Ubuntu Server (via Cloud-Init)
- Ubuntu Desktop (UEFI-only Autoinstall)
- RHEL / AlmaLinux (via Kickstart)
More tutorials:


hi,
when i tried to install ubuntu desktop then it is going to public net and not taking the image locally.
mmh. You can try to:
Thank you so much for your step-by-step documentation.
I have a client-server domain network, and it already has a DHCP server with a /24 subnet, no other subnet or vlan. if so, do I have to point to the domain DHCP server IP?
Thank you.
Yes, can even configure DHCP server to assign static IPs to your nodes, based on their MAC addresses.