In this tutorial, you will learn how to rescue OpenStack instance using SystemRescue image. According to SystemRescure Homepage;
SystemRescue (formerly known as SystemRescueCd) is a Linux system rescue toolkit available as a bootable medium for administrating or repairing your system and data after a crash. It aims to provide an easy way to carry out admin tasks on your computer, such as creating and editing the hard disk partitions. It comes with a lot of Linux system utilities such as GParted, fsarchiver, filesystem tools and basic tools (editors, midnight commander, network tools). It can be used for both Linux and windows computers, and on desktops as well as servers.
Table of Contents
Rescue OpenStack Instance using SystemRescue Image
Common Scenarios to use SystemRescure on OpenStack
So, what are the common situations that might prompt the need to use SystemRescue to rescue an OpenStack instance? Some of the situations may include;
- Filesystem Corruption: If an OpenStack instance experienced issues with filesystem corruption that prevents it from booting correctly, then you might need to boot if from SystemRescue to be able to login and repair the filesystem errors.
- Lost Passwords: While you can boot you instance into a single user mode and reset your passwords, sometime it is challenging to get access to instance grub menu. As such, SystemRescure can be used instead.
- Kernel Panic: If you instance crashes leading to Kernel panic, that renders your machine inaccessible, a quicker way to fix it would be to boot it using SystemRescue to diagnose and fix any issue.
- Boot Loader Issues: You can also fix your instance boot issues using SystemRescue image.
Precautions to take Before Putting Instance in Rescue Mode
Remember when you put your instance rescue mode, that instance wont be accessible until you have unrescue it. As such, here are some of the precautions that you might need to put in place.
- Backup your data: If there is any critical data stored on the instance, be sure to have backed it up and validated the backup before taking the instance into the rescue mode.
- Plan Downtime: If the instance is actively being used, you can plan downtime so you can fix any would be issue during a maintenance window period or off-peak hours to minimize service interruption.
- Implement Redundancy: If your instance is running a critical service, you can consider setting it up in high availability to ensure redundancy and continued service availability when you put your other node in rescue mode.
Download and Import SystemRescue Image into Openstack
To be able to use SystemRescue image on OpenStack to rescue your instances, you have to first import it into OpenStack.
Therefore, download the image into your controller node;
wget https://fastly-cdn.system-rescue.org/releases/11.00/systemrescue-11.00-amd64.isoSimilarly, download the checksum hash file to verify integrity of the image.
wget https://www.system-rescue.org/releases/11.00/systemrescue-11.00-amd64.iso.sha512Next, verify integrity of the image. Ensure both the ISO file and Checksum file are in the same working directory.
sha512sum --check systemrescue-11.00-amd64.iso.sha512If all good, you should get such an output;
systemrescue-11.00-amd64.iso: OKYou can now import image into OpenStack. To import image into OpenStack, you can use use glance or openstack command.
Activate your OpenStack environment and load the credentials
source $HOME/kolla-ansible/bin/activatesource /etc/kolla/admin-openrc.shThen create the SystemRescue image;
glance image-create --name systemrescue \
	--file ./systemrescue-11.00-amd64.iso \
	--disk-format iso \
	--container-format bare \
	--progress
+------------------+----------------------------------------------------------------------------------+
| Property         | Value                                                                            |
+------------------+----------------------------------------------------------------------------------+
| checksum         | fee7f202ba632552dbaf82a89c2438af                                                 |
| container_format | bare                                                                             |
| created_at       | 2024-04-20T07:25:20Z                                                             |
| direct_url       | rbd://17ef548c-f68b-11ee-9a19-4d1575fdfd98/glance-                               |
|                  | images/1c0c448c-e766-4b8a-ac01-4b553c888074/snap                                 |
| disk_format      | iso                                                                              |
| id               | 1c0c448c-e766-4b8a-ac01-4b553c888074                                             |
| min_disk         | 0                                                                                |
| min_ram          | 0                                                                                |
| name             | systemrescue                                                                     |
| os_hash_algo     | sha512                                                                           |
| os_hash_value    | 10a3145a5101c00977091e7c946086edcc5e4acf8dfb57b1e912fdf27c23899cedc12cf14ef503a1 |
|                  | 8a1018f917066149957d7460f3c080e2891af64cac05bc35                                 |
| os_hidden        | False                                                                            |
| owner            | dee76bfb1767468ba250225944203193                                                 |
| protected        | False                                                                            |
| size             | 894435328                                                                        |
| status           | active                                                                           |
| stores           | rbd                                                                              |
| tags             | []                                                                               |
| updated_at       | 2024-04-20T07:25:30Z                                                             |
| virtual_size     | Not available                                                                    |
| visibility       | shared                                                                           |
+------------------+----------------------------------------------------------------------------------+
If you want to use openstack command;
openstack image create systemrescuecd \
        --file ./systemrescue-11.00-amd64.iso \
        --disk-format iso \
        --container-format bare \
        --progress
+------------------+----------------------------------------------------------------------------------------------------------------------------------------------------+
| Field            | Value                                                                                                                                              |
+------------------+----------------------------------------------------------------------------------------------------------------------------------------------------+
| container_format | bare                                                                                                                                               |
| created_at       | 2024-04-20T07:27:08Z                                                                                                                               |
| disk_format      | iso                                                                                                                                                |
| file             | /v2/images/83b6b25a-717d-4263-ad45-150cd301eb30/file                                                                                               |
| id               | 83b6b25a-717d-4263-ad45-150cd301eb30                                                                                                               |
| min_disk         | 0                                                                                                                                                  |
| min_ram          | 0                                                                                                                                                  |
| name             | systemrescuecd                                                                                                                                     |
| owner            | dee76bfb1767468ba250225944203193                                                                                                                   |
| properties       | os_hidden='False', owner_specified.openstack.md5='', owner_specified.openstack.object='images/systemrescuecd', owner_specified.openstack.sha256='' |
| protected        | False                                                                                                                                              |
| schema           | /v2/schemas/image                                                                                                                                  |
| status           | queued                                                                                                                                             |
| tags             |                                                                                                                                                    |
| updated_at       | 2024-04-20T07:27:08Z                                                                                                                               |
| visibility       | shared                                                                                                                                             |
+------------------+----------------------------------------------------------------------------------------------------------------------------------------------------+
Rescueing OpenStack Instance
As already mentioned, there are various situations that might prompt you to consider using SystemRescue to rescue your OpenStack instance.
In my case, I had forgotten the instance credentials and I couldn’t easily access Grub menu from the OpenStack console. The only chance I had was with using SystemRescue.
openstack server list+--------------------------------------+----------+--------+------------------+--------+--------+
| ID | Name | Status | Networks | Image | Flavor |
+--------------------------------------+----------+--------+------------------+--------+--------+
| c6efdc70-ed41-4d34-9317-c3eb878df62b | jammy | ACTIVE | net=10.10.10.156 | jammy | minif |
| 4e5b93a9-9de9-42e4-9419-5df8a3bd07cc | cephtest | ACTIVE | net=10.10.10.142 | cirros | mini |
+--------------------------------------+----------+--------+------------------+--------+--------+
Or
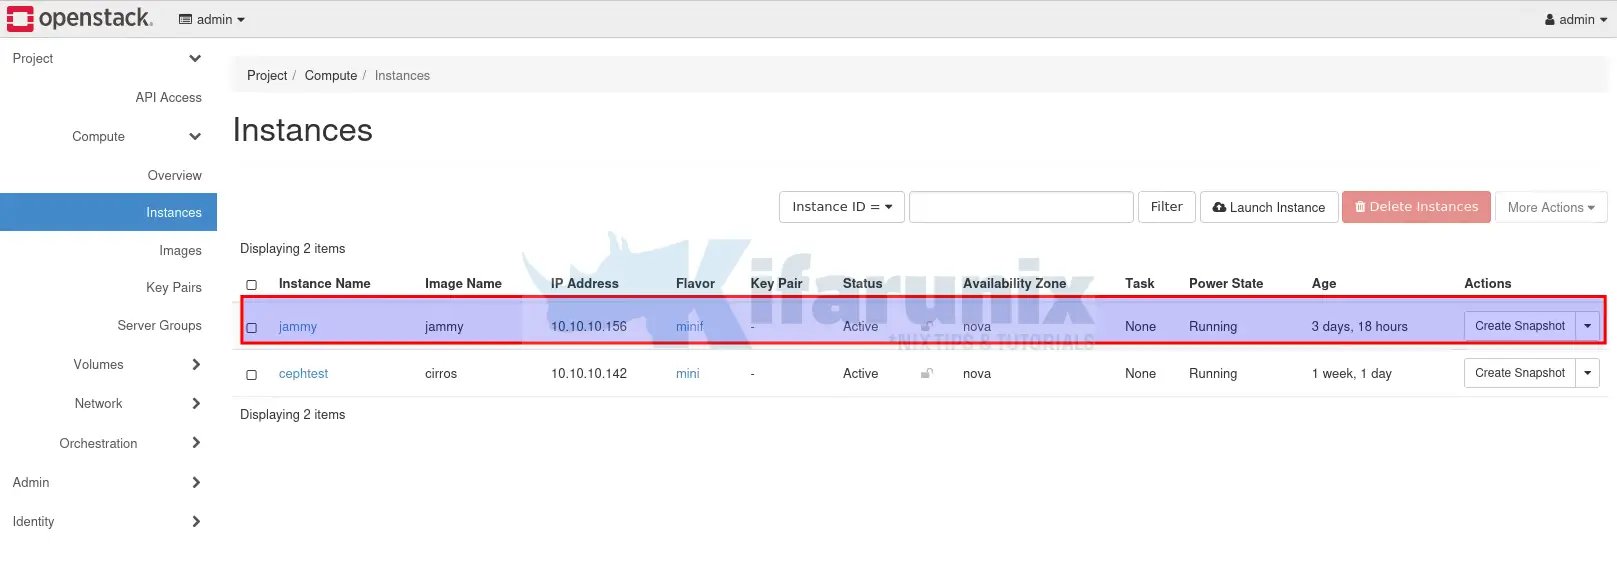
That is the instance that I will be working on!
There are two ways in which you can rescue you OpenStack instance.
- Rescueing Instance from command line
- Rescueing Instance from Horizon Dashboard
Rescueing Instance from command line
To rescue an instance from command line, you can use the command;
openstack server rescue [--image <image>] [--password <password>] <server>you need to know the instance/server name or ID, as well the SystemRescue image name or ID.
openstack server listSee our output above.
openstack image listSample output;
+--------------------------------------+--------------+--------+
| ID                                   | Name         | Status |
+--------------------------------------+--------------+--------+
| 024bd4c2-8ae6-4020-9f61-fb463c4b0b16 | cirros       | active |
| 097705d6-1d51-4c97-9c4a-12c7514ec3a7 | jammy        | active |
| 1c0c448c-e766-4b8a-ac01-4b553c888074 | systemrescue | active |
+--------------------------------------+--------------+--------+
Now that we have the server name/ID as well the rescue image name/id, proceed to stop and rescue the instance.
openstack server stop c6efdc70-ed41-4d34-9317-c3eb878df62bConfirm that the instance that instance is shutoff;
openstack server list+--------------------------------------+----------+---------+------------------+--------+--------+
| ID | Name | Status | Networks | Image | Flavor |
+--------------------------------------+----------+---------+------------------+--------+--------+
| c6efdc70-ed41-4d34-9317-c3eb878df62b | jammy | SHUTOFF | net=10.10.10.156 | jammy | minif |
| 4e5b93a9-9de9-42e4-9419-5df8a3bd07cc | cephtest | ACTIVE | net=10.10.10.142 | cirros | mini |
+--------------------------------------+----------+---------+------------------+--------+--------+
Now, rescue the instance;
openstack server rescue --image 1c0c448c-e766-4b8a-ac01-4b553c888074 c6efdc70-ed41-4d34-9317-c3eb878df62bThis will start the instance and boot into SystemRescue.
Rescue Instance on OpenStack Horizon
You can as well rescue instance from OpenStack horizon;
Assuming you have already imported a SystemRescue image into OpenStack;
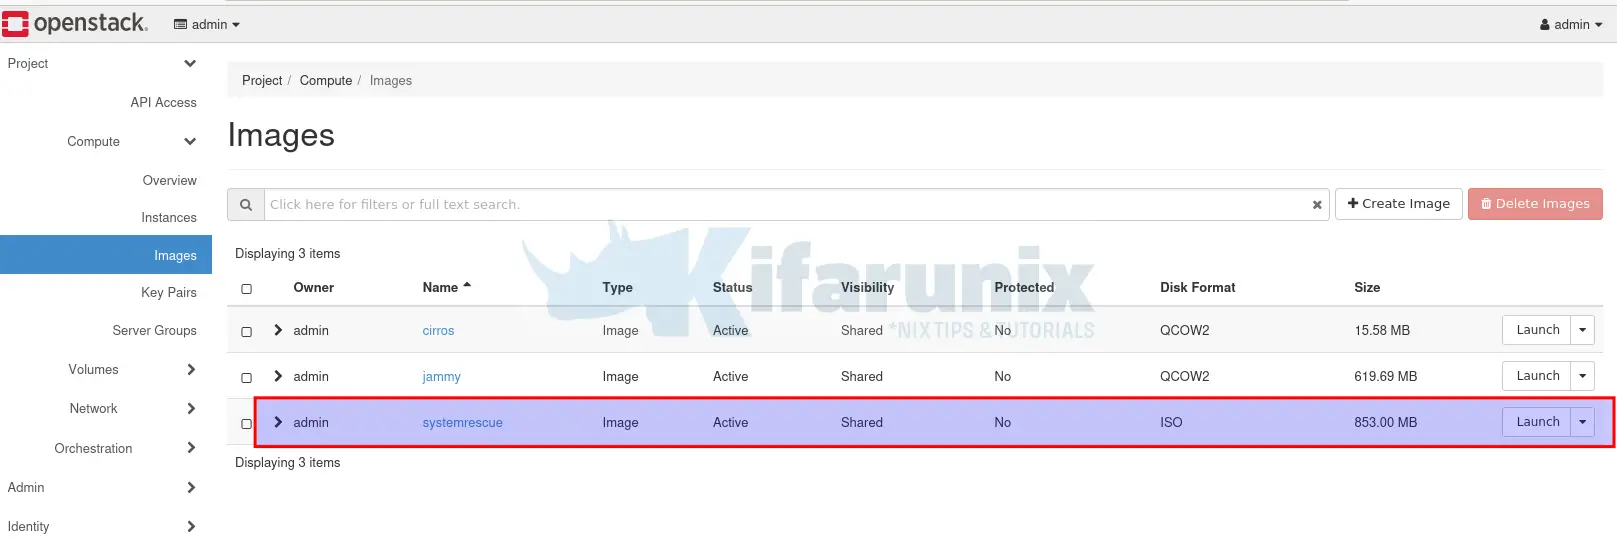
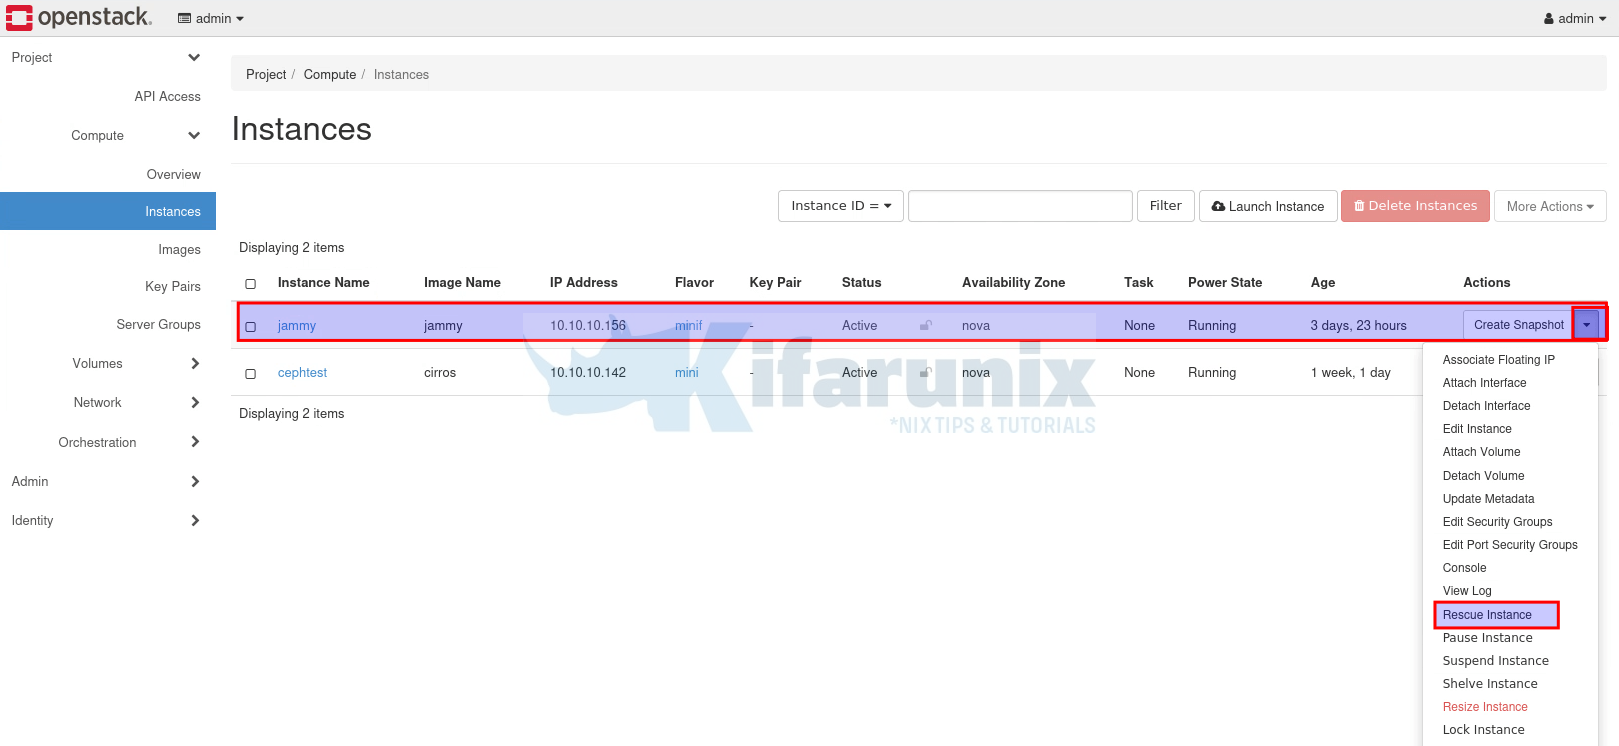
Then select your project and navigate to Project > Compute > Instances.
Identify the instance you want to rescue under the actions drop down button on the right of the instance, click Rescue Instance.
Next, select a rescue image (we use SystemRescue image here) and optionally set a password on the rescued instance.

Click Confirm, to shutdown the instance and boot it from the rescue image.
The state of the image now should show as Rescue.

Access and Troubleshoot Instance from Rescue State
You can access a rescued instance from command line or from horizon.
Accessing Rescued Instance on Command Line
To access a rescued instance from the terminal, you need to identify the compute node on which the instance is hosted, as well the instance_name. You can get these details using openstack server show command or from Horizon.
openstack server show c6efdc70-ed41-4d34-9317-c3eb878df62bSample details;
+-------------------------------------+-------------------------------------------------------------------------------------------------------------------------------------------+
| Field | Value |
+-------------------------------------+-------------------------------------------------------------------------------------------------------------------------------------------+
| OS-DCF:diskConfig | AUTO |
| OS-EXT-AZ:availability_zone | nova |
| OS-EXT-SRV-ATTR:host | openstack |
| OS-EXT-SRV-ATTR:hostname | jammy |
| OS-EXT-SRV-ATTR:hypervisor_hostname | openstack |
| OS-EXT-SRV-ATTR:instance_name | instance-0000000b |
| OS-EXT-SRV-ATTR:kernel_id | |
| OS-EXT-SRV-ATTR:launch_index | 0 |
| OS-EXT-SRV-ATTR:ramdisk_id | |
| OS-EXT-SRV-ATTR:reservation_id | r-mvg279bn |
| OS-EXT-SRV-ATTR:root_device_name | /dev/vda |
| OS-EXT-SRV-ATTR:user_data | None |
| OS-EXT-STS:power_state | Running |
| OS-EXT-STS:task_state | None |
| OS-EXT-STS:vm_state | rescued |
| OS-SRV-USG:launched_at | 2024-04-20T13:27:51.000000 |
| OS-SRV-USG:terminated_at | None |
| accessIPv4 | |
| accessIPv6 | |
| addresses | net=10.10.10.156 |
| config_drive | |
| created | 2024-04-16T13:39:31Z |
| description | None |
| flavor | description=, disk='5', ephemeral='0', , id='minif', is_disabled=, is_public='True', location=, name='minif', original_name='minif', |
| | ram='2048', rxtx_factor=, swap='0', vcpus='1' |
| hostId | f32cbc449e29ca574b72dd876976e8c4cf44d4c86b5b39617f322080 |
| host_status | UP |
| id | c6efdc70-ed41-4d34-9317-c3eb878df62b |
| image | jammy (097705d6-1d51-4c97-9c4a-12c7514ec3a7) |
| key_name | None |
| locked | False |
| locked_reason | None |
| name | jammy |
| progress | None |
| project_id | dee76bfb1767468ba250225944203193 |
| properties | |
| security_groups | name='default' |
| server_groups | [] |
| status | RESCUE |
| tags | |
| trusted_image_certificates | None |
| updated | 2024-04-20T13:27:51Z |
| user_id | 885eb7e423154ed781cdd0a71cb5221f |
| volumes_attached | |
+-------------------------------------+-------------------------------------------------------------------------------------------------------------------------------------------+
The details i need are:
| OS-EXT-SRV-ATTR:hypervisor_hostname | openstack
| OS-EXT-SRV-ATTR:instance_name       | instance-0000000b
So, login to the node, in this case, openstack node;
ssh username@compute-nodeReplace the details accordingly.
Then use virsh command to login to instance console. We are using Kolla-ansible deployed OpenStack hence, our OpenStack services are running as Docker containers. We will therefore connect to Nova Libvirt service to get to login to the instance.
docker exec -it nova_libvirt bashvirsh list Id Name State
-----------------------------------
23 instance-00000008 running
25 instance-0000000b running
Then;
virsh console instance-0000000bOr simply;
docker exec -it nova_libvirt virsh listdocker exec -it nova_libvirt virsh console instance-0000000bYou are given such prompt;
Connected to domain 'instance-0000000b'
Escape character is ^] (Ctrl + ])
Press the Escape character combination to jump into shell. If it doesn’t work, try CTLR+C.
In my case, I was not able to get to the shell prompt. Thus, we will resort to using Horizon console!
From the console, you can do any administrative tasks to fix the issue you intended to fix.
To exit the virsh console, use CTRL+Shift+].
Accessing Rescued Instance from Horizon
Navigate to your project instances page on Horizon and click the instance that you had rescued to open it, and click console to access the console.
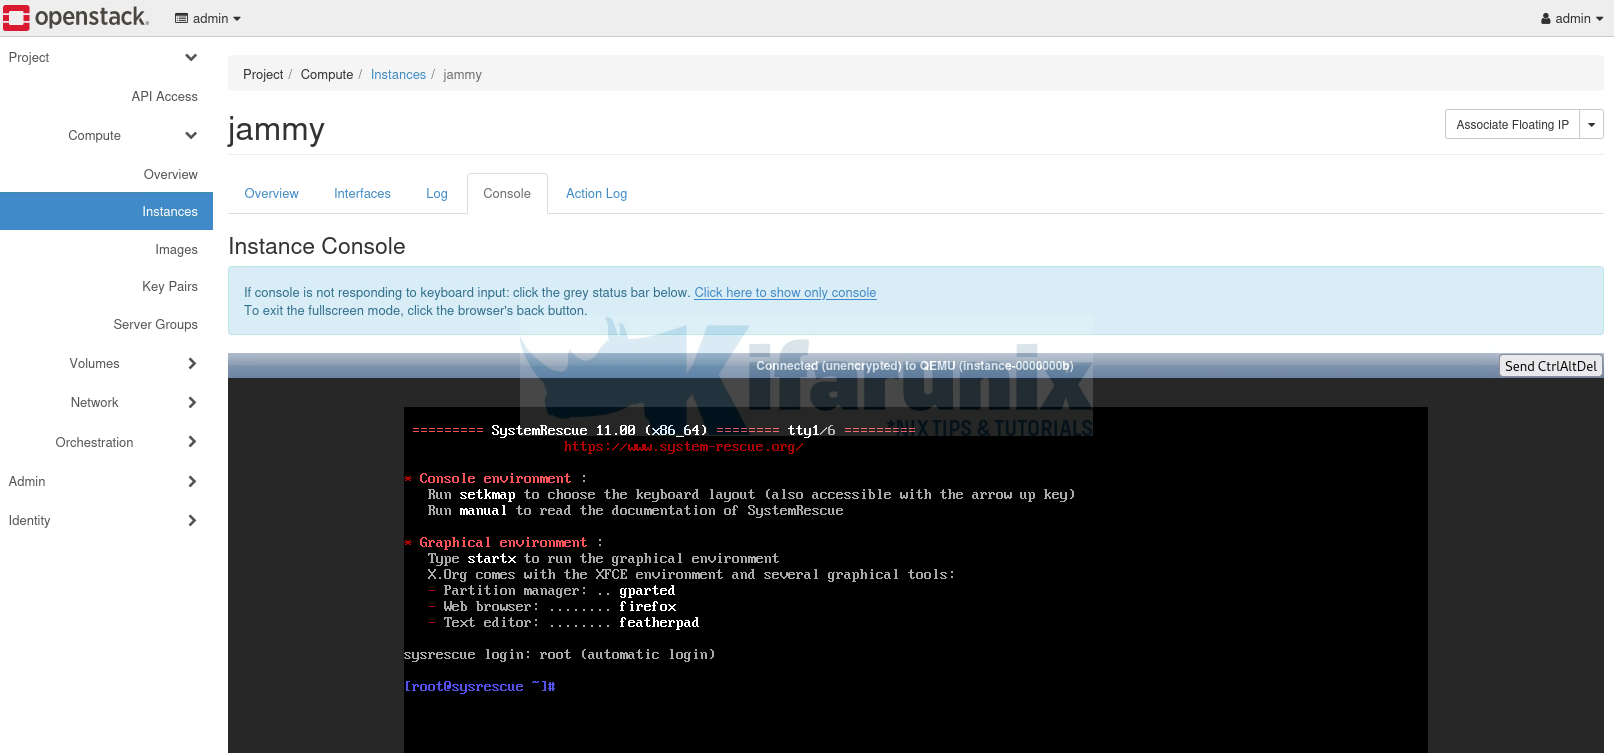
To open the console only on new browser tab, right click the link, “click here to show only console” and open in new tab.
Troubleshooting OpenStack Instance in Rescue Mode
From the console of the instance, either on the command line or on horizon, you can now do your administrative tasks or troubleshooting.
Mounting Instance Filesystem
If you need to update your instance configuration for example, then you have to mount your root filesystem.
Similarly, if you have other drive partitions for boot/esp and you need to make changes related to processes whose configurations resides on such partitions, you have to mount it as well.
SystemRescue has almost all Linux usual commands! Let’s check the drives
lsblkFrom the screenshot, vdb is our instance drive, where vdb1 is the rootFS, vdb15 are ESP Boot partitions.
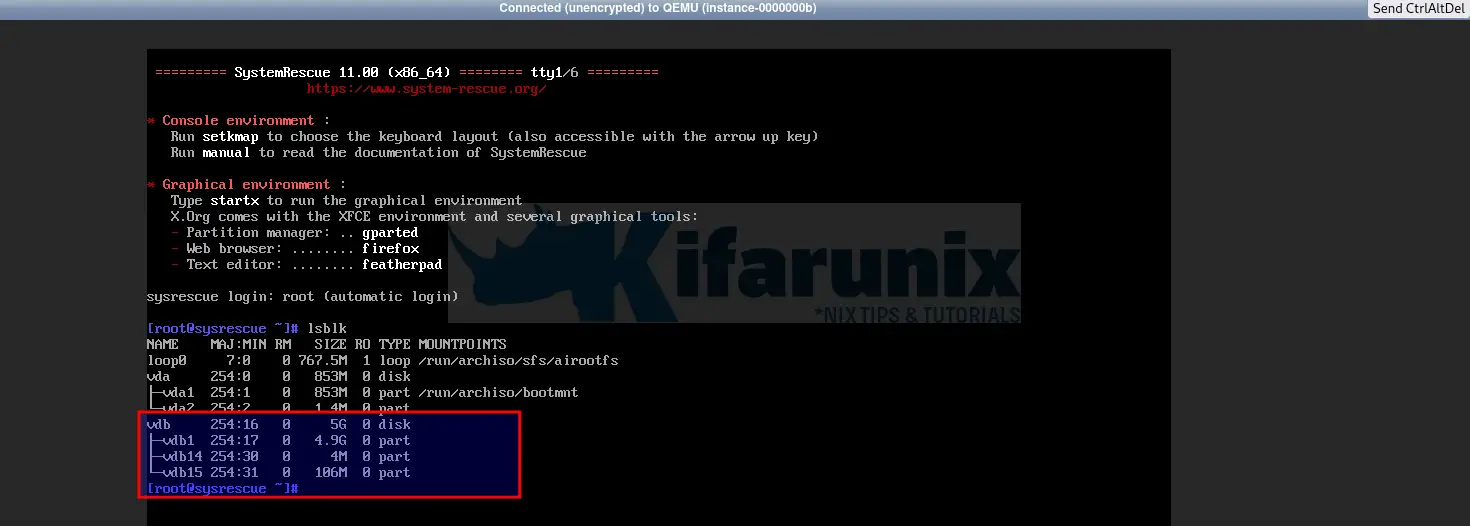
So, you can mount the drives;
mkdir /mnt/vdbmount /dev/vdb1 /mnt/vdb/mount /dev/vdb15 /mnt/vdb/boot/efiTroubleshooting Instance from SystemRescue
From here, you can edit some files directly, for example, if you want to set static IP address;
vim /mnt/vdb/etc/netplan/50-cloud-init.yamlMake your appropriate changes and save the configurations.
You can also chroot into your instance root directory and perform your troubleshooting.
A chroot is an operation that changes the apparent root directory for the current running process and their children. A program that is run in such a modified environment cannot access files and commands outside that environmental directory tree. This modified environment is called a chroot jail.
Reasoning
Changing root is commonly done for performing system maintenance on systems where booting and/or logging in is no longer possible. Common examples are:Reinstalling the boot loader.
ArchWiki
Rebuilding the initramfs image.
Upgrading or downgrading packages.
Resetting a forgotten password.
Building packages in a clean chroot.
To chroot into your instance rootfs in SystemRescue;
chroot /mnt/vdbFrom chroot environment, you can perform any action you need to.
Unrescue the Instance
Once you are done fixing or troubleshooting your instance, you can exit the rescue system and unrescue the instance.
If you are doing from command line, exit the console and;
openstack server unrescue <INSTANCE_ID>E.g
openstack server unrescue c6efdc70-ed41-4d34-9317-c3eb878df62bOr from the Horizon;
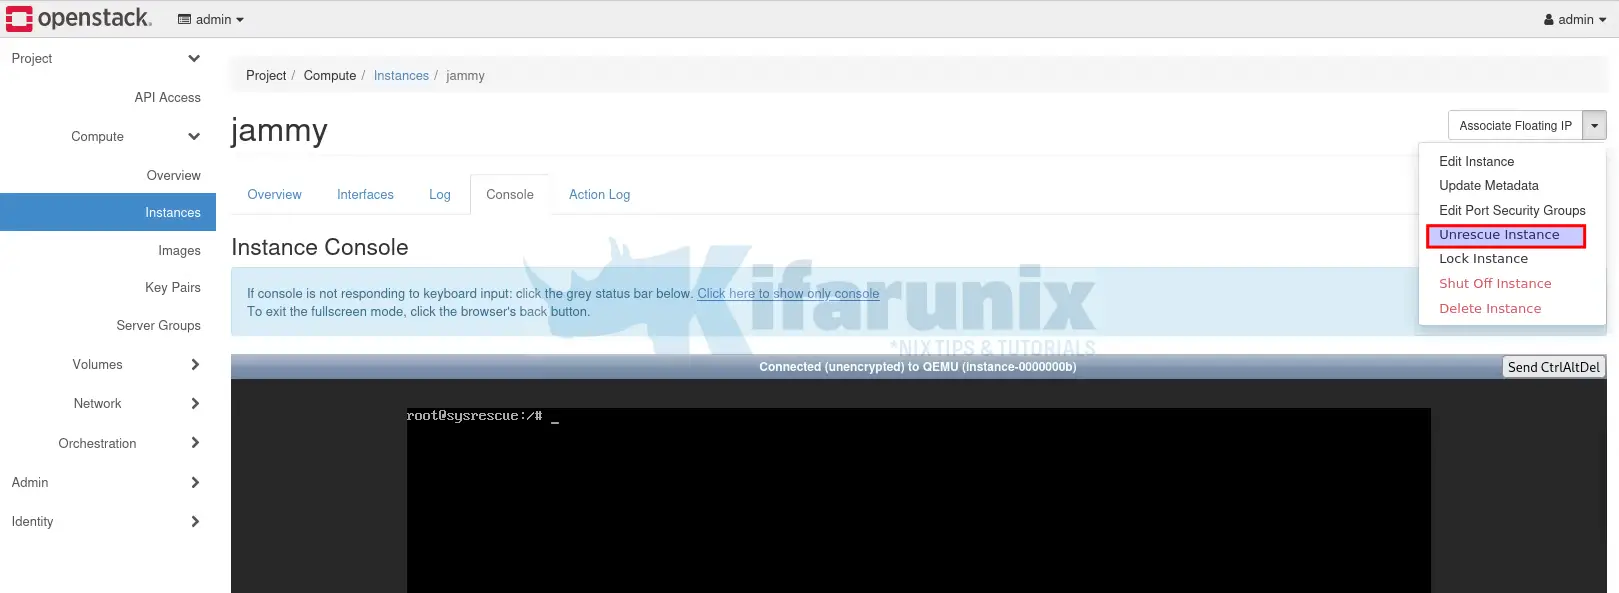
And that is.
Once your instance is up, verify if it is working as expected.

