In this guide, you will learn how to integrate Request Tracker (RT) with Active Directory for authentication. Request Tracker is a powerful, open-source ticketing system used by IT and security teams to manage incidents, requests, and workflows efficiently. By connecting RT with your organization’s Active Directory, you can centralize user management, simplify logins, and improve access control through existing domain credentials. This integration allows users to authenticate using their AD usernames and passwords.
Table of Contents
Integrate Request Tracker (RT) with Active Directory for Authentication
RT supports different authentication methods as explained on the documentation page. We will however, focus on external authentication via Windows AD.
Therefore, in this integration, Active Directory handles authentication (AuthN), verifying who the user is while RT manages authorization (AuthZ), defining what each user can do within the RT system. For instance, a user’s login is validated through AD, but their permissions, such as viewing, owning, or resolving tickets, are configured directly within RT.
You can achieve this integration using the RT::Authen::ExternalAuth extension, which enables RT to communicate with your AD server over LDAP. Once configured, users can log in seamlessly using their AD credentials, and RT can automatically create their accounts upon first login.
Prerequisites
Before proceeding, ensure that:
- You have administrative access to your RT server and Active Directory.
- The AD server is reachable over the network on port 389 (LDAP) or 636 (LDAPS).
Similarly, you can also check the links below on how to setup RT as well as Windows AD:
Install and Set Up Active Directory on Windows Server 2025 with LDAPS
Example Environment Setup
For this guide, we’ll use the following example setup:
- Domain: kifarunix.com
- AD Server: dc01.kifarunix.com
- RT Server: incidents.kifarunix.com
- Teams:
- RT_Analysts:
- Tier 1 / Tier 2 SOC analysts
- Can view, own, comment on, and reply to tickets.
- Resolve tickets once incidents are closed
- Cannot modify queue settings or global RT configuration
- RT_QueueManagers:
- Queue owners / leads
- View and manage all tickets within their assigned queues
- Assign, reassign, or escalate tickets
- Modify ticket status, priority, and ownership
- Cannot change global RT configuration
- RT_Admins:
- System administrators
- Full admin rights across RT
- RT admins who maintain queues, scrips, users, and integrations.
- RT_Analysts:
Based on the teams currently defined for our RT, we have created the groups above in our AD Groups OU:
See example output from the AD powershell:
Get-ADGroup -SearchBase "OU=Groups,DC=kifarunix,DC=com" -Filter * | Select-Object Name, DistinguishedNameName DistinguishedName
---- -----------------
RT_Analysts CN=RT_Analysts,OU=Groups,DC=kifarunix,DC=com
RT_QueueManagers CN=RT_QueueManagers,OU=Groups,DC=kifarunix,DC=com
RT_Admins CN=RT_Admins,OU=Groups,DC=kifarunix,DC=comSo, RT users will be added to those groups accordingly.
Understanding the Integration Architecture
The integration between RT and Active Directory works through the Lightweight Directory Access Protocol (LDAP). Here’s how the authentication flow works:
- User Login Attempt: A user enters their AD username and password on the RT login page.
- LDAP Query: RT connects to the AD server using a service account.
- Authentication: RT binds to LDAP using the user’s credentials to verify authentication.
- User Lookup: RT retrieves user attributes (email, name,) from AD.
- Account Creation/Update: RT automatically creates or updates the user account.
- Group Mapping: RT maps AD groups to RT groups for permission assignment
- Session Creation: Upon successful authentication, RT creates a session for the user
Integrate Request Tracker (RT) with Windows AD (Active Directory)
Now, let’s step through how to integrate RT with AD for authentication.
Step 1: Configure Bind DN Account in Windows AD
To allow Request Tracker to authenticate users against Active Directory via LDAP, it needs a service account, commonly referred to as a Bind DN, with permission to search the directory tree.
This account is used by RT to:
- Connect to AD securely
- Perform user lookups
- Resolve group membership (if group-based access is configured)
We have created a BIND DN in our AD;
Get-ADUser -Identity read-only | Select-Object DistinguishedNameReplace read-only with the correct username (sAMAccountName) of your BIND DN account.
Sample output;
DistinguishedName
-----------------
CN=read-only,OU=ServiceAccounts,DC=kifarunix,DC=com
If you haven’t created your BIND DN, refer here; Create BIND DN User for Application Authentication.
Step 2: Verify AD Bind DN Connectivity from RT
Before integrating Active Directory (AD) with RT, it’s important to verify that your Bind DN account can successfully connect and authenticate to the AD server over LDAP[S].
To test the BIND DN connection, you need to ensure that the LDAP utilities are installed on your RT server.
Depending on the OS the RT is running, you can install LDAP utilities as follows.
On RHEL/CentOS/Fedora systems, you can install the required utilities using the following command:
sudo yum install openldap-clientsOn Ubuntu/Debian systems, you can install the utilities using:
sudo apt install ldap-utilsIf you are using AD with LDAPS, ensure that the CA certificate for your Active Directory server is imported onto the RT host. This is necessary to establish trust and prevent certificate validation errors during the LDAP connection.
We have already imported and installed the AD CA certificate into the RT server;
cat /etc/pki/ca-trust/source/anchors/ad-cs-root-ca.crt-----BEGIN CERTIFICATE-----
MIIDaTCCAlGgAwIBAgIQH1caEucYr4pMEt2XbV00IjANBgkqhkiG9w0BAQ0FADBH
MRMwEQYKCZImiZPyLGQBGRYDY29tMRkwFwYKCZImiZPyLGQBGRYJa2lmYXJ1bml4
MRUwEwYDVQQDEwxraWZhcnVuaXgtQ0EwHhcNMjUwODA5MTcwOTM4WhcNMzAwODA5
MTcxOTM3WjBHMRMwEQYKCZImiZPyLGQBGRYDY29tMRkwFwYKCZImiZPyLGQBGRYJ
a2lmYXJ1bml4MRUwEwYDVQQDEwxraWZhcnVuaXgtQ0EwggEiMA0GCSqGSIb3DQEB
AQUAA4IBDwAwggEKAoIBAQC1dPRaG78k7ggr8oBFTqetXDN4vo9kyB0elE3kuGgC
bZOZSpK61uRTorPZkohW0pNTi2VZAsW2oYMbY4dM4B8UEJUgyN6oDlgz38D9P1BC
6Ny4VCfm0xMU9FYp/f/L+F2AyiH0WH9/+hVJE1cDjPn6bEpsaBZdcVi0+cL9w6cb
+4OFpqhoR+dgL44PnkMde+eIfRxZ2hCLT32LT23yo5MekNhb2mlhATcx9kK448L3
CfC002RzuEt2i8K0enZGvahcNv2eFbx8QD+PCxs2TJgQRSrXvBKo71YG0OCNZS8n
+rnaRHWPKLW9XC17hXC56xABs0UZ9hQQxkoErAtCU8ERAgMBAAGjUTBPMAsGA1Ud
DwQEAwIBhjAPBgNVHRMBAf8EBTADAQH/MB0GA1UdDgQWBBQGDoGWUmlYMc9fFuhV
L9v0AM4kSzAQBgkrBgEEAYI3FQEEAwIBADANBgkqhkiG9w0BAQ0FAAOCAQEAeM9+
YI/4dvEqrmo6dpIr+XNGfRN78zShBFZJoEx7McyQtHI0mM+G03VINiDevHzcF5bj
dEPok6kJdU8ntmwuNZrbeQoHRAWQYCemOvaSe/WYZ/CZz5D4vCtcKGnYXnZKloZ+
b6sL5opF8PCzYVy7sJDWQGEQrtA2HUANexCjOJ7bKnjdjI2R3bGa2zOGWLrOGi5f
lRv0+bdenzudhmUNhjmdrlc910bCe4u9ihpUA/zgctWWmkasmQVdh6U2EqV58v3b
wcHHmht9EyHdek7iBbMCvGo4kbDfflt5d5nmnoFtkb0QBZpSZMwYtTdCgOnAVA6J
je1IhclnDq/d23boXQ==
-----END CERTIFICATE-----Then update the system CA:
update-ca-trustOn Ubuntu/Debian, you can place it under:
/usr/local/share/ca-certificates/Then update the system CAs;
sudo update-ca-certificatesOnce the CA certificate is imported, you can perform a test query to verify connectivity and authentication for your Bind DN account:
ldapsearch -x -D "cn=read-only,ou=ServiceAccounts,dc=kifarunix,dc=com" \
	-W -H ldaps://dc01.kifarunix.com:636 \
	-b "ou=groups,dc=kifarunix,dc=com" dn -LLL
Here is a break down of the command;
-x: Use simple authentication instead of SASL.-D "cn=read-only,ou=ServiceAccounts,dc=kifarunix,dc=com": The Bind DN you created in AD (this is the account you’re testing).-W: Prompts for the password for the Bind DN.-H ldaps://dc01.kifarunix.com:636: The LDAP server (using LDAPS for secure communication over port 636). If using standard LDAP, just use port 389.-b "ou=groups,dc=kifarunix,dc=com": This is the Base DN. It tells ldapsearch where in the LDAP directory tree to start the search.dn: Only retrieve the DN (Distinguished Name) for each object found.-LLL: Format the output to remove extra metadata and show only the search results.
If the Bind DN is valid and the connection is successful, you should see a list of distinguished names (DNs) of the objects found in the search base. If there are issues with the Bind DN, you may encounter errors like “Invalid credentials” or “Unable to connect.”
Sample results in my case:
dn: OU=Groups,DC=kifarunix,DC=com

dn: CN=RT_Analysts,OU=Groups,DC=kifarunix,DC=com

dn: CN=RT_QueueManagers,OU=Groups,DC=kifarunix,DC=com

dn: CN=RT_Admins,OU=Groups,DC=kifarunix,DC=com
This confirms that the BIND DN works fine.
Step 3: Installing Required RT Components
RT requires additional Perl modules to communicate with Active Directory via LDAP.
Install Perl LDAP modules. We assume you installing the same on an RT that already has cpanm installed.
cpanm Net::LDAPcpanm Authen::SASLcpanm Digest::SHANext, the required module is RT::Authen::ExternalAuth::LDAP extension which provides robust external authentication capabilities for RT. RT now natively ships with the extension and hence, you dont need to install it differently.
Step 4: Configure RT for External LDAP Authentication
Now that all required modules are setup, proceed to configure RT to authenticate against Active Directory.
Hence, before you proceed, back up your RT configs and DB:
cp -r /opt/rt6{,.backup.$(date +%Y%m%d)}mariadb-dump -u root -p rt6 > /mnt/rt6-db.backup.$(date +%Y%m%d).sqlOnce the back up is done, proceed with configuration.
Edit the RT configuration:
vim /opt/rt6/etc/RT_SiteConfig.pmCopy, update it according to your environment setup and paste the following into the configuration, just before the closing 1;.
# External AD Authentication
# Set authentication priority. RT will try external auth first, then fall back to internal DB if needed
Set( $ExternalAuthPriority, ["Kifarunix_AD"] );
Set( $ExternalInfoPriority, ["Kifarunix_AD"] );

# Make users created from LDAP Privileged
Set( $UserAutocreateDefaultsOnLogin, { Privileged => 1 } );

# Users should still be autocreated by RT as internal users if they
# fail to exist in an external service; this is so requestors (who are not in LDAP)
# can still be created when they email in.
Set($AutoCreateNonExternalUsers, 1);

Set($ExternalSettings, {
    # AN EXAMPLE LDAP SERVICE
    'Kifarunix_AD' => {
        ## LDAP Server Configuration
        'type'   => 'ldap',
        'server' => 'dc01.kifarunix.com',

        ## Service Account Credentials
        'user' => 'cn=read-only,ou=ServiceAccounts,dc=kifarunix,dc=com',
        'pass' => 'ChangME',

        ## LDAP Search Configuration
        'base' => 'dc=kifarunix,dc=com',

        ## Filter to restrict login to specific groups
        'filter' => '(&(objectClass=user)(|(memberOf=CN=RT_Analysts,OU=Groups,DC=kifarunix,DC=com)(memberOf=CN=RT_QueueManagers,OU=Groups,DC=kifarunix,DC=com)(memberOf=CN=RT_Admins,OU=Groups,DC=kifarunix,DC=com)))',

        ## Disabled user filter
        'd_filter' => '(userAccountControl:1.2.840.113556.1.4.803:=2)',

        ## Group Membership Configuration
#        'group'        => '(&(objectClass=user)(|(memberOf=CN=RT_Analysts,OU=Groups,DC=kifarunix,DC=com)(memberOf=CN=RT_QueueManagers,OU=Groups,DC=kifarunix,DC=com)(memberOf=CN=RT_Admins,OU=Groups,DC=kifarunix,DC=com)))',
#        'group_attr'      => 'member',
#        'group_attr_value'=> 'dn',
#        'group_scope'     => 'base',

        ## Use TLS for secure communication
        'tls' => {
            verify => "require",
            cafile => "/etc/pki/ca-trust/source/anchors/ad-cs-root-ca.crt"
        },

        ## Net::LDAP compatibility settings
        'net_ldap_args' => [ version => 3 ],

        ## Attribute Matching
        # Determines which LDAP attributes to check for username
        'attr_match_list' => [
            'Name',
        ],

        ## Attribute Mapping
        # Maps LDAP attributes to RT user fields
        'attr_map' => {
            'Name'         => 'sAMAccountName',
            'EmailAddress' => 'userPrincipalName',
            'RealName'     => 'displayName',
        },
    },
});
Refer to the RT::Authen::ExternalAuth::LDAP documentation for more information.
At the end of the day, this was how my configuration file looked like:
use utf8;

# Any configuration directives you include  here will override
# RT's default configuration file, RT_Config.pm
#
# To include a directive here, just copy the equivalent statement
# from RT_Config.pm and change the value. We've included a single
# sample value below.
#
# If this file includes non-ASCII characters, it must be encoded in
# UTF-8.
#
# This file is actually a perl module, so you can include valid
# perl code, as well.
#
# The converse is also true, if this file isn't valid perl, you're
# going to run into trouble. To check your SiteConfig file, use
# this command:
#
#   perl -c /path/to/your/etc/RT_SiteConfig.pm
#
# You must restart your webserver after making changes to this file.
#

# You may also split settings into separate files under the etc/RT_SiteConfig.d/
# directory.  All files ending in ".pm" will be parsed, in alphabetical order,
# after this file is loaded.


# You must install Plugins on your own, this is only an example
# of the correct syntax to use when activating them:
#     Plugin( "RT::Extension::HelpDesk" );

Set( $CommentAddress, '[email protected]' );
Set( $CorrespondAddress, '[email protected]' );
Set( $DatabaseHost, 'localhost' );
Set( $DatabaseName, 'rt6' );
Set( $DatabasePassword, 'changeme' );
Set( $DatabasePort, '' );
Set( $DatabaseType, 'mysql' );
Set( $DatabaseUser, 'rt_user' );
Set( $Organization, 'kifarunix.com' );
Set( $OwnerEmail, '[email protected]' );
Set( $SendmailPath, '/opt/rt6/etc/msmtp_wrapper' );
Set( $WebDomain, 'incidents.kifarunix.com' );
Set( $WebPort, '443' );
Set( $rtname, 'kifarunix.com' );
Set( $LogToFile,      'debug');
Set( $LogToFileNamed, 'rt.log');
Set( $LogDir,         '/var/log/rt6');
Set( $WebSecureCookies, 1 );
Set($RTAddressRegexp , '^(incidents\@kifarunix\.com)$');
Plugin('RT::IR');
# Enable the ResetPassword extension
# Plugin('RT::Extension::ResetPassword');

# Basic Configuration Options
Set($AllowUsersWithoutPassword, 0);
Set($CreateNewUserAndSetPassword, 0);
Set($CreateNewUserAsPrivileged, 0);
Set($DisableResetPasswordOnLogin, 0);
Set($PasswordChangeLinkExpirySeconds, 14400);
Set($MinimumPasswordLength, 10);
Set($ResetPasswordFromAddress, '[email protected]');

# External AD Authentication
# Set authentication priority. RT will try external auth first, then fall back to internal DB if needed
Set( $ExternalAuthPriority, ["Kifarunix_AD"] );
Set( $ExternalInfoPriority, ["Kifarunix_AD"] );

# Make users created from LDAP Privileged
Set( $UserAutocreateDefaultsOnLogin, { Privileged => 1 } );

# Users should still be autocreated by RT as internal users if they
# fail to exist in an external service; this is so requestors (who are not in LDAP)
# can still be created when they email in.
Set($AutoCreateNonExternalUsers, 1);

Set($ExternalSettings, {
    # AN EXAMPLE LDAP SERVICE
    'Kifarunix_AD' => {
        ## LDAP Server Configuration
        'type'   => 'ldap',
        'server' => 'dc01.kifarunix.com',

        ## Service Account Credentials
        'user' => 'cn=read-only,ou=ServiceAccounts,dc=kifarunix,dc=com',
        'pass' => 'p@ssw0rd',

        ## LDAP Search Configuration
        'base' => 'dc=kifarunix,dc=com',

        ## Filter to restrict login to specific groups
        'filter' => '(&(objectClass=user)(|(memberOf=CN=RT_Analysts,OU=Groups,DC=kifarunix,DC=com)(memberOf=CN=RT_QueueManagers,OU=Groups,DC=kifarunix,DC=com)(memberOf=CN=RT_Admins,OU=Groups,DC=kifarunix,DC=com)))',

        ## Disabled user filter
        'd_filter' => '(userAccountControl:1.2.840.113556.1.4.803:=2)',

        ## Group Membership Configuration
#        'group'        => '(&(objectClass=user)(|(memberOf=CN=RT_Analysts,OU=Groups,DC=kifarunix,DC=com)(memberOf=CN=RT_QueueManagers,OU=Groups,DC=kifarunix,DC=com)(memberOf=CN=RT_Admins,OU=Groups,DC=kifarunix,DC=com)))',
#        'group_attr'      => 'member',
#        'group_attr_value'=> 'dn',
#        'group_scope'     => 'base',

        ## Use TLS for secure communication
        'tls' => {
            verify => "require",
            cafile => "/etc/pki/ca-trust/source/anchors/ad-cs-root-ca.crt"
        },

        ## Net::LDAP compatibility settings
        'net_ldap_args' => [ version => 3 ],

        ## Attribute Matching
        # Determines which LDAP attributes to check for username
        'attr_match_list' => [
            'Name',
        ],

        ## Attribute Mapping
        # Maps LDAP attributes to RT user fields
        'attr_map' => {
            'Name'         => 'sAMAccountName',
            'EmailAddress' => 'userPrincipalName',
            'RealName'     => 'displayName',
        },
    },
});
1;
Step 5: Verify Configuration Syntax
Check for syntax errors:
perl -c /opt/rt6/etc/RT_SiteConfig.pmYou should see: syntax OK. Otherwise, fix any would be issue and proceed.
Step 6: Restart Web Server
Once you confirm all is good, restart the Web server to apply the changes.
We are using Apache Web server in our setup, hence:
systemctl restart httpdFor any other web server, refer to their documentation on how to restart the service.
Step 7: Create AD User Groups on RT and Assign Permissions
Next, create the RT groups that map to your AD groups.
Login to the RT as an administrative user and navigate to Admin > Groups > Create.

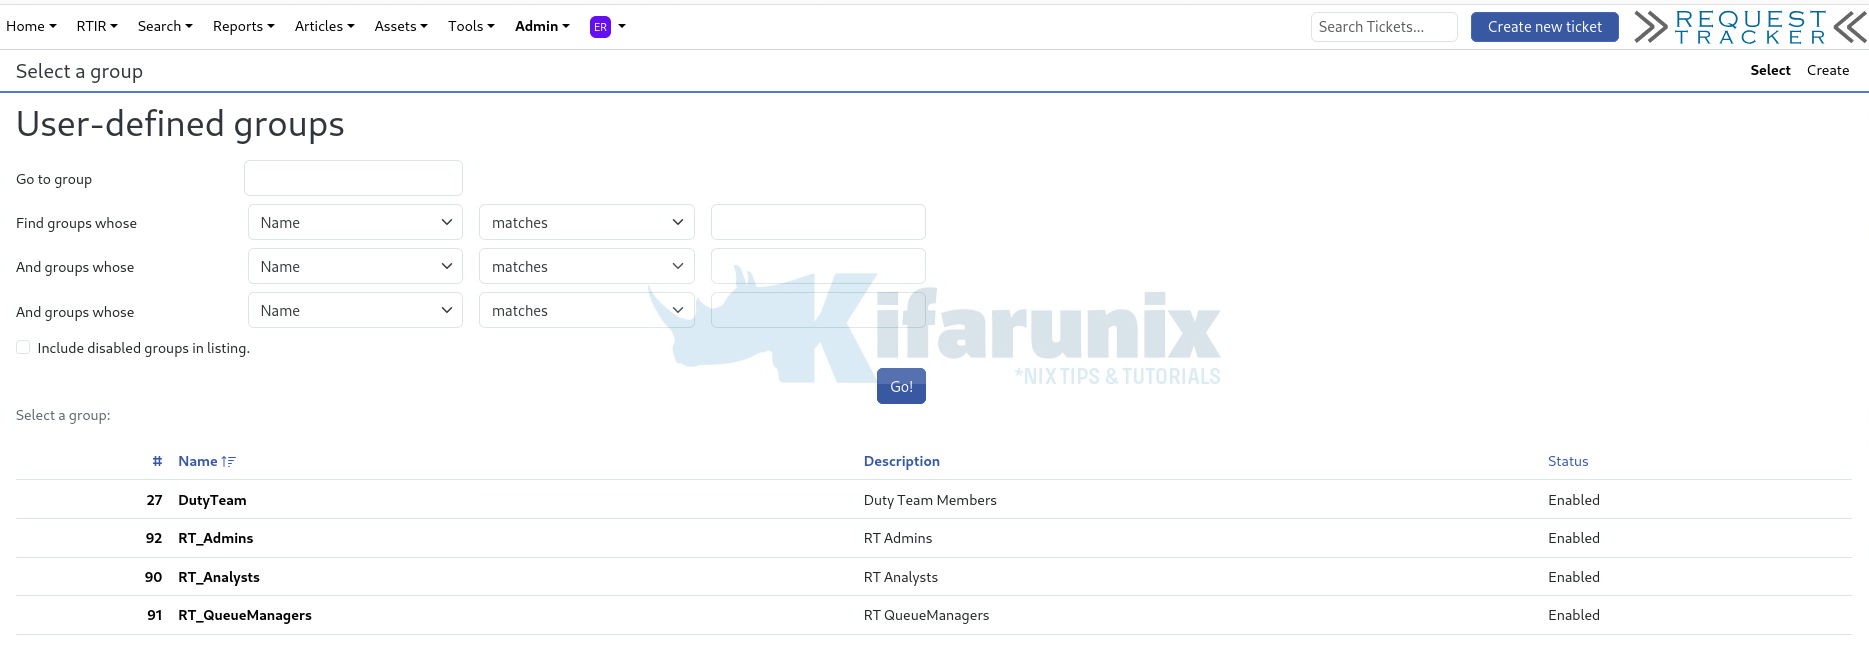
On the “Create a new group” creation box, enter the group name and optional description. Ensure the Enabled box is checked.

Click Create to create the group.
You can view all the groups under Admin > Groups > Select.

Now that we have the groups, we need to assign the respective permissions.
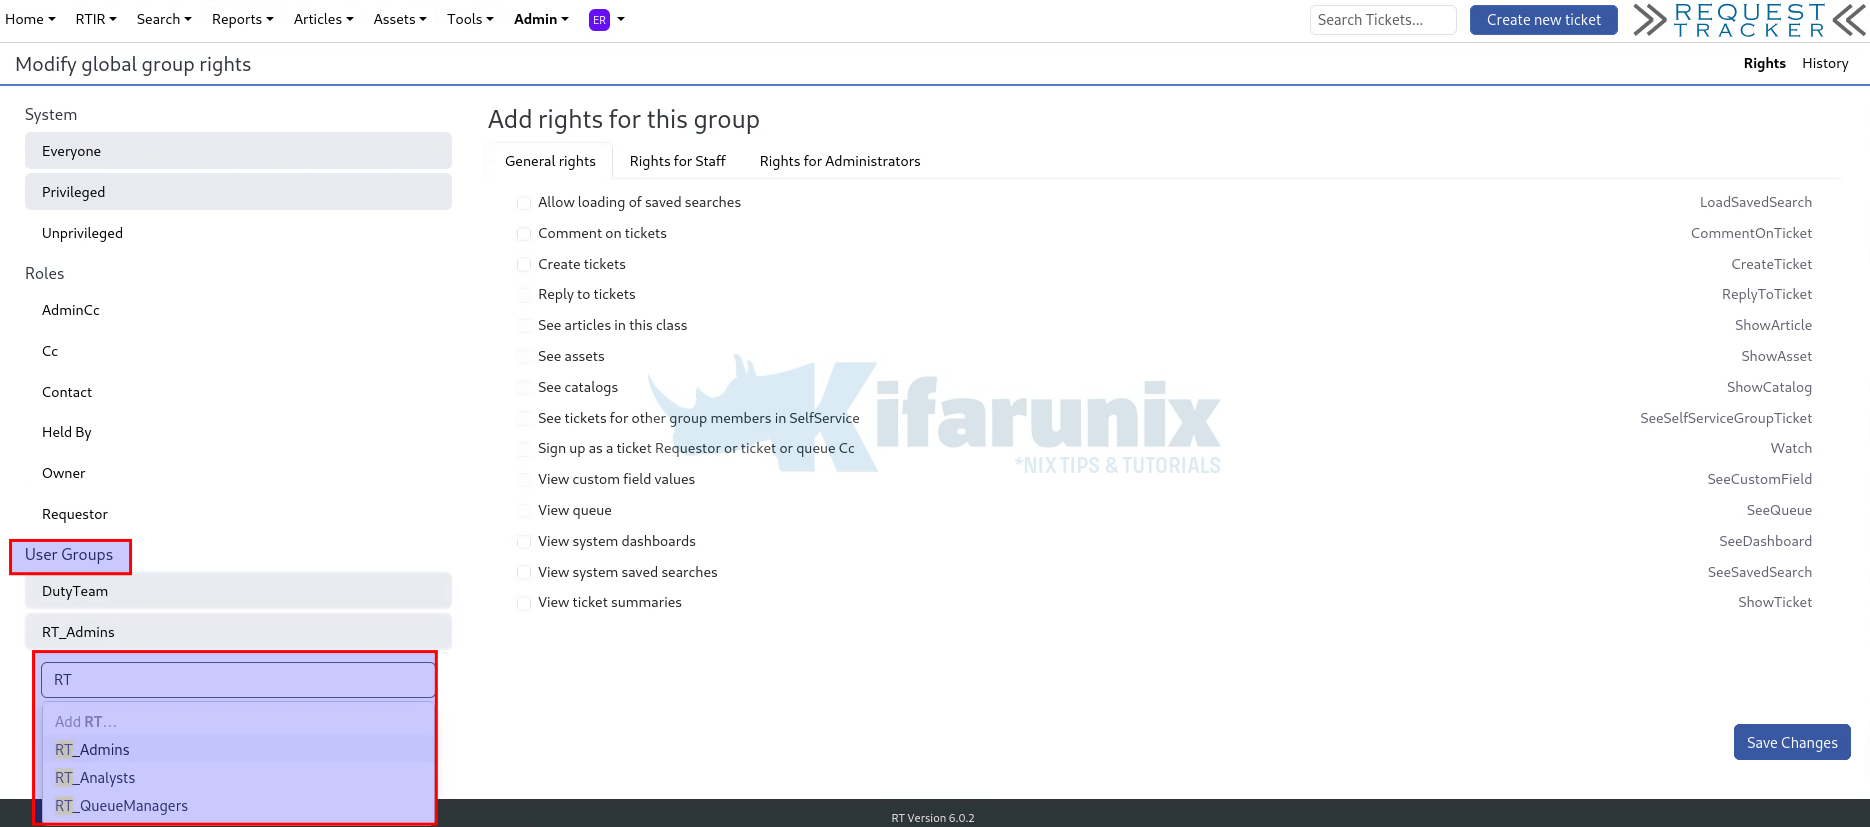
You can assign the permissions per RT queue (Admin > Queues > Select > Select a queue > Rights > Group rights/User rights > Assign) or globally (Admin > Global > Group rights > User Groups > Select Group > Assign). In our setup, we will assign the three groups the respective global permissions.
Hence, navigate to Admin > Global > Group rights. Under User Groups, search and select your respective group.

Once you have selected a group, you can then assign respective rights, from the General, Staff or Administrator rights.
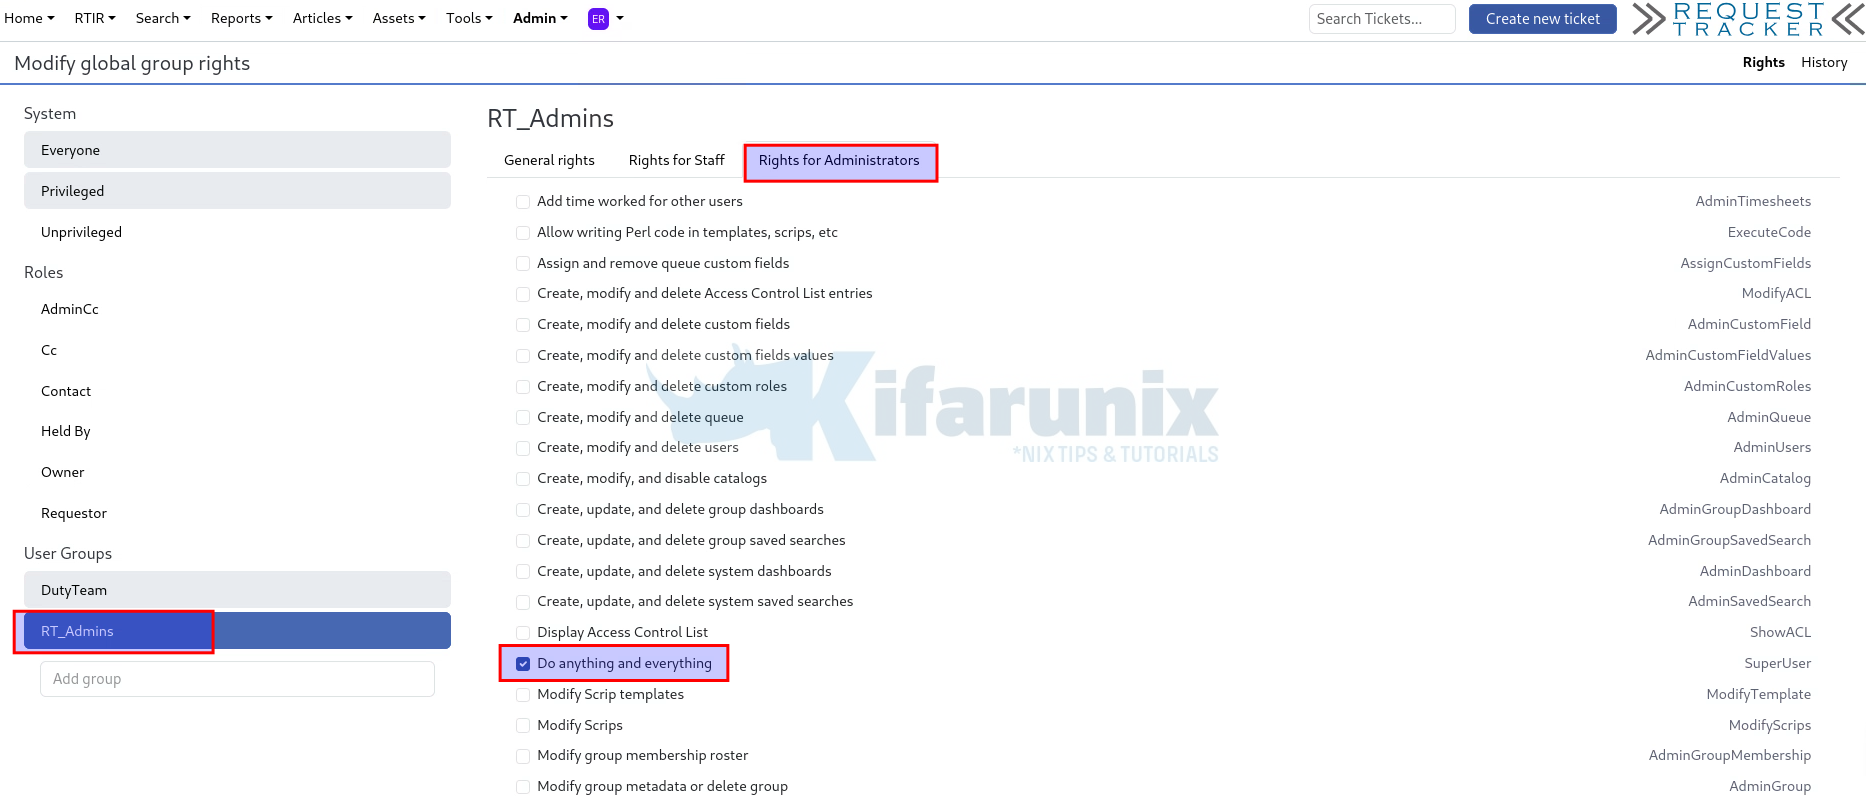
For example, RT_Admins, we only need to make this full administrator, hence, click on Rights for Administrators and assign the Do anything and everything permission

Our RT_Analysts have the following permissions:
- General rights:
- Comment on tickets
- Create tickets
- Reply to tickets
- Staff rights:
- Forward Tickets outside the RT
- Own tickets
- Steal tickets
- Take tickets
- View exact outgoing email messages and their recipients
- View group
- View group dashboards
- View group saved searches
RT_QueueManagers:
- General rights:
- Allow loading of saved searches
- Comment on tickets
- Create tickets
- Reply to tickets
- See assets
- See catalogs
- See tickets for other group members in SelfService
- View custom field values
- View queue
- View system dashboards
- View system saved searches
- View ticket summaries
- Rights for Staff:
- Create Assets
- Forward messages outside of RT
- Modify assets
- Modify ticket owner
- Modify tickets
- Own tickets
- Show search “Advanced” menu
- Steal tickets
- Take tickets
- View exact outgoing email messages and their recipients
- View group
- View group dashboards
Save the changes when done.
Now, all the users that will belong to these groups, will inherit the group permissions.
Step 8: Test RT Authentication via Windows AD
To test RT authentication via AD:
- Navigate to your RT URL (e.g., https://name.company.com)
- Log in with a member’s AD credentials (e.g., john.doe)
- Password should be their AD password.

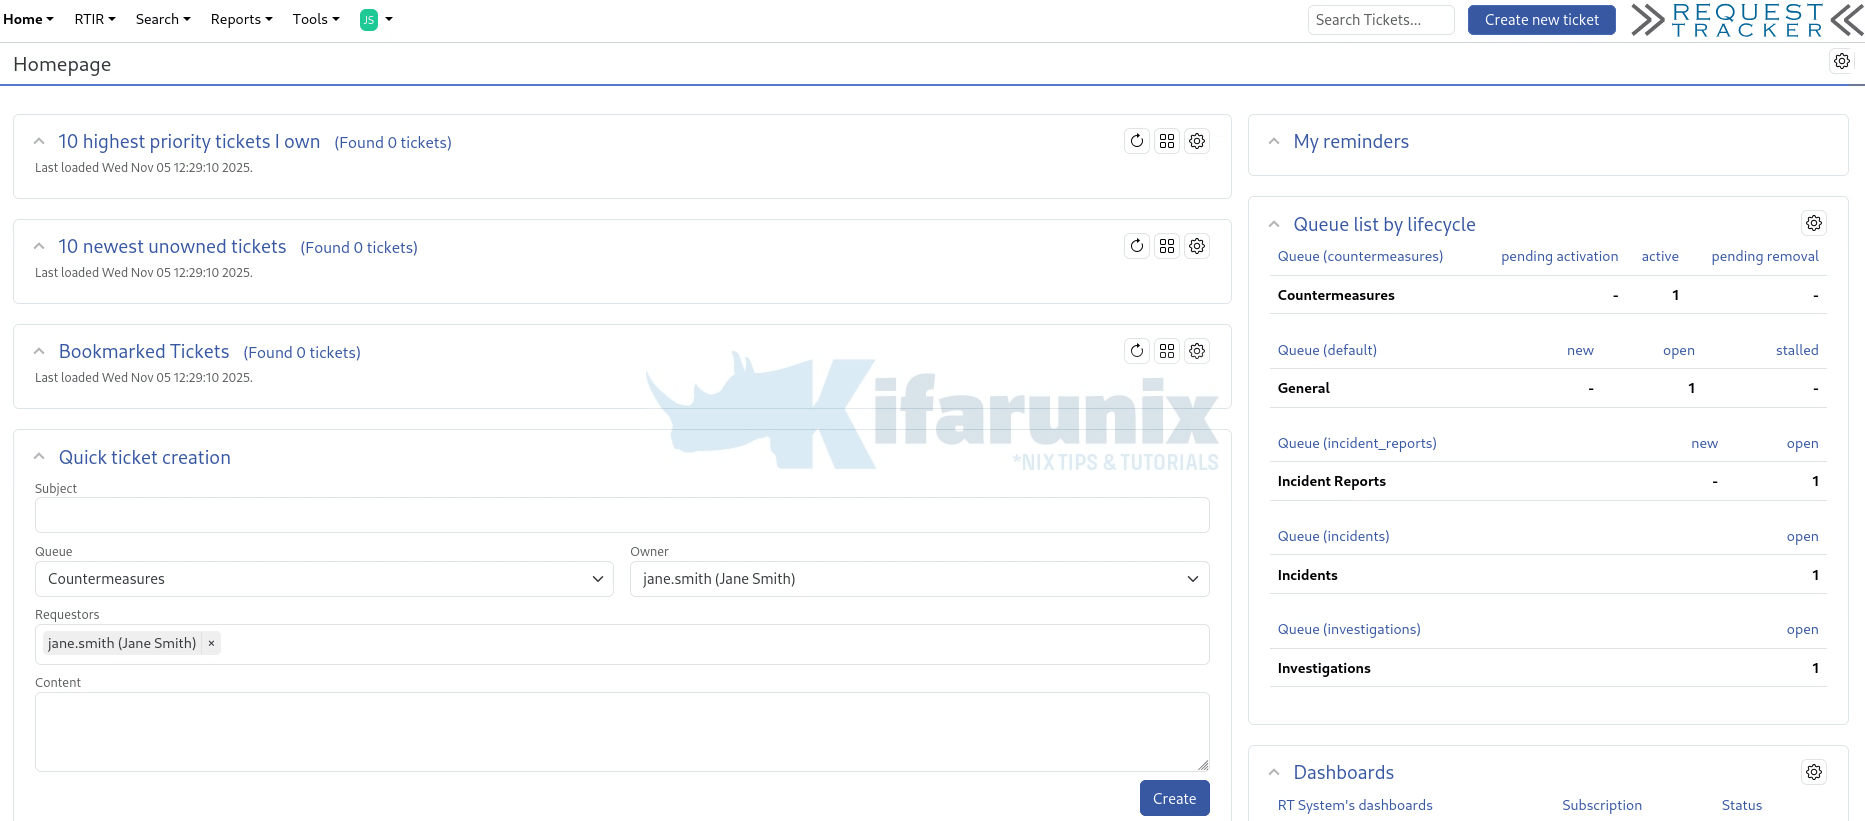
- Check if login succeeds (It succeeded in our trial).

- At the same time, check RT logs (this is for RT6):
Snippet of the logs for a successful logintail -f /opt/rt6/var/logs/rt.log...
[14602] [Wed Nov 5 17:29:10 2025] [debug]: UserExists params:
username: jane.smith , service: Kifarunix_AD (/opt/rt6/sbin/../lib/RT/Authen/ExternalAuth/LDAP.pm:566)
[14602] [Wed Nov 5 17:29:10 2025] [debug]: LDAP Search === Base: dc=kifarunix,dc=com == Filter: (&(&(objectClass=user)(|(memberOf=CN=RT_Analysts,OU=Groups,DC=kifarunix,DC=com)(memberOf=CN=RT_QueueManagers,OU=Groups,DC=kifarunix,DC=com)(memberOf=CN=RT_Admins,OU=Groups,DC=kifarunix,DC=com)))(sAMAccountName=jane.smith)) == Attrs: sAMAccountName,sAMAccountName (/opt/rt6/sbin/../lib/RT/Authen/ExternalAuth/LDAP.pm:611)
[14602] [Wed Nov 5 17:29:10 2025] [debug]: LDAP Search === Base: dc=kifarunix,dc=com == Filter: (&(&(objectClass=user)(|(memberOf=CN=RT_Analysts,OU=Groups,DC=kifarunix,DC=com)(memberOf=CN=RT_QueueManagers,OU=Groups,DC=kifarunix,DC=com)(memberOf=CN=RT_Admins,OU=Groups,DC=kifarunix,DC=com)))(userAccountControl:1.2.840.113556.1.4.803:=2)(sAMAccountName=jane.smith)) == Attrs: uid (/opt/rt6/sbin/../lib/RT/Authen/ExternalAuth/LDAP.pm:723)
[14602] [Wed Nov 5 17:29:10 2025] [debug]: RT::User::CanonicalizeUserInfoFromExternalAuth called by RT::User /opt/rt6/sbin/../lib/RT/User.pm 891 with: Name: jane.smith (/opt/rt6/sbin/../lib/RT/User.pm:925)
[14602] [Wed Nov 5 17:29:10 2025] [debug]: Attempting to get user info using this external service: Kifarunix_AD (/opt/rt6/sbin/../lib/RT/User.pm:933)
[14602] [Wed Nov 5 17:29:10 2025] [debug]: Attempting to use this canonicalization key: Name (/opt/rt6/sbin/../lib/RT/User.pm:942)
[14602] [Wed Nov 5 17:29:10 2025] [debug]: LDAP Search === Base: dc=kifarunix,dc=com == Filter: (&(&(objectClass=user)(|(memberOf=CN=RT_Analysts,OU=Groups,DC=kifarunix,DC=com)(memberOf=CN=RT_QueueManagers,OU=Groups,DC=kifarunix,DC=com)(memberOf=CN=RT_Admins,OU=Groups,DC=kifarunix,DC=com)))(sAMAccountName=jane.smith)) == Attrs: displayName,sAMAccountName,userPrincipalName (/opt/rt6/sbin/../lib/RT/Authen/ExternalAuth/LDAP.pm:451)
[14602] [Wed Nov 5 17:29:10 2025] [debug]: Found one matching record (/opt/rt6/sbin/../lib/RT/Authen/ExternalAuth/LDAP.pm:490)
[14602] [Wed Nov 5 17:29:10 2025] [info]: RT::User::CanonicalizeUserInfoFromExternalAuth returning EmailAddress: [email protected], Name: jane.smith, RealName: Jane Smith (/opt/rt6/sbin/../lib/RT/User.pm:1000)
[14602] [Wed Nov 5 17:29:10 2025] [debug]: UPDATED user ( jane.smith ) from External Service (/opt/rt6/sbin/../lib/RT/Authen/ExternalAuth.pm:645)
[14602] [Wed Nov 5 17:29:10 2025] [info]: Successful login for jane.smith from 192.168.233.1 (/opt/rt6/sbin/../lib/RT/Authen/ExternalAuth.pm:546)
[14602] [Wed Nov 5 17:29:10 2025] [debug]: Autohandler called ExternalAuth. Response: (1, Successful login) (/opt/rt6/share/html/Elements/DoAuth:58) - And there you go. If authentication fails, the logs will show you what the issue could actually be.
That confirms that the RT integration with Ad for authentication is working perfectly.
Common Troubleshooting Tips
- Bind Failures: Make sure the firewall or SELinux isn’t blocking access. Ensure correct BIND DN password.
- Attribute Mismatches: Active Directory often uses different login attributes (for example,
sAMAccountNamevs.UserPrincipalName). Update your LDAP filter to match what AD expects. - SSL Errors: If you’re using LDAPS, import the Active Directory CA certificate.
- DNS Problems: Ensure AD’s hostname is resolveable.
- No such object Errors: This usually means the base DN (Distinguished Name) is incorrect. Double-check it in Active Directory Users and Computers.
Conclusion
Integrating Request Tracker (RT) with Active Directory allows your organization to centralize user management and streamline authentication. By connecting RT to AD, administrators can leverage existing user accounts and groups, reduce account duplication, and simplify access control.
Once the integration is complete and tested, users can log in to RT using their domain credentials, and permissions can be managed directly through AD groups. Regularly review your configuration and keep SSL certificates, credentials, and LDAP parameters up to date to maintain a secure and reliable setup.
This integration not only improves security but also enhances the overall user experience by aligning RT with your organization’s existing identity infrastructure.

