In this tutorial, we will guide you through the process to install Ubuntu 24.04 with UEFI and Software RAID 1. UEFI (Unified Extensible Firmware Interface) is the modern replacement for the traditional BIOS, offering improved security and faster boot times, making it the preferred choice for new installations. Software RAID 1 on the other hand is an implementation of Software Redundant Array of Independent Disks that mirrors data across two drives, creating an exact copy on each. This setup not only enhances data redundancy but also improves read performance, allowing for continued access to your data even if one drive fails.
By the end of this tutorial, you will have a fully functional Ubuntu 24.04 system configured with RAID 1, ensuring that your data is safeguarded against single-drive failures. Whether you are a seasoned Linux user or a newcomer, this step-by-step guide will equip you with the knowledge and skills needed to set up a reliable and efficient system. Let’s get started!
Table of Contents
Install Ubuntu 24.04 with UEFI and Software RAID 1
Create Ubuntu 24.04 Machine with RAID Drives and UEFI
To demonstrate this setup, we will run an Ubuntu 24.04 VM on KVM, configured with two drives for the RAID 1 setup and enable UEFI as the machine type.
Drives and Firmware Type:
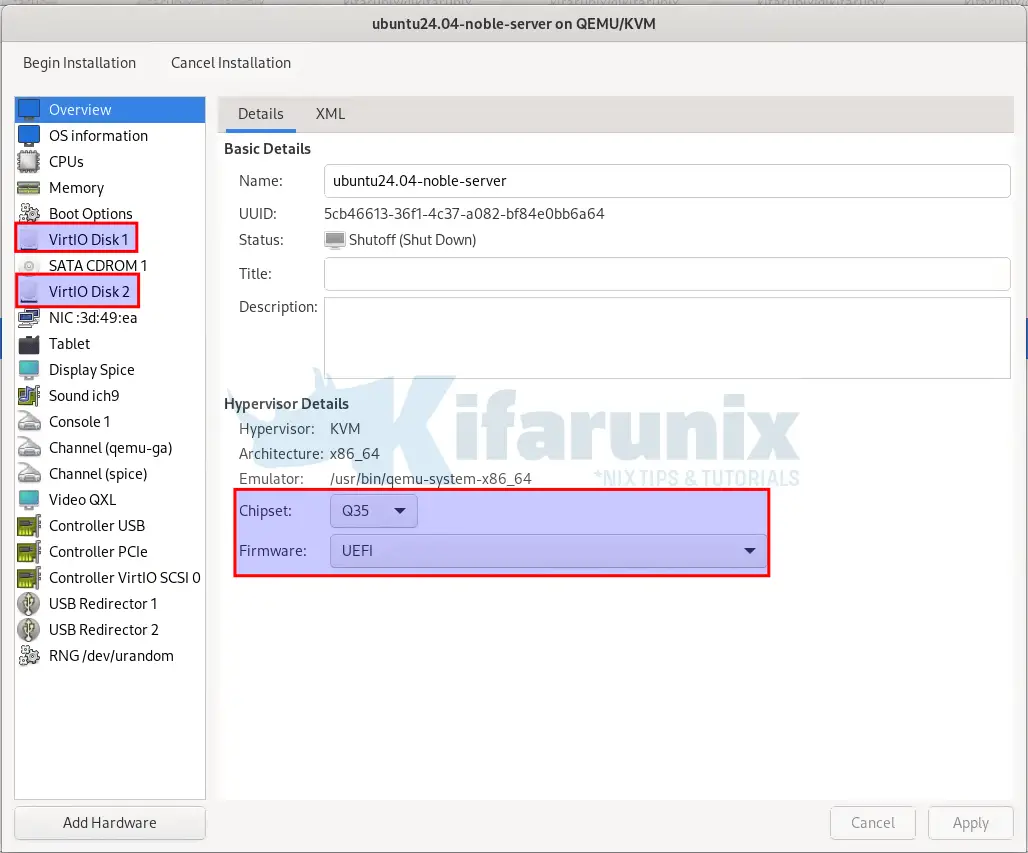
Alternatively, this same configuration can be implemented on physical hardware with dedicated drives.
Launch Installation
As usual, launch the installation of the Ubuntu 24.04 machine and go through the process. When you get to the storage configuration part, check the next section below on storage configuration to learn how to setup Ubuntu 24.04 OS with software RAID-1.
Guided Storage Configuration
To get the flexibility of creating your RAID partitions for your Ubuntu 24.04, select Custom Storage Layout.
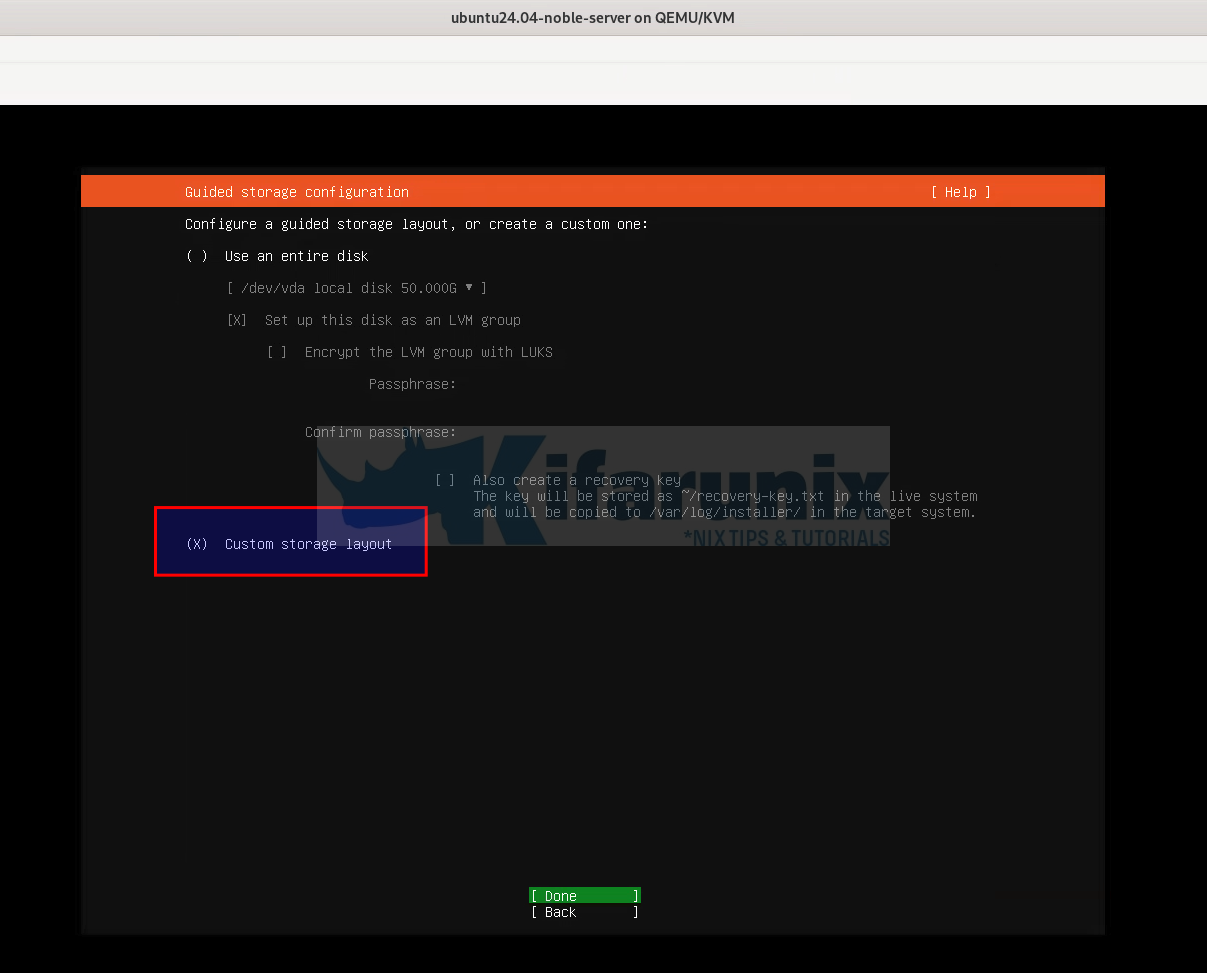
Click Done to proceed with storage setup.
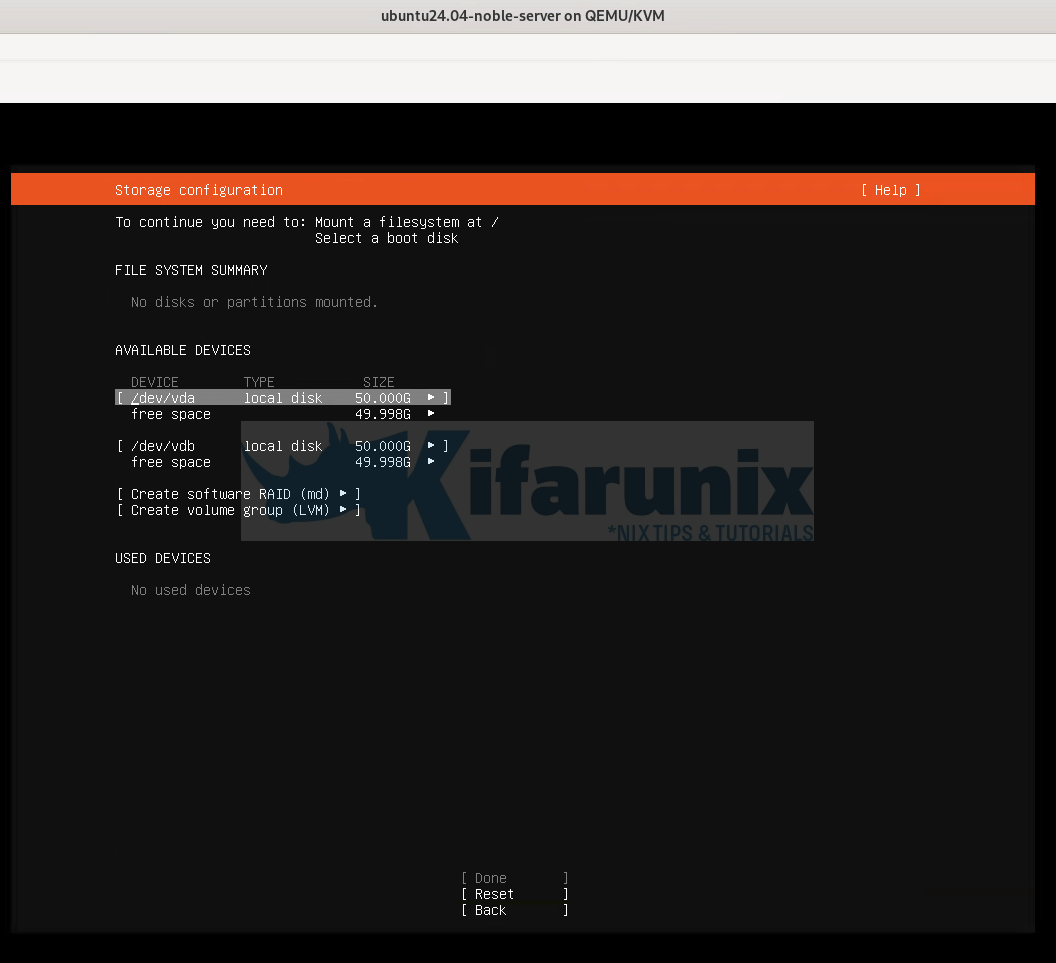
Now, this is how the layout is like before configuration.
Initialize RAID Drives as Boot Devices
As you can see the message on the screen:
To continue you need to:
- Mount a Filesystem at /
- Select a boot disk
So, first of all, you need to initialize the two RAID drives as boot devices. This step is crucial as it determines which device the system will use to boot the operating system. Until you select a boot device and mount FS on /, installation wont proceed.
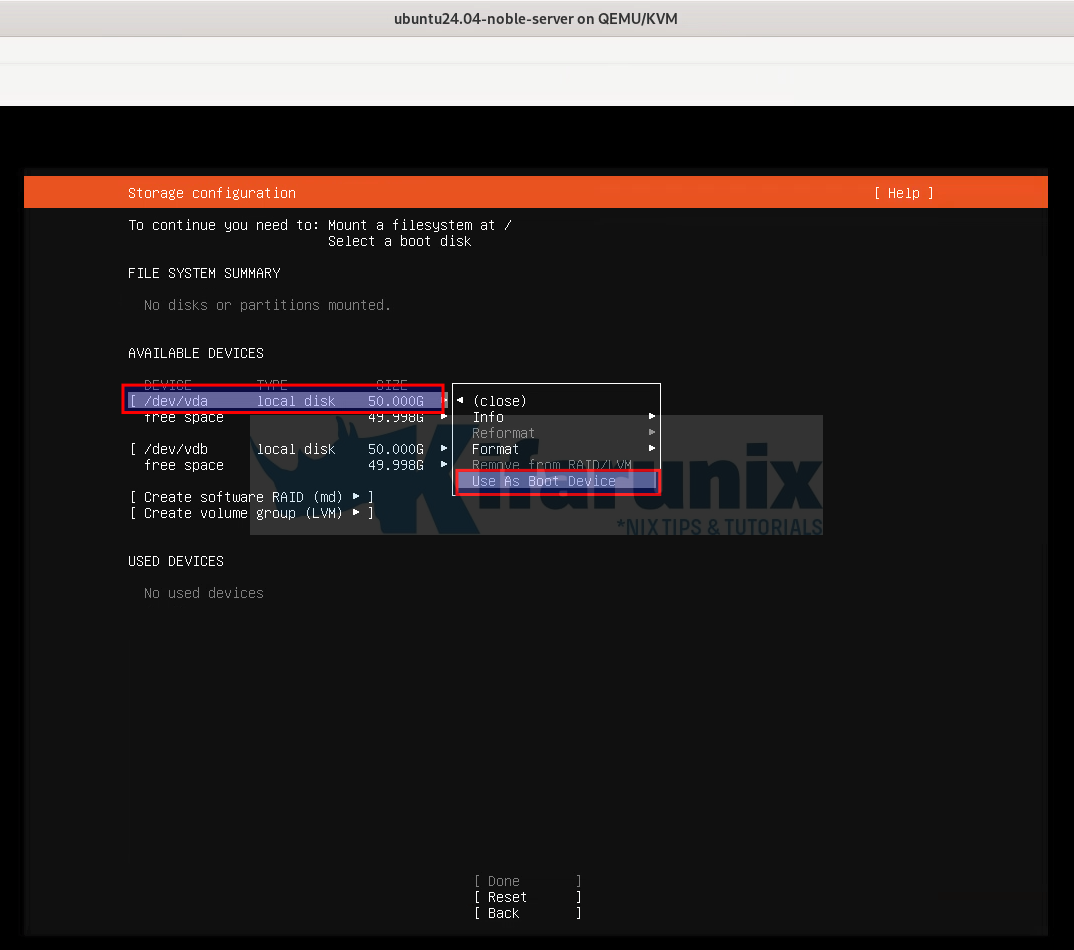
Since we are using two drives to configure a RAID 1 for Ubuntu 24.04, select each of the devices (click /dev/vdX or whatever it is, not the free space) and choose the option, Use As Boot Device. Remember the purpose of RAID 1 is redundancy, and you need to be able to boot your system if one of the drives gets corrupted.
First Drive:
Second Drive, add as another boot device.
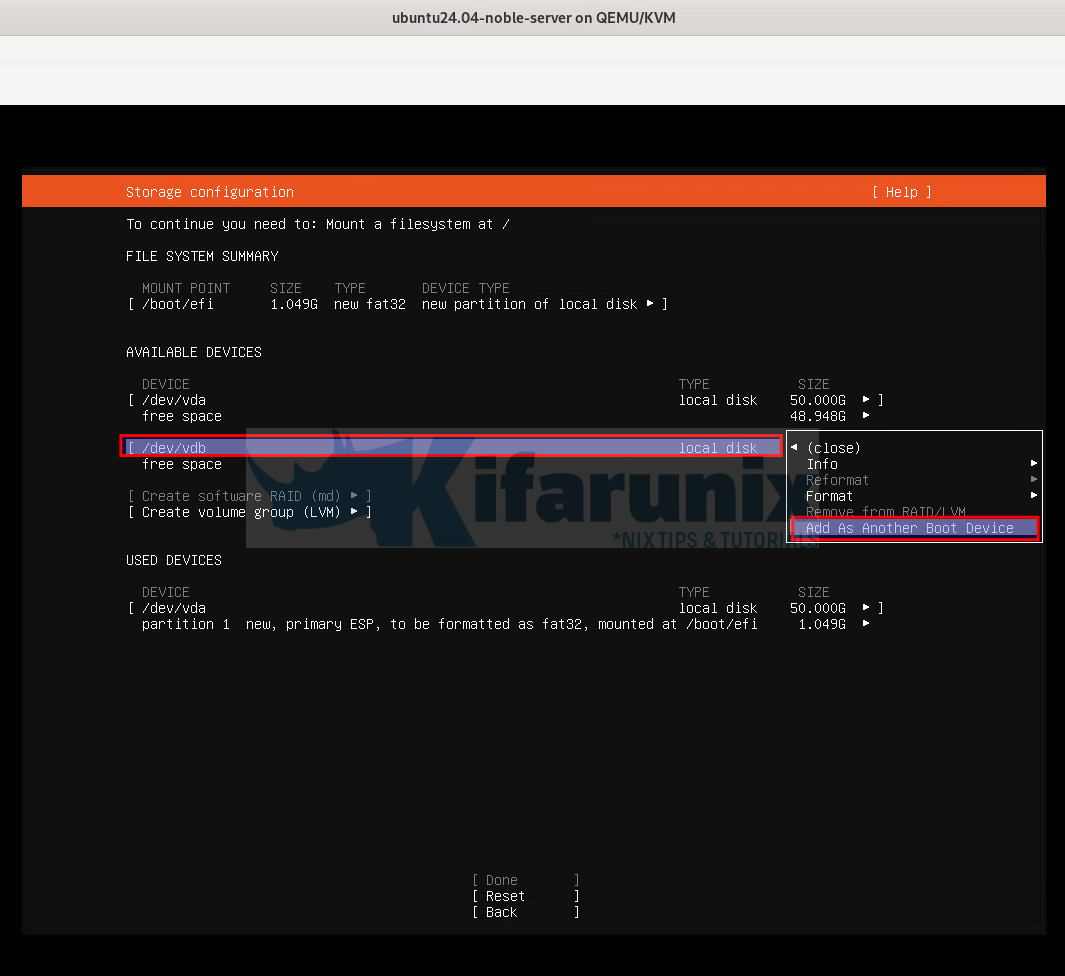
You will notice that, once you initialize your drives as boot devices, an ESP (UEFI system partition, /boot/efi) is created and mounted.
Setup RAID 1 on the Drives
You will notice that the option to create software RAID as well as LVM is now greyed out. This is because we have set both drives as boot devices.
Therefore, select the free space on each device and add GPT partition.
install Ubuntu 24.04 with UEFI and Software RAID 1
Next, ensure the partition is left unformatted, since we will need to create RAID on it.
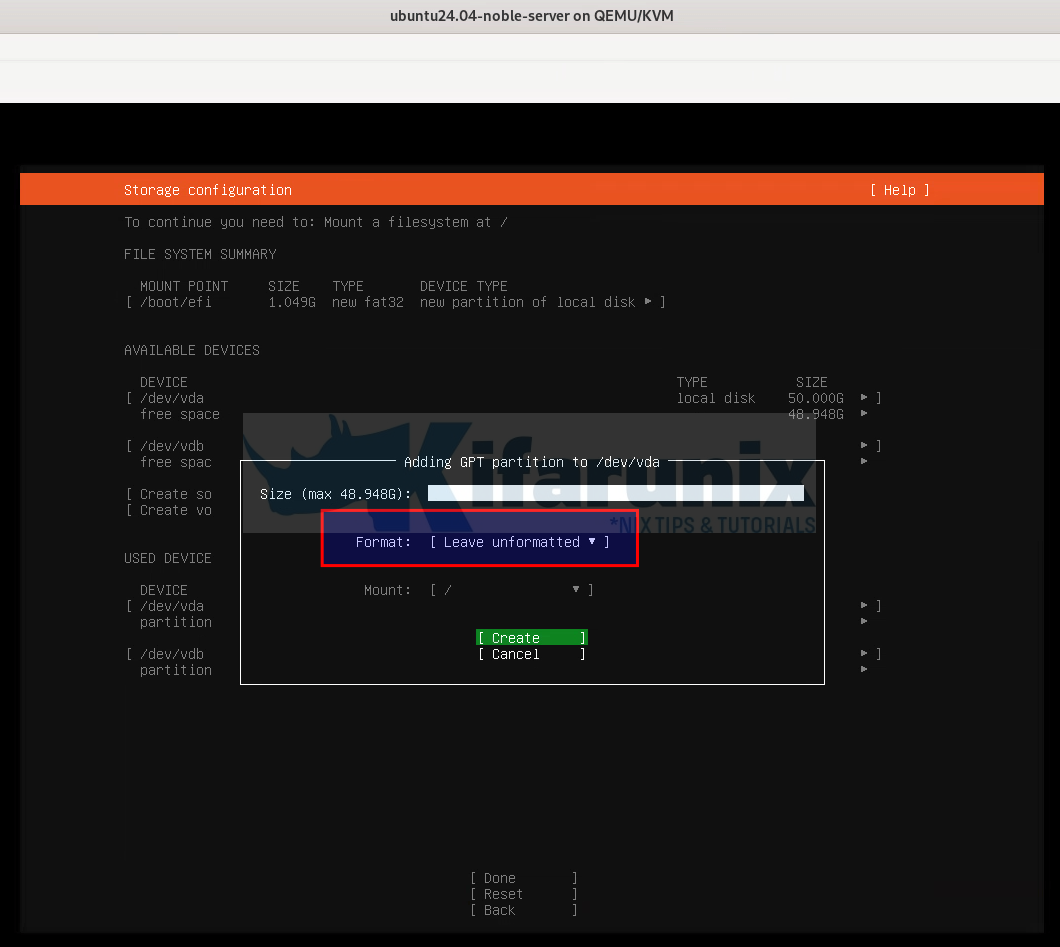
Click Create to create unformatted partition.
Do the same on the other drive.
Now, again, you see the option to create software RAID as well as LVM is activated.
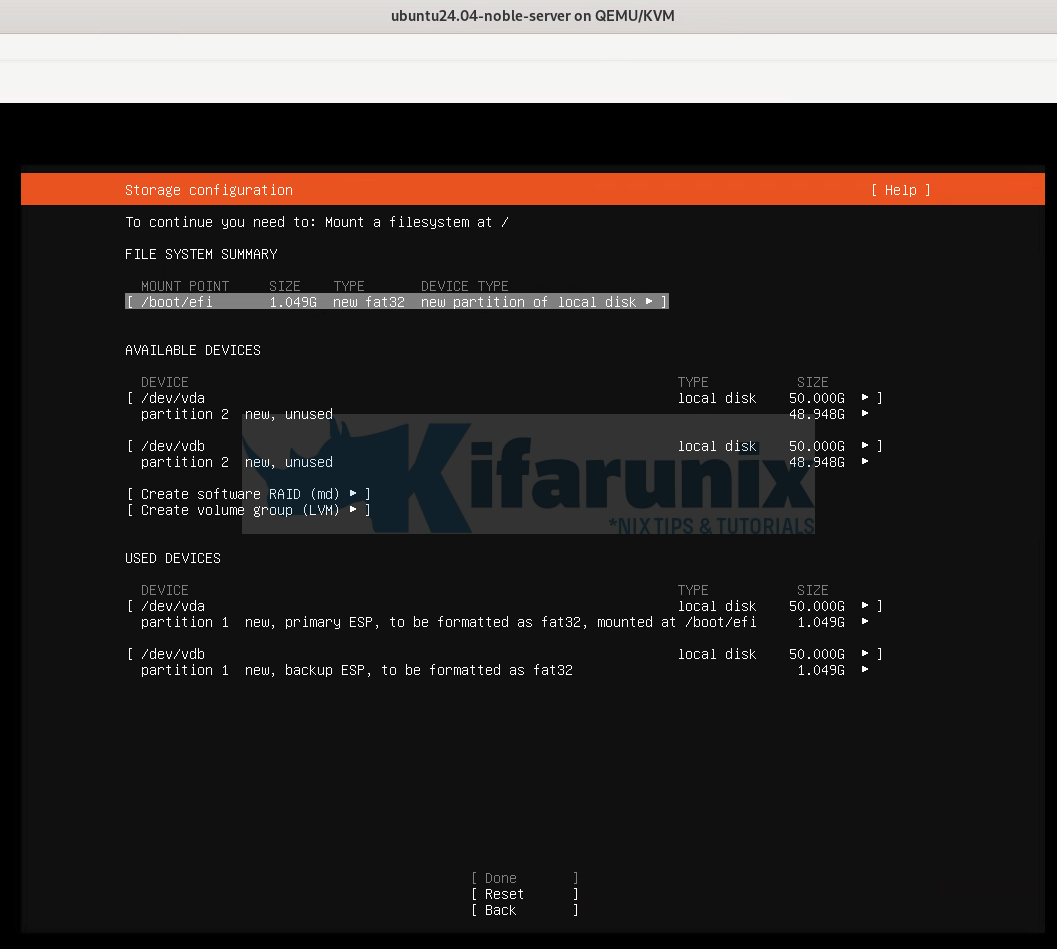
So, proceed to create RAID 1. Select “Create Software RAID (md)”:
- Leave the default name
- RAID 1 is selected by default. Leave it with defaults.
- Now, select the two unformatted partitions created above to make the RAID.
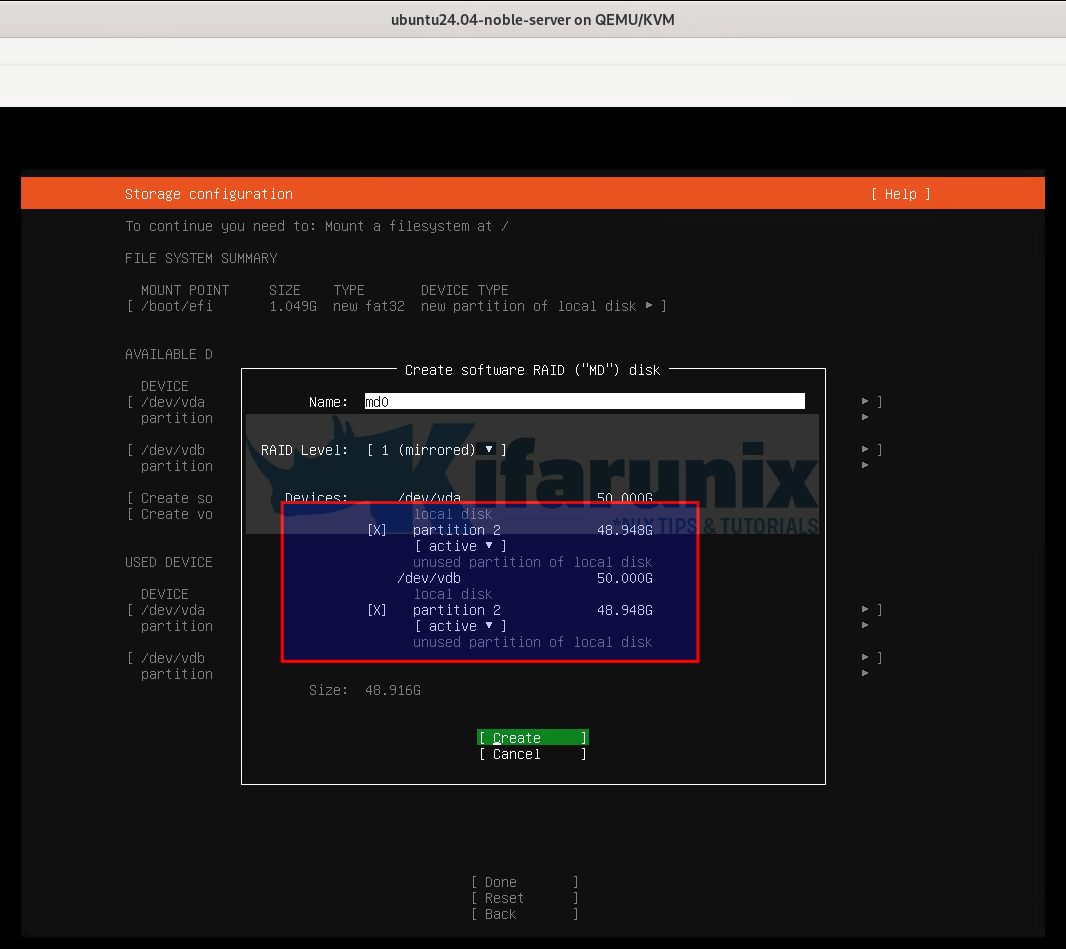
- Click Create when done.
Creating System Partitions on RAID 1
At this point, you have two options:
- Option 1: Creating System Partitions Directly on RAID Device (md0)
- Option 2: Creating a Volume Group on RAID Device (md0) on top of which you can create system partitions especially if you want to encrypt the drive.
We will go without LVM and create partition direcly on the RAID 1 md0 device.
So, if you choose this approach, select the RAID device, md0 free space and click add add GPT partition.
We will only create the root filesystem partition of EXT4.
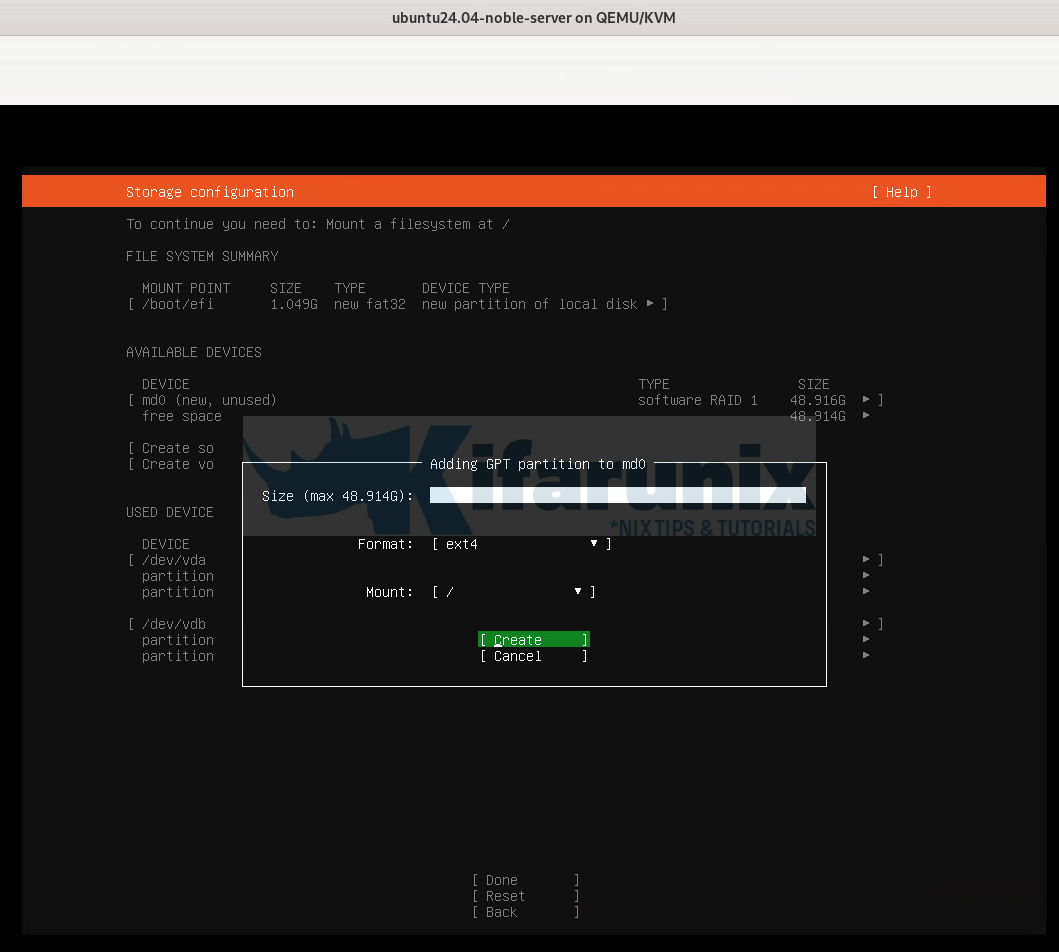
If you want, you can create more partitions and respective filesystem types.
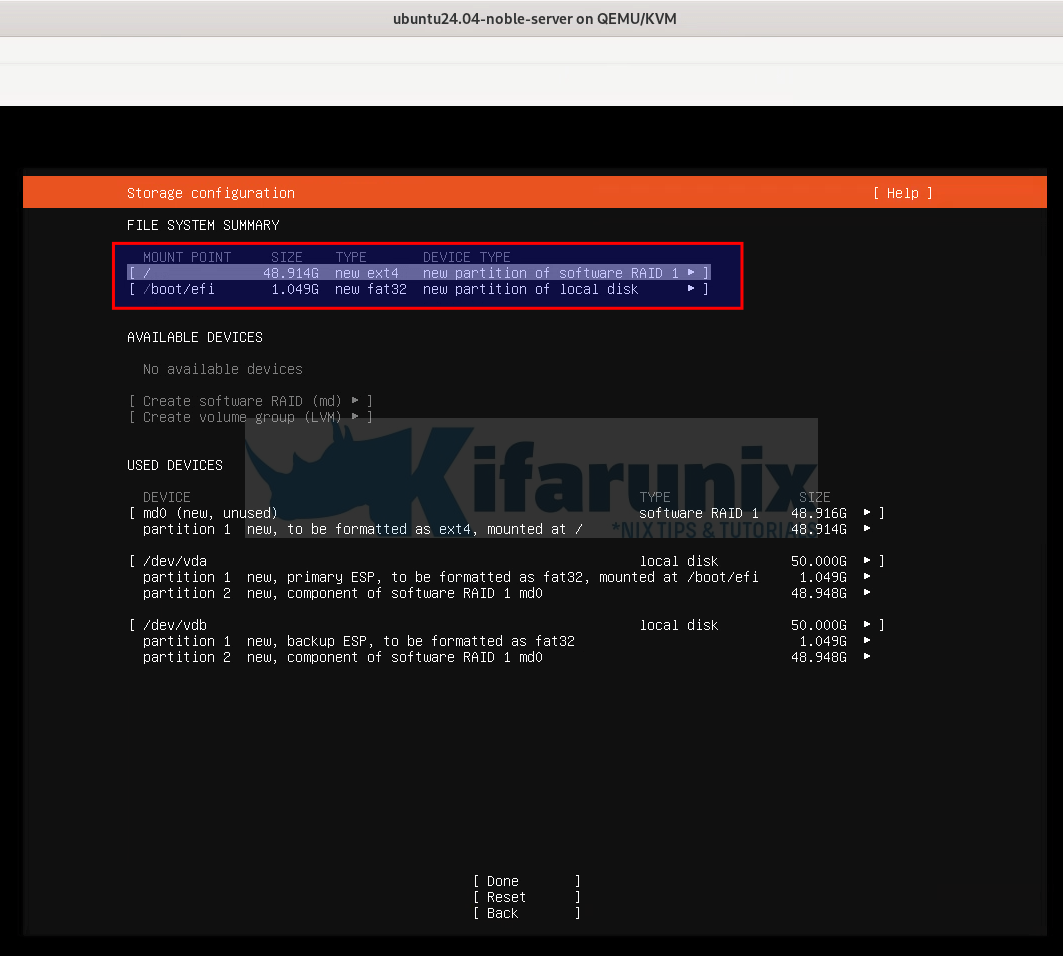
Proceed with Ubuntu 24.04 OS installation on RAID 1 drives
At this point, you have created and mounted root filesystem as well as boot devices and you are ready to proceed with installation.
Thus, click done, confirm changes to the drives and continue.
Reboot the system when installation is complete to boot into your Ubuntu 24.04 server with RAID 1 and UEFI!
Confirm Ubuntu 24.04 OS Disk
If all went well, your system should just boot up normally.
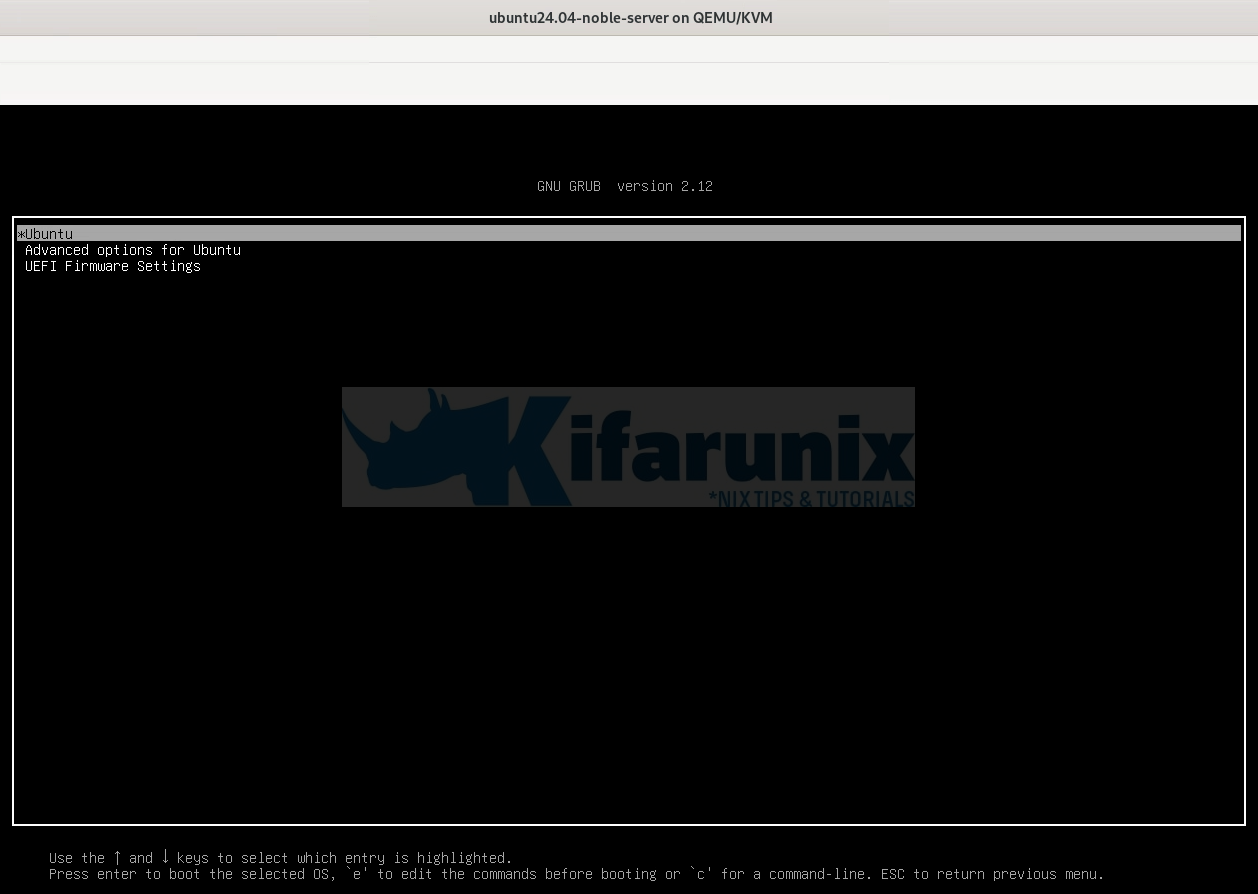
Login and confirm the changes.
Devices:
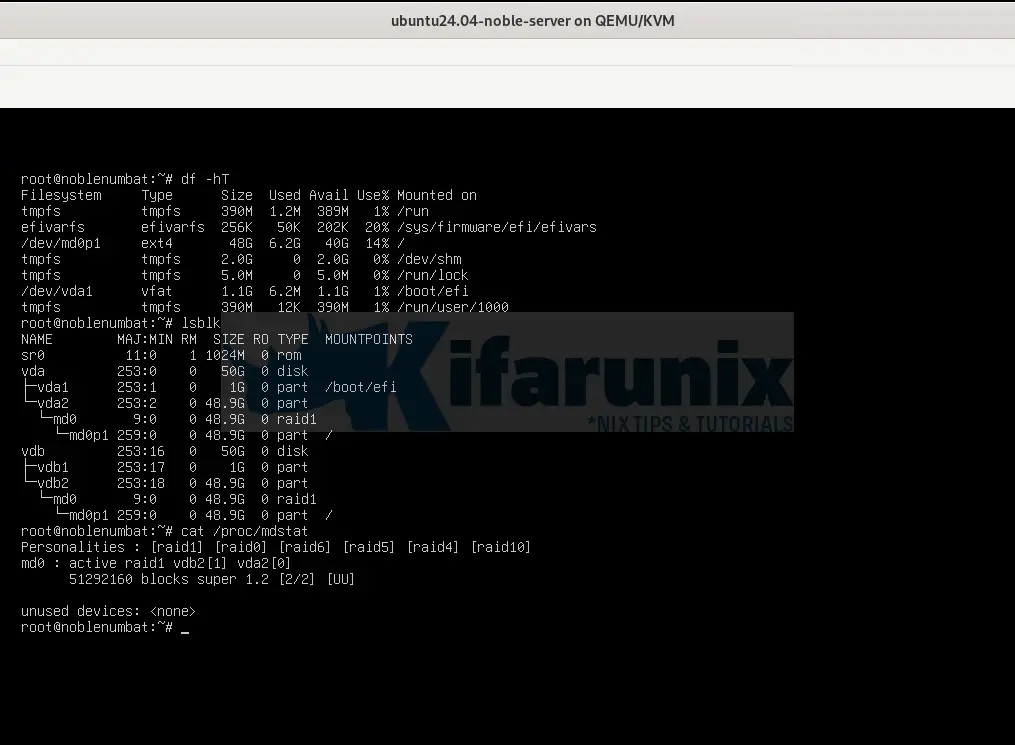
As you can see, we have the two drives, mounted as / under raid 1 configuration.
From the RAID stats;
cat /prod/mdstatPersonalities : [raid1] [raid0] [raid6] [raid5] [raid4] [raid10]
md0 : active raid1 vdb2[1] vda2[0]
51292160 blocks super 1.2 [2/2] [UU]
unused devices: <none>
Where:
- md0: This indicates the name of the RAID array.
- Active RAID 1: Specifies that the array is configured as RAID 1, which mirrors data across two disks for redundancy.
- vdb2[1] vda2[0]: These are the physical devices included in the RAID array:
vdb2is the second partition of the second virtual disk.vda2is the second partition of the first virtual disk.
- [2/2] [UU]: This indicates the number of active devices in the array:
- 2/2: There are two devices present, and both are active.
- [UU]: Both devices are functioning correctly (indicated by “U” for “up”).
Make Boot Devices Redundant
As you can see from our devices screenshot above, the ESP partition that is currently being used is loaded under /dev/vda1. Remember we set both vda1 and vdb1 as boot devices. Now, how to make sure that, if either of the drives crushes, we can still be able to boot into our OS?
As you can see now, ESP is on /boot/efi is on Drive 1, /dev/vda. Let’s poweroff the system, and detach the second drive, /dev/vdb and boot to see.
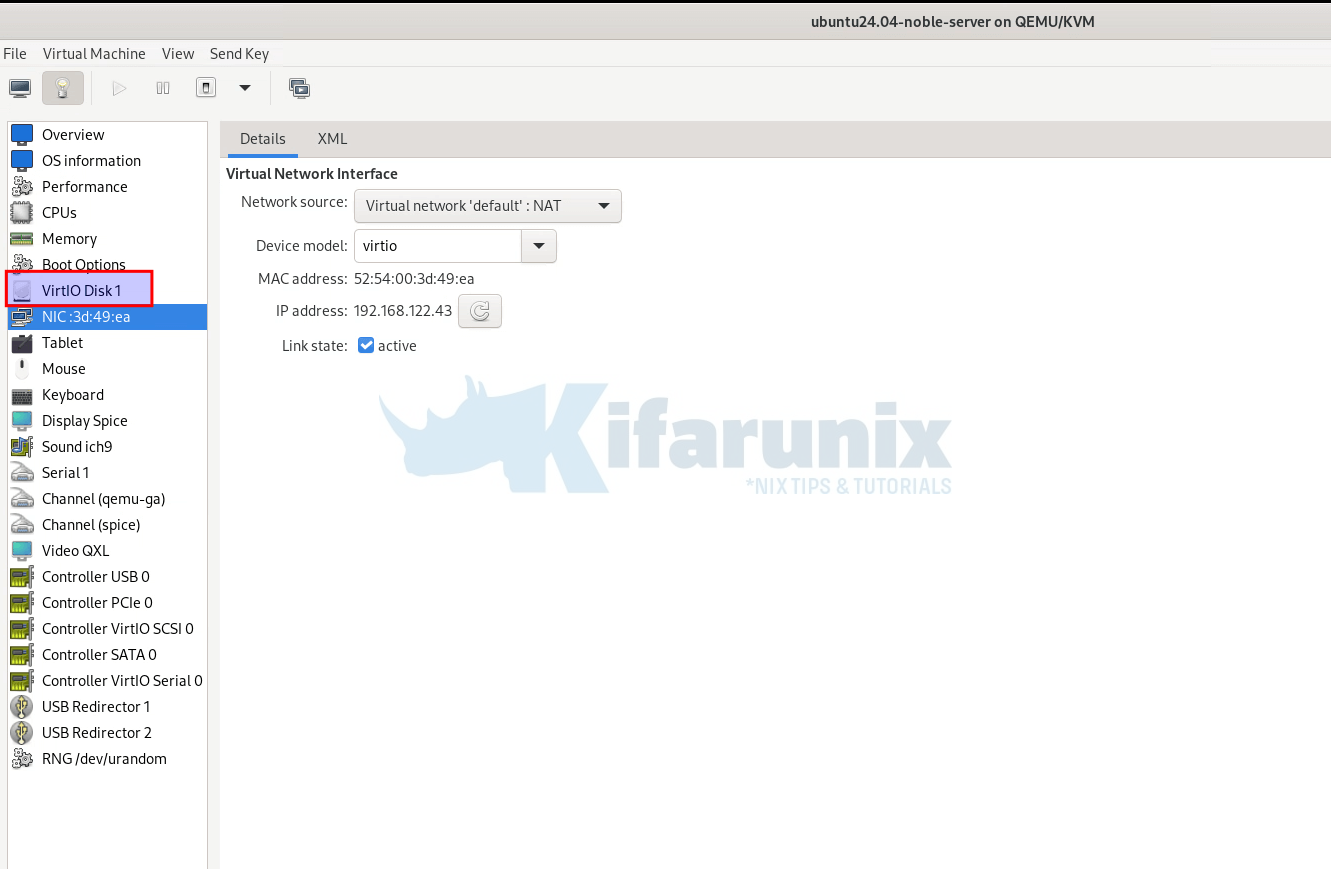
And when we boot, it boots fine.
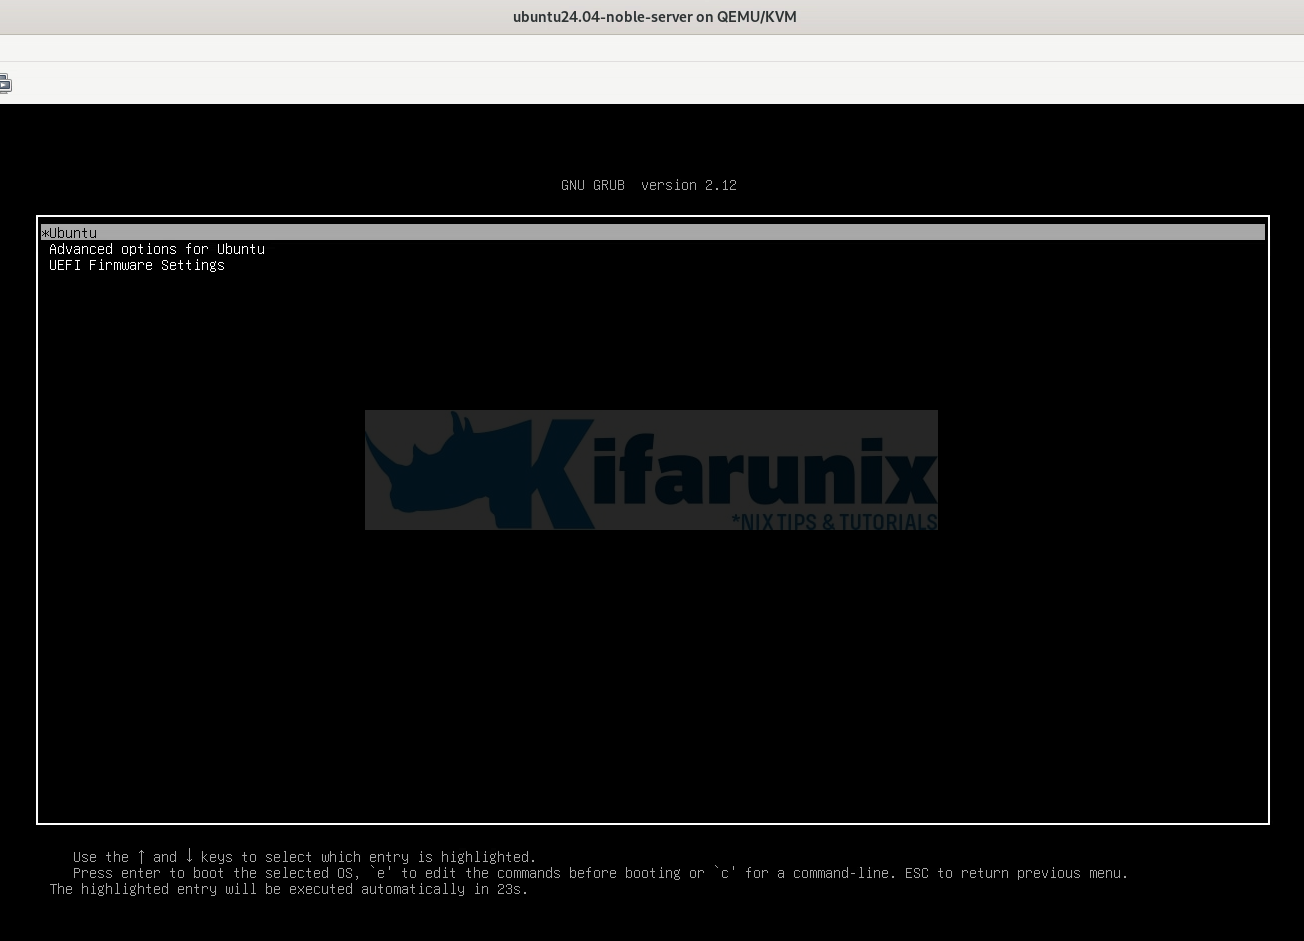
Drives;
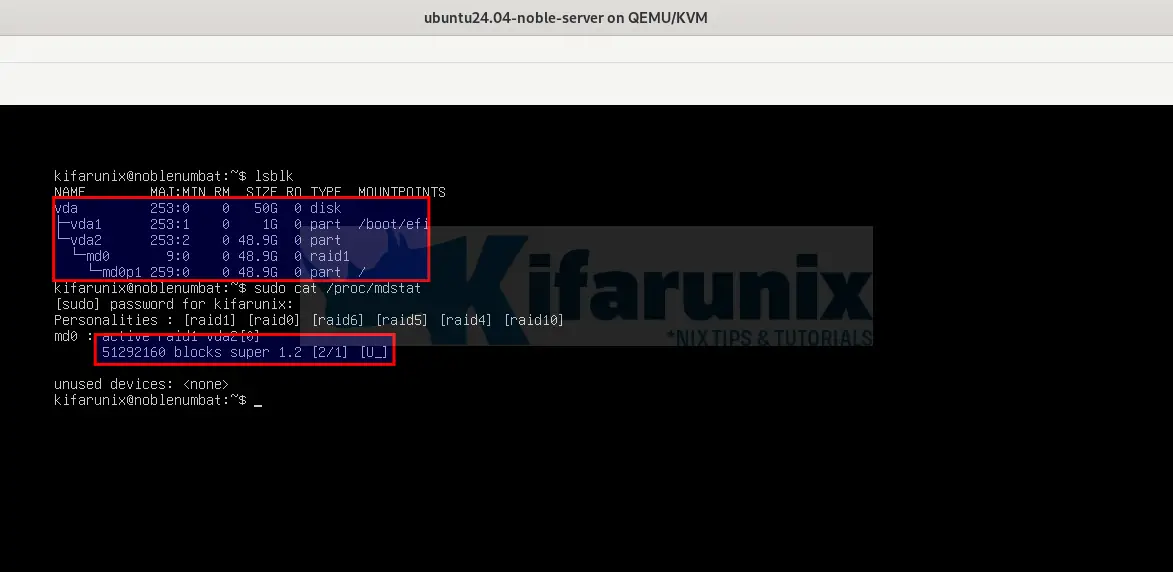
As you can see, one of the RAID drives is out!
Personalities : [raid1] [raid0] [raid6] [raid5] [raid4] [raid10]
md0 : active raid1 vda2[0]
      51292160 blocks super 1.2 [2/1] [U_]

unused devices: <none>
- vdb2 is out.
- [2/1]: 1 out of 2 devices is active
- [U_]: First device is up and running. The second device is missing or not functioning.
But, what if vda device goes out! Well, this is a sample result of booting from the drive 2.
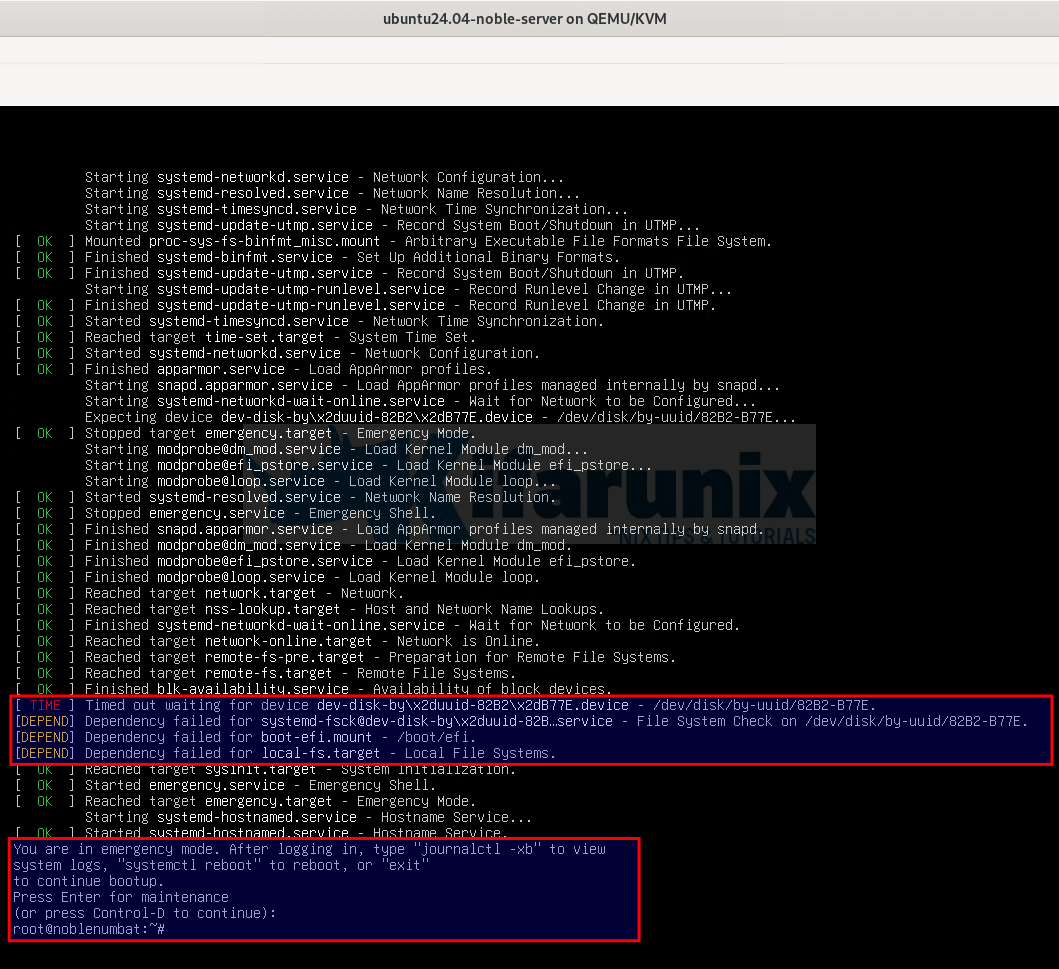
As you can see, the init system is unable to find the boot device that is defined on the /etc/fstab file. Remember, /boot/efi was on /dev/vda1 during curtin installation and since we have removed this device or “this device has crashed” and the second device, /dev/vdb1 UUID was different from /dev/vda1 UUID, the init system wont find it and thus it will trigger the “timed out waiting for dev device” error.
So, how to ensure that both boot devices, /dev/vda1 and /dev/vdb1 have the same UUID as defined on fstab?
While the system is booted correctly, with both drives in place, get the fstab contents;
cat /etc/fstab# /etc/fstab: static file system information.
#
# Use 'blkid' to print the universally unique identifier for a
# device; this may be used with UUID= as a more robust way to name devices
# that works even if disks are added and removed. See fstab(5).
#
# <file system> <mount point> <type> <options> <dump> <pass>
# / was on /dev/md0p1 during curtin installation
/dev/disk/by-id/md-uuid-c56bf47a:1eea5e7d:b67dde6b:9edd4170-part1 / ext4 defaults 0 1
# /boot/efi was on /dev/vda1 during curtin installation
/dev/disk/by-uuid/82B2-B77E /boot/efi vfat defaults 0 1
/swap.img none swap sw 0 0
Boot device, vda1 UUID is 82B2-B77E
Confirm with blkid command;
blkid/dev/vdb2: UUID="c56bf47a-1eea-5e7d-b67d-de6b9edd4170" UUID_SUB="59f73e67-4d88-c50e-f881-04448dd254ed" LABEL="ubuntu-server:0" TYPE="linux_raid_member" PARTUUID="08f7f490-c31d-45d6-9a5b-76b721a115e2"
/dev/vdb1: UUID="82C6-AF47" BLOCK_SIZE="512" TYPE="vfat" PARTUUID="989fc25f-6f49-44b8-be1d-5e36e48672dc"
/dev/md0p1: UUID="28dd75dc-9521-48f2-849b-a85d1bc65010" BLOCK_SIZE="4096" TYPE="ext4" PARTUUID="ff028f11-f996-46ba-9d17-e290c7139d23"
/dev/vda2: UUID="c56bf47a-1eea-5e7d-b67d-de6b9edd4170" UUID_SUB="b9ef4a9f-230c-2038-3676-59bf9e11de4e" LABEL="ubuntu-server:0" TYPE="linux_raid_member" PARTUUID="640af299-ccba-444c-bd60-4ee6dc71f1a3"
/dev/vda1: UUID="82B2-B77E" BLOCK_SIZE="512" TYPE="vfat" PARTUUID="35a36d5e-88c6-4193-b1f0-48b5f04de14e"
As you can see, the two boot devices have different UUID, and yet only one entry can be defined on fstab.
So, to ensure this is same, let’s clone /dev/vda1 to /dev/vdb1 so they can have similar properties.
Be cautious while using dd command against devices!! Double check the input and output devices!
dd if=/dev/vda1 of=/dev/vdb1 status=progressWhen done, let’s confirm the UUIDs of both boot devices.
blkid | grep -E "vda1|vdb1"/dev/vdb1: UUID="82B2-B77E" BLOCK_SIZE="512" TYPE="vfat" PARTUUID="989fc25f-6f49-44b8-be1d-5e36e48672dc"
/dev/vda1: UUID="82B2-B77E" BLOCK_SIZE="512" TYPE="vfat" PARTUUID="35a36d5e-88c6-4193-b1f0-48b5f04de14e"
Now, they have same UUID for boot devices.
As such, if one of the RAID drives for root filesystem crushes, you should still be able to boot into the other.
Also, our the UEFI boot manager is one and the same, and boot device part UUID is automatically updated based on available device, so no need, I believe, to create bootloader manually on the drive!
efibootmgr -vBootCurrent: 0001
Timeout: 0 seconds
BootOrder: 0002,0001,0000,0003
Boot0000* UiApp FvVol(7cb8bdc9-f8eb-4f34-aaea-3ee4af6516a1)/FvFile(462caa21-7614-4503-836e-8ab6f4662331)
dp: 04 07 14 00 c9 bd b8 7c eb f8 34 4f aa ea 3e e4 af 65 16 a1 / 04 06 14 00 21 aa 2c 46 14 76 03 45 83 6e 8a b6 f4 66 23 31 / 7f ff 04 00
Boot0001* UEFI Misc Device PciRoot(0x0)/Pci(0x2,0x4)/Pci(0x0,0x0){auto_created_boot_option}
dp: 02 01 0c 00 d0 41 03 0a 00 00 00 00 / 01 01 06 00 04 02 / 01 01 06 00 00 00 / 7f ff 04 00
data: 4e ac 08 81 11 9f 59 4d 85 0e e2 1a 52 2c 59 b2
Boot0002* Ubuntu HD(1,GPT,35a36d5e-88c6-4193-b1f0-48b5f04de14e,0x800,0x219800)/File(\EFI\ubuntu\shimx64.efi)
dp: 04 01 2a 00 01 00 00 00 00 08 00 00 00 00 00 00 00 98 21 00 00 00 00 00 5e 6d a3 35 c6 88 93 41 b1 f0 48 b5 f0 4d e1 4e 02 02 / 04 04 34 00 5c 00 45 00 46 00 49 00 5c 00 75 00 62 00 75 00 6e 00 74 00 75 00 5c 00 73 00 68 00 69 00 6d 00 78 00 36 00 34 00 2e 00 65 00 66 00 69 00 00 00 / 7f ff 04 00
Boot0003* EFI Internal Shell FvVol(7cb8bdc9-f8eb-4f34-aaea-3ee4af6516a1)/FvFile(7c04a583-9e3e-4f1c-ad65-e05268d0b4d1)
dp: 04 07 14 00 c9 bd b8 7c eb f8 34 4f aa ea 3e e4 af 65 16 a1 / 04 06 14 00 83 a5 04 7c 3e 9e 1c 4f ad 65 e0 52 68 d0 b4 d1 / 7f ff 04 00
You can now test by rebooting the machine with single drive. I tested this and OS boots fine with each single drive!
And that is pretty much it on how to install Ubuntu 24.04 with UEFI and Software RAID 1. In our next guide, we will how to create software RAID 1 with LVM encryption and UEFI.
Check out our other tutorials on Ubuntu 24;


Great tutorial! It got me on the right track.
Did you ever get around to making this tutirial: In our next guide, we will how to create software RAID 1 with LVM encryption and UEFI.
I followed the steps in this turorial and tried with creating a LVM with LUKS encryption but it makes the installer crash. Without the encryption it works.
I was using Ubuntu Server 24.04.2 LTS
Thanks 🙌
Hi Kanin,
The team is working on that. When ready, it will be published. All the very best in the meantime.
Thanks for this. The screen shots made it much easier. I did this on a pair of new 2TB drives for a home server. Looks like for some reason it decided to make /dev/sdb the boot drive?
neal@bunky:/etc$ lsblk
NAME MAJ:MIN RM SIZE RO TYPE MOUNTPOINTS
loop0 7:0 0 4K 1 loop /snap/bare/5
loop1 7:1 0 73.9M 1 loop /snap/core22/2133
loop2 7:2 0 247.6M 1 loop /snap/firefox/6966
loop3 7:3 0 516.2M 1 loop /snap/gnome-42-2204/226
loop4 7:4 0 91.7M 1 loop /snap/gtk-common-themes/1535
loop5 7:5 0 50.8M 1 loop /snap/snapd/25202
loop6 7:6 0 226.2M 1 loop /snap/thunderbird/825
loop7 7:7 0 10.8M 1 loop /snap/snap-store/1270
loop8 7:8 0 248.8M 1 loop /snap/firefox/7024
sda 8:0 0 1.8T 0 disk
├─sda1 8:1 0 1G 0 part
└─sda2 8:2 0 1.8T 0 part
└─md0 9:0 0 1.8T 0 raid1
└─md0p1 259:0 0 1.8T 0 part /
sdb 8:16 0 1.8T 0 disk
├─sdb1 8:17 0 1G 0 part /boot/efi
└─sdb2 8:18 0 1.8T 0 part
└─md0 9:0 0 1.8T 0 raid1
└─md0p1 259:0 0 1.8T 0 part /
sr0 11:0 1 1024M 0 rom
So if I was brave enough, I’d DD in the opposite direction?
neal@bunky:/etc$ cat fstab
# /etc/fstab: static file system information.
#
# Use ‘blkid’ to print the universally unique identifier for a
# device; this may be used with UUID= as a more robust way to name devices
# that works even if disks are added and removed. See fstab(5).
#
#
# / was on /dev/md0p1 during curtin installation
/dev/disk/by-id/md-uuid-9eb03754:f270f80c:41a401dd:c5ac0451-part1 / ext4 defaults 0 1
# /boot/efi was on /dev/sdb1 during curtin installation
/dev/disk/by-uuid/9F14-C17F /boot/efi vfat defaults 0 1
Hello there,
Did you check the last part to make the boot devive redundant? https://kifarunix.com/install-ubuntu-24-04-with-uefi-and-software-raid-1/#make-boot-devices-redundant