In this tutorial, you will learn how to encrypt data at rest on Ceph Cluster OSD. Current release versions of Ceph now support data encryption at rest. But, what is encryption at rest? Encryption at rest basically means protecting the data that is written to or stored on drives from unauthorized access. If the drives containing data that is encrypted at rest falls on the hands of a malicious actor, they wont be able to access the data without access to the drive decryption keys.
Table of Contents
Encrypting Data at Rest on Ceph Cluster OSD
To demonstrate how you can encrypt data that is written to Ceph OSD, follow along this blog post.
What is the Possible Impact of Encryption on Ceph Performance?
Well, as much as you are trying to ensure that you maintain security and comply to some standards that requires data to be encrypted, is there any possible compromise on the performance of the Ceph with encryption on?
Yes, this topic has been extensively tested by Ceph and the results published on this post, Ceph Reef Encryption Performance. Read more before you can proceed.
Install Ceph Storage Cluster
In our previous guide, we learnt how to install and setup Ceph storage cluster.
Therefore, you can follow any of the following guides to install Ceph.
How to install and setup Ceph Storage cluster
You can stop at the point where you need to add the OSDs so that you can continue from the steps below to learn how to encrypt OSD while adding it to the Ceph cluster.
Add and Encrypt OSDs on Ceph Cluster
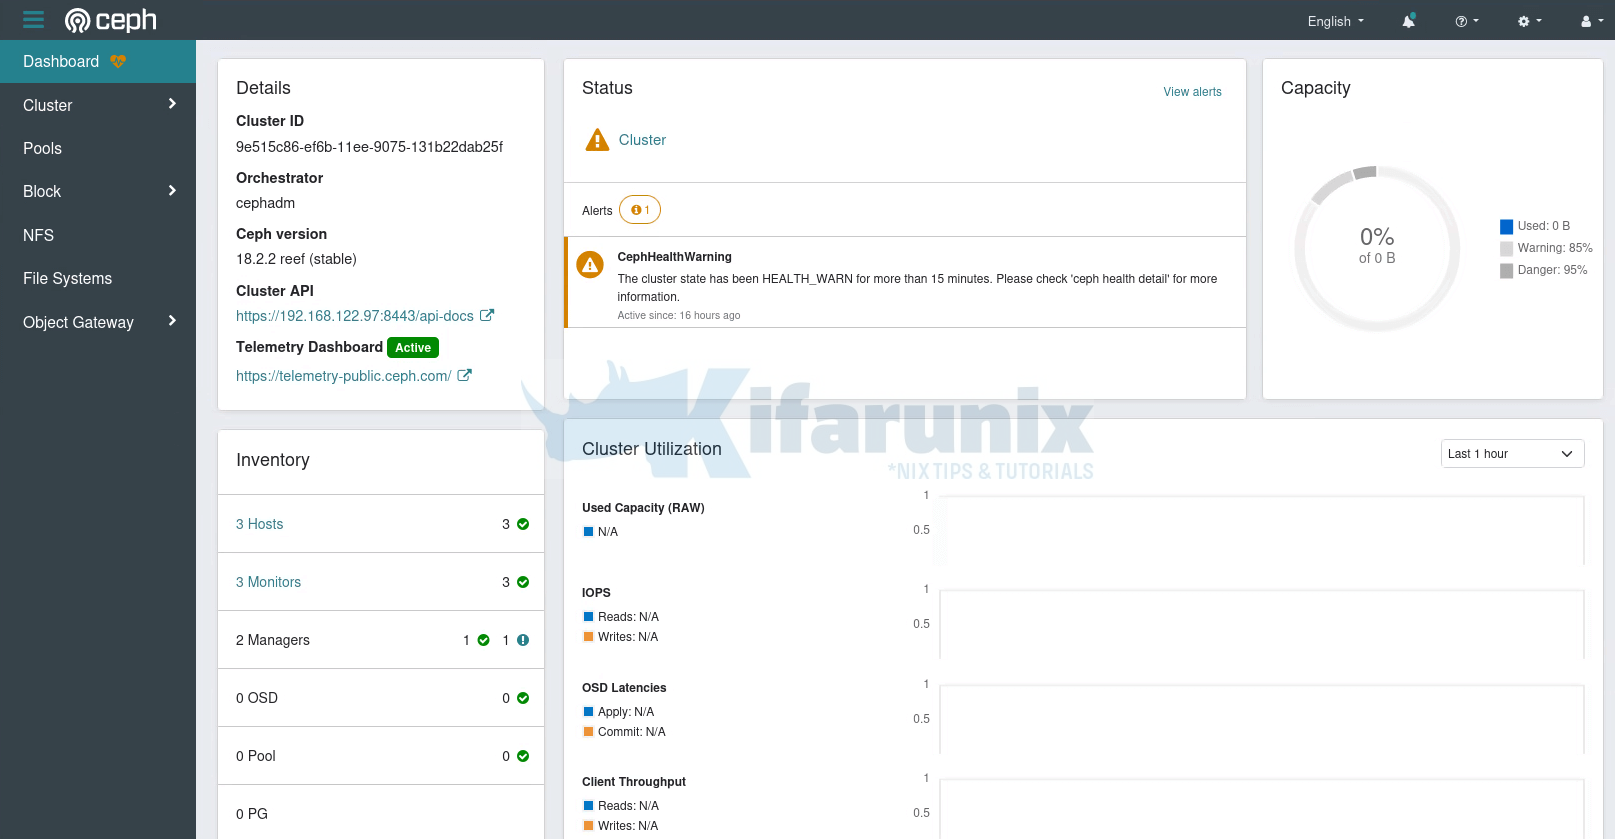
Our Ceph storage cluster is now running currently with no OSDs added.

As you can see, there is 0 OSDs added.
You can also confirm the same from the command line;
sudo ceph -s cluster:
id: 9e515c86-ef6b-11ee-9075-131b22dab25f
health: HEALTH_WARN
OSD count 0 < osd_pool_default_size 3
services:
mon: 3 daemons, quorum node01,node02,node03 (age 7h)
mgr: node01.mfinxk(active, since 17h), standbys: node02.qcxdky
osd: 0 osds: 0 up, 0 in
data:
pools: 0 pools, 0 pgs
objects: 0 objects, 0 B
usage: 0 B used, 0 B / 0 B avail
pgs:
In our setup, we have three Ceph OSD nodes each with un-allocated 100G raw drives. See example drives on one of the Ceph OSD node.
lsblkNAME MAJ:MIN RM SIZE RO TYPE MOUNTPOINTS
vda 252:0 0 25G 0 disk
├─vda1 252:1 0 1M 0 part
├─vda2 252:2 0 2G 0 part /boot
└─vda3 252:3 0 23G 0 part
└─ubuntu--vg-ubuntu--lv 253:0 0 23G 0 lvm /
vdb 252:16 0 100G 0 disk
LUKS and dm-crypt can be used in Ceph to encrypt block devices.
According to Ceph Encryption page;
- Logical volumes can be encrypted using
dmcryptby specifying the--dmcryptflag when creating OSDs. - Ceph currently uses LUKS (version 1) due to wide support by all Linux distros supported by Ceph.
Add and Encrypt OSDs from the Ceph Dashboard
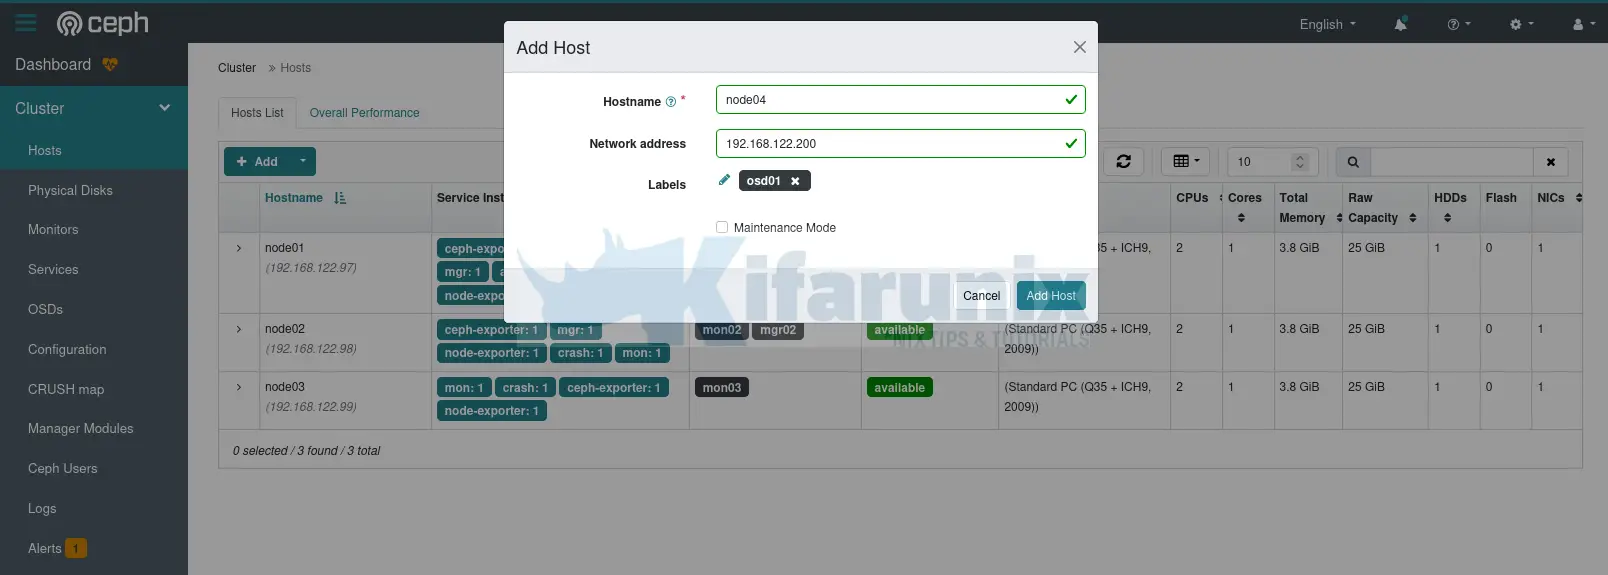
To add and encrypt Ceph OSD from the dashboard, first add OSD hosts to the cluster by navigating to the Dashboard and head over to Cluster > Hosts > Hosts List. Click +Add and follow the add host wizard to define the node hostname, IP address and the label.

Click Add Host. After a short while, the host will show up under the host lists;
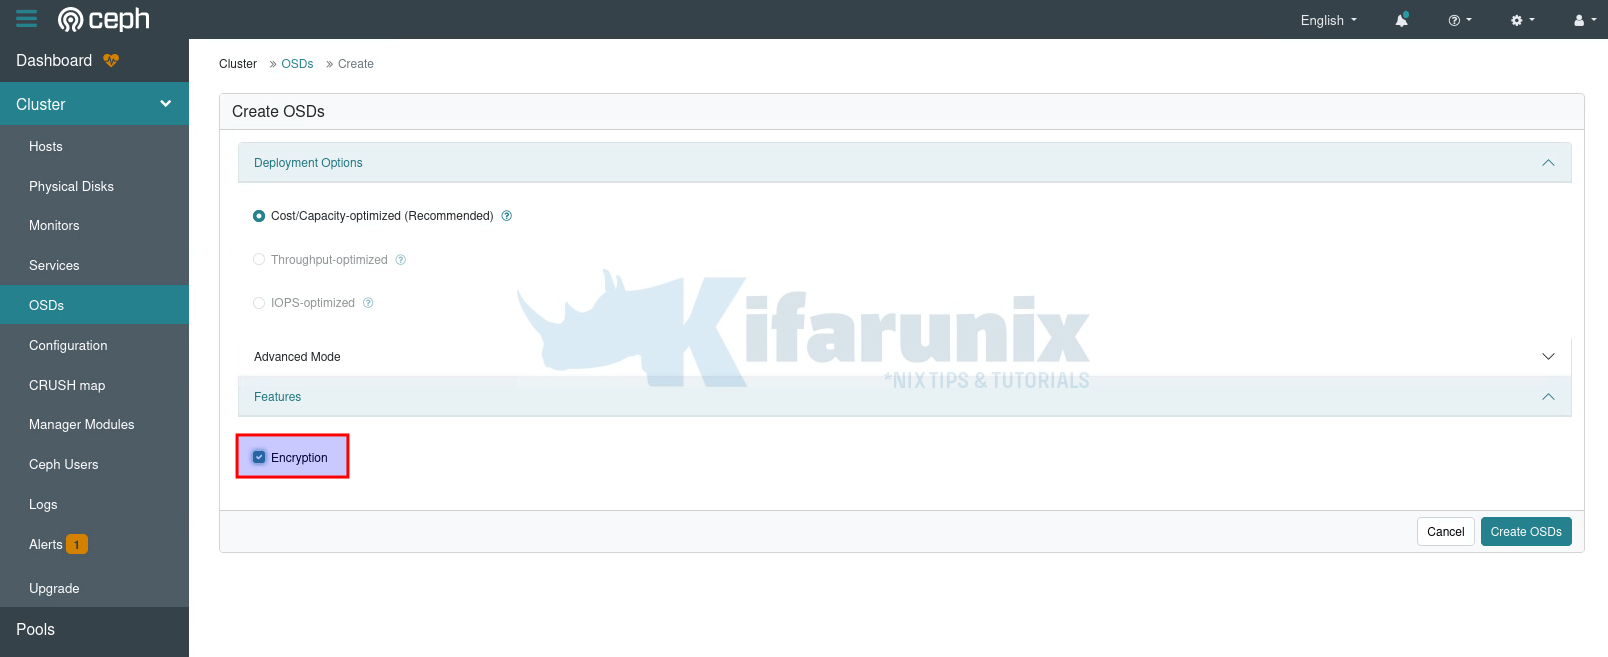
Once the host is up, you can proceed to add the OSD from Cluster > OSDs > OSDs List > +Create.

On the Create OSD screen:
- deployment options is automatically selected based on your node detected drive type.
- click advance mode drop down for more options such as being able to select or choose which drive to use for OSD on your node if it has multiple drives attached. Otherwise, all available un-used drives will be used for OSD.
- Click the Encryption check box to enable OSD encryption.

- Click Create OSDs to create your encrypted OSD.
- After a short while, the OSD should now be added.

- Click the drop down button to see more OSD details.
If you had added multiple hosts with usable drives, those drives will be automatically added as OSDs and they will be automatically encrypted as well.
Similarly, if you add any additional host, with drives that can be used as OSDs, then those drives will be automatically detected and used as OSDs. And of course, they will be encrypted as well!
Use OSD Service Specification to Enable OSD Encryption
Let’s assume have added storage hosts to your cluster already;
sudo ceph orch host lsHOST ADDR LABELS STATUS
node01 192.168.122.97 _admin,mon01
node02 192.168.122.98 mon02
node03 192.168.122.99 mon03
node04 192.168.122.200 osd01
node05 192.168.122.201 osd02
5 hosts in cluster
Once you have the hosts in place, with drives that can be used as OSDs attached to the OSD nodes;
sudo ceph orch device lsHOST PATH TYPE DEVICE ID SIZE AVAILABLE REFRESHED REJECT REASONS
node04 /dev/vdb hdd 100G Yes 5s ago
node05 /dev/vdb hdd 100G Yes 5s ago
then proceed to add create new OSDs and encrypt them.
OSD service specification is file that defines the OSD drives configurations. This configuration file gives you the ability to either enable or disable OSD encryption.
This is a sample OSD service specification (Extracted from an already cluster with OSDs added);
sudo ceph orch ls --service-type osd --exportservice_type: osd
service_id: cost_capacity
service_name: osd.cost_capacity
placement:
host_pattern: '*'
spec:
data_devices:
rotational: 1
encrypted: true
filter_logic: AND
objectstore: bluestore
So, what are the properties of OSD service specification:
- service_type: Specifies the type of Ceph service which can be any of the
mon,crash,mds,mgr,osdorrbd-mirror, or a gateway (nfsorrgw), part of the monitoring stack (alertmanager,grafana,node-exporterorprometheus) or (container) for custom containers. - service_id: Unique name identifier of the service such as OSD deployment option as used in the example above. It is recommended that the OSD spec defines the service_id.
- service_name: defines custom name of the service.
- placement: define the hosts on which the OSDs need to be deployed. It can take any of the following options:
- host_pattern: A host name pattern used to select hosts. ‘*’ mean all hosts (including even those that will be added later), “host[1-3]” matches host1, host2, host3…
- label: A label used in the hosts where OSD need to be deployed.
- hosts: An explicit list of host names where OSDs needs to be deployed.
- Spec section defines the OSD device properties;
- data_devices: Define the devices to deploy OSD and the attributes of those devices. For example, rotational specifies whether drive is NVME/SSD =0 or normal HDD=1.
- encrypted: Specifies whether to encrypt the OSD drives with LUKS (true) or no (false).
- filter_logic: defines the logic used to match disks with filters. The default value is ‘AND’.
- objectstore: defines the Ceph storage backend, which is bluestore.
You can define specs for different drives. Just separate the specifications from each using — in the yaml file.
So you can create your own OSD specification file and apply to create OSDs based on your specifications.
In this guide, we will use the specification above to create and encrypt our OSDs.
So, let’s create a YAML file to put out OSD drives specification parameters.
cat > osd-spec.yaml << EOL
service_type: osd
service_id: cost_capacity
service_name: osd.cost_capacity
placement:
  host_pattern: '*'
spec:
  data_devices:
    rotational: 1
  encrypted: true
  filter_logic: AND
  objectstore: bluestore
EOL
Once you are ready to go, then use ceph command to apply the specifications into the cluster.
Before you can write the changes, do a dry run;
sudo ceph orch apply -i osd-spec.yaml --dry-runWhen you execute the command first time, you will have to wait a little bit, Preview data is being generated.. Please re-run this command in a bit.
Then re-run the command;
sudo ceph orch apply -i osd-spec.yaml --dry-runSample output;
WARNING! Dry-Runs are snapshots of a certain point in time and are bound
to the current inventory setup. If any of these conditions change, the
preview will be invalid. Please make sure to have a minimal
timeframe between planning and applying the specs.
####################
SERVICESPEC PREVIEWS
####################
+---------+------+--------+-------------+
|SERVICE  |NAME  |ADD_TO  |REMOVE_FROM  |
+---------+------+--------+-------------+
+---------+------+--------+-------------+
################
OSDSPEC PREVIEWS
################
+---------+---------------+--------+----------+----+-----+
|SERVICE  |NAME           |HOST    |DATA      |DB  |WAL  |
+---------+---------------+--------+----------+----+-----+
|osd      |cost_capacity  |node04  |/dev/vdb  |-   |-    |
|osd      |cost_capacity  |node05  |/dev/vdb  |-   |-    |
+---------+---------------+--------+----------+----+-----+
If all is well, write the changes!
sudo ceph orch apply -i osd-spec.yamlYou can also be able to apply the specifications from the standard input without using the file;
cat << EOL | sudo ceph orch apply -i -
service_type: osd
service_id: cost_capacity
service_name: osd.cost_capacity
placement:
  host_pattern: '*'
spec:
  data_devices:
    rotational: 1
  encrypted: true
  filter_logic: AND
  objectstore: bluestore
EOL
Check the OSD status;
sudo ceph osd statusID HOST USED AVAIL WR OPS WR DATA RD OPS RD DATA STATE
0 node04 26.2M 99.9G 0 0 0 0 exists,up
1 node05 426M 99.5G 0 0 0 0 exists,up
Check Ceph status;
sudo ceph -s cluster:
id: ad7f576a-f1de-11ee-b470-fb0098ab30ad
health: HEALTH_WARN
OSD count 2 < osd_pool_default_size 3
services:
mon: 5 daemons, quorum node01,node02,node03,node05,node04 (age 5h)
mgr: node02.ptcclf(active, since 5h), standbys: node04.oenghv
osd: 2 osds: 2 up (since 58s), 2 in (since 87s)
data:
pools: 0 pools, 0 pgs
objects: 0 objects, 0 B
usage: 452 MiB used, 200 GiB / 200 GiB avail
pgs:
Status from Dashboard;

From command line, you can add additional OSD nodes and label it.
sudo ceph orch host add node06 192.168.122.202 osd03Ceph will the scan the host for the availability of the un-allocated drives and set that up as OSD. It also enables encryption at the same time since you have already enabled OSD encryption, in cluster wide.
sudo ceph -s cluster:
id: ad7f576a-f1de-11ee-b470-fb0098ab30ad
health: HEALTH_OK
services:
mon: 5 daemons, quorum node01,node02,node03,node05,node04 (age 6h)
mgr: node02.ptcclf(active, since 6h), standbys: node04.oenghv
osd: 3 osds: 2 up (since 20m), 3 in (since 10s)
data:
pools: 0 pools, 0 pgs
objects: 0 objects, 0 B
usage: 452 MiB used, 200 GiB / 200 GiB avail
pgs:
We have added three OSD nodes;
sudo ceph orch host lsHOST ADDR LABELS STATUS
node01 192.168.122.97 _admin,mon01,mgr01
node02 192.168.122.98 mon02,mgr02
node03 192.168.122.99 mon03
node04 192.168.122.200 osd01
node05 192.168.122.201 osd02
node06 192.168.122.202 osd03
6 hosts in cluster
Encrypt OSDs from the Command Line using ceph-volume Command
Ceph provides yet another command that can be used to manually manage various OSD operations such as preparing, activating, creating, deleting, scanning OSD drives on the OSD nodes. ceph-volume can be used to enable encryption for the underlying OSD devices when they are being added into the Ceph storage cluster. Read more on the ceph-volume man page/documentation.
The command is not usually installed by default. Therefore, on all OSD nodes, install the ceph-volume package to get the ceph-volume command.
(We are using Ubuntu OS on our OSD nodes, refer to documentation on how to install ceph-volume for other Linux distros)
sudo su -wget -q -O- 'https://download.ceph.com/keys/release.asc' | \
gpg --dearmor -o /etc/apt/trusted.gpg.d/cephadm.gpgecho deb https://download.ceph.com/debian-reef/ $(lsb_release -sc) main \
> /etc/apt/sources.list.d/cephadm.listapt updateapt install ceph-volumeYou can even check the help page;
ceph-volume -hOnce the package is in place:
- proceed to define how the OSD client nodes will connect to the Ceph cluster monitor nodes. This can be achieved by editing or creating (if it does not exist) the ceph.conf file on the OSD client and defining the monitor nodes addresses.
- Similarly, in order for the ceph-volume client to bootstrap the OSD on the Ceph cluster, it requires the client OSD boostrap keys installed on the OSD nodes. The key is used to authenticate and authorize the OSD ceph client to boostrap OSD. You can place the key in the ceph.conf file in the client node.
Sample config;
sudo cat /etc/ceph/ceph.conf# minimal ceph.conf for 8a7f658e-f3f5-11ee-9a19-4d1575fdfd98
[global]
fsid = 8a7f658e-f3f5-11ee-9a19-4d1575fdfd98
mon_host = [v2:192.168.122.78:3300/0,v1:192.168.122.78:6789/0] [v2:192.168.122.79:3300/0,v1:192.168.122.79:6789/0] [v2:192.168.122.80:3300/0,v1:192.168.122.80:6789/0] [v2:192.168.122.90:3300/0,v1:192.168.122.90:6789/0] [v2:192.168.122.91:3300/0,v1:192.168.122.91:6789/0]
Therefore, run this command on the admin node to copy the ceph.conf into the OSD nodes.
ceph config generate-minimal-conf | ssh root@node03 '[ ! -d /etc/ceph ] && mkdir -p /etc/ceph; cat > /etc/ceph/ceph.conf'This installs ceph.conf on node03, which is one of my OSD nodes. Do the same on other OSD nodes.
Append the Ceph client OSD bootstrap authentication key, client.bootstrap-osd, to the ceph.conf file copied above.
You can confirm presence of this key on the Ceph admin node;
sudo ceph auth listYou can check the key details by running;
sudo ceph auth get client.bootstrap-osd[client.bootstrap-osd]
key = AQCWERFmBvnRFxAANvFxM+D/QKGZwi40R91uWQ==
caps mon = "allow profile bootstrap-osd"
So, copy the bootstrap key and append it to ceph.conf file on the OSD client node.
ceph auth get client.bootstrap-osd | ssh root@node03 '[ ! -d /etc/ceph ] && mkdir -p /etc/ceph; cat >> /etc/ceph/ceph.conf'This is how the OSD client Ceph configuration now looks like.
root@node03:~# cat /etc/ceph/ceph.conf# minimal ceph.conf for 8a7f658e-f3f5-11ee-9a19-4d1575fdfd98
[global]
fsid = 8a7f658e-f3f5-11ee-9a19-4d1575fdfd98
mon_host = [v2:192.168.122.78:3300/0,v1:192.168.122.78:6789/0] [v2:192.168.122.79:3300/0,v1:192.168.122.79:6789/0] [v2:192.168.122.90:3300/0,v1:192.168.122.90:6789/0] [v2:192.168.122.91:3300/0,v1:192.168.122.91:6789/0]
[client.bootstrap-osd]
	key = AQCWERFmBvnRFxAANvFxM+D/QKGZwi40R91uWQ==
	caps mon = "allow profile bootstrap-osd"
Now that the Ceph OSD client authentication to the Ceph cluster is sorted, proceed to create and OSD and enable LUKs encryption using ceph-volume command.
lsblkNAME MAJ:MIN RM SIZE RO TYPE MOUNTPOINTS
vda 252:0 0 50G 0 disk
├─vda1 252:1 0 1M 0 part
├─vda2 252:2 0 2G 0 part /boot
└─vda3 252:3 0 48G 0 part
└─ubuntu--vg-ubuntu--lv 253:0 0 48G 0 lvm /
vdb 252:16 0 100G 0 disk
ceph-volume lvm create --bluestore --data /dev/vdb --dmcryptIf the command proceeded successfully, you should see;
...
Running command: /usr/bin/systemctl enable --runtime ceph-osd@0
Running command: /usr/bin/systemctl start ceph-osd@0
--> ceph-volume lvm activate successful for osd ID: 0
--> ceph-volume lvm create successful for: /dev/vdb
Note that the Ceph status may show OSDs added via ceph-volume as stray. This is because in a cephadm managed cluster, then the cluster expects the OSDs to be added via cephadm command.
This should confirm that the OSD is fine and works as expected despite the stray alert.
ceph osd statusID HOST USED AVAIL WR OPS WR DATA RD OPS RD DATA STATE 0 node03 27.3M 99.9G 0 0 0 0 exists,up
Verifying Ceph OSD Encryption
Will that said and done, how can you actually verify and confirm that your OSDs are indeed encrypted?
Use blkid or lsblk commands
As you are already aware, Ceph uses LUKS to encrypt devices. LUKS utilizes dm-crypt (device mapper crypt) to perform the actual encryption and decryption operations.
Therefore, to check if your OSD drives have been encrypted, you can use lsblk or blkid commands to check if the type device has been set to crypt.
lsblkvda 252:0 0 25G 0 disk
├─vda1 252:1 0 1M 0 part
├─vda2 252:2 0 2G 0 part /boot
└─vda3 252:3 0 23G 0 part
└─ubuntu--vg-ubuntu--lv 253:0 0 23G 0 lvm /
vdb 252:16 0 100G 0 disk
└─ceph--77ed4102--9aa3--46bb--a15c--ea153402a145-osd--block--032e3d0c--852a--47d7--9d8e--cb5edb5e9385 253:1 0 100G 0 lvm
└─Lf51dM-9AjA-VXcr-4Xzh-fg5V-NMC5-OtWm2G 253:2 0 100G 0 crypt
Check with blkid;
blkid/dev/mapper/ubuntu--vg-ubuntu--lv: UUID="3a831e3a-ad80-41f3-8522-a4dd0339a313" BLOCK_SIZE="4096" TYPE="ext4"
/dev/vda2: UUID="3fe75a77-1468-4afd-8cc0-16c918998504" BLOCK_SIZE="4096" TYPE="ext4" PARTUUID="516263b8-9f12-4606-97ac-00e662aa43ba"
/dev/vda3: UUID="6IXVle-syS2-5NBM-pSeG-2lmN-Xqds-3OVWmn" TYPE="LVM2_member" PARTUUID="6bb1ea38-2b0e-40f3-917c-6c0f35aed4ab"
/dev/mapper/ceph--77ed4102--9aa3--46bb--a15c--ea153402a145-osd--block--032e3d0c--852a--47d7--9d8e--cb5edb5e9385: UUID="533c9923-0d05-4728-b000-98e6073d352a" TYPE="crypto_LUKS"
/dev/vdb: UUID="hkpkHM-XSOw-8zOC-oOgp-1vpe-6FP5-8k02Cs" TYPE="LVM2_member"
/dev/mapper/Lf51dM-9AjA-VXcr-4Xzh-fg5V-NMC5-OtWm2G: TYPE="ceph_bluestore"
/dev/vda1: PARTUUID="46e914b8-4bad-4a15-a717-05f331e1348a"
Use dmsetup command
You can use dmsetup command to check device info;
sudo dmsetup infoLUKS encrypted devices should have “crypt” on UUID.
Name:              Lf51dM-9AjA-VXcr-4Xzh-fg5V-NMC5-OtWm2G
State:             ACTIVE
Read Ahead:        256
Tables present:    LIVE
Open count:        24
Event number:      0
Major, minor:      253, 2
Number of targets: 1
UUID: CRYPT-LUKS2-533c99230d054728b00098e6073d352a-Lf51dM-9AjA-VXcr-4Xzh-fg5V-NMC5-OtWm2G

Name:              ceph--77ed4102--9aa3--46bb--a15c--ea153402a145-osd--block--032e3d0c--852a--47d7--9d8e--cb5edb5e9385
State:             ACTIVE
Read Ahead:        256
Tables present:    LIVE
Open count:        1
Event number:      0
Major, minor:      253, 1
Number of targets: 1
UUID: LVM-nKdTOHbx49cPGV0oGwan8UHxWCnIUzPtLf51dM9AjAVXcr4Xzhfg5VNMC5OtWm2G

Name:              ubuntu--vg-ubuntu--lv
State:             ACTIVE
Read Ahead:        256
Tables present:    LIVE
Open count:        1
Event number:      0
Major, minor:      253, 0
Number of targets: 1
UUID: LVM-5FgBZu71fPGdhHYjBHMuBi3fkNg8brDb68qG8z9MtNnVnUjeG1Bg4EF8rfHc73Y8
Check device metadata using ceph-volume command
Next, check the device metadata and look for the keyword, encrypted. If the drive is encrypted, the value of this keyword should be 1, otherwise it is 0.
Also, remember, as much as we raw devices for OSD, Ceph formatted them and converted them info LVM.
See example from one of the OSD nodes;
ceph-volume lvm list====== osd.1 =======
[block] /dev/ceph-77ed4102-9aa3-46bb-a15c-ea153402a145/osd-block-032e3d0c-852a-47d7-9d8e-cb5edb5e9385
block device /dev/ceph-77ed4102-9aa3-46bb-a15c-ea153402a145/osd-block-032e3d0c-852a-47d7-9d8e-cb5edb5e9385
block uuid Lf51dM-9AjA-VXcr-4Xzh-fg5V-NMC5-OtWm2G
cephx lockbox secret AQAkggpmGHmONhAAnX5cWOks3Lr1ULJB8BnWGg==
cluster fsid 9e515c86-ef6b-11ee-9075-131b22dab25f
cluster name ceph
crush device class
encrypted 1
osd fsid 032e3d0c-852a-47d7-9d8e-cb5edb5e9385
osd id 1
osdspec affinity cost_capacity
type block
vdo 0
devices /dev/vdb
encrypted 1That confirms OSD drive encryption.
Verify Drive LUKS information
Now, that you have verified encryption is on, you can try to dump the drive information.
cryptsetup luksDump /dev/ceph-77ed4102-9aa3-46bb-a15c-ea153402a145/osd-block-032e3d0c-852a-47d7-9d8e-cb5edb5e9385From the ceph-volume list command above, you can get the block device path.
Sample output;
LUKS header information
Version:       	2
Epoch:         	3
Metadata area: 	16384 [bytes]
Keyslots area: 	16744448 [bytes]
UUID:          	533c9923-0d05-4728-b000-98e6073d352a
Label:         	(no label)
Subsystem:     	(no subsystem)
Flags:       	(no flags)

Data segments:
  0: crypt
	offset: 16777216 [bytes]
	length: (whole device)
	cipher: aes-xts-plain64
	sector: 512 [bytes]

Keyslots:
  0: luks2
	Key:        512 bits
	Priority:   normal
	Cipher:     aes-xts-plain64
	Cipher key: 512 bits
	PBKDF:      argon2i
	Time cost:  4
	Memory:     1048576
	Threads:    2
	Salt:       6c 4b 0b a7 d3 bd d0 7e af 83 3a a2 83 b1 4f 83
	            a3 07 38 06 16 dd 6b 2e cf 88 64 a1 18 7d a0 42
	AF stripes: 4000
	AF hash:    sha256
	Area offset:32768 [bytes]
	Area length:258048 [bytes]
	Digest ID:  0
Tokens:
Digests:
  0: pbkdf2
	Hash:       sha256
	Iterations: 163840
	Salt:       6b 51 27 28 10 4a ab 9c 0a 96 01 dd cc 4a 6e 73
	            fc ce 27 bd 97 69 cd 5a 67 14 a0 94 49 aa a1 12
	Digest:     81 25 76 0e a6 df e0 15 55 bc f5 15 62 db b2 0b
	            f2 9a 35 84 f8 46 4a fc cd ac f5 0c 19 a9 54 6e
Obtaining OSD Encryption Passphrase
Now that you have confirmed that the OSDs are encrypted with LUKS, where does Ceph store the OSD LUKS encryption passphrase?
In Ceph, OSD LUKS encryption keys are stored in the Ceph monitor nodes keyring as dm-crypt keys.
You can check the same from the authentication and capabilities using the command below;
sudo ceph auth listLook for keys like client.osd-lockbox.$OSD_UUID.
client.osd-lockbox.011bb406-c3f1-42ed-b614-0ea889c93956
	key: AQAgfgpmipDxMBAAr1Y8vrS/fF6wQwV1s3x/Qg==
	caps: [mon] allow command "config-key get" with key="dm-crypt/osd/011bb406-c3f1-42ed-b614-0ea889c93956/luks"
client.osd-lockbox.032e3d0c-852a-47d7-9d8e-cb5edb5e9385
	key: AQAkggpmGHmONhAAnX5cWOks3Lr1ULJB8BnWGg==
	caps: [mon] allow command "config-key get" with key="dm-crypt/osd/032e3d0c-852a-47d7-9d8e-cb5edb5e9385/luks"
client.osd-lockbox.a8df6061-c22b-452f-882b-01fbe7f42d93
	key: AQCOiQpmtc6xIhAArd2TL/Oypzc1MTqA0ShIQQ==
	caps: [mon] allow command "config-key get" with key="dm-crypt/osd/a8df6061-c22b-452f-882b-01fbe7f42d93/luks"
The format of the key/value is dm-crypt/osd/$OSD_UUID/luks.
You can get the OSD UUID using the ceph-volume command on the OSD node.
For example, on our node05 OSD;
sudo ceph-volume lvm list | grep fsid cluster fsid 9e515c86-ef6b-11ee-9075-131b22dab25f
osd fsid 032e3d0c-852a-47d7-9d8e-cb5edb5e9385
So, osd fsid is what is in they keyring above. Each encrypted OSD has it owns LUKS key.
To get more details about the OSD LUKS key, run the command below on the ceph admin node.
sudo ceph config-key get <key>To get the details of node05 OSD key, for example;
sudo ceph config-key get dm-crypt/osd/032e3d0c-852a-47d7-9d8e-cb5edb5e9385/luksSample passphrase;
rNcd0xk9vZpyUAxcRDpgB9bEW25nEhm4yEbncXAoHIy5jIdB4f6VitJTWbCWbww5dtHzkCZoeGyRa4F+gYFSpH+beNWnKW0PS7QZ5hRpfLD0f+01PS44tPeIKjWlhsh6+mwFUTmi3o7HUUprIqFtcRzcHTIzhG9V5OXXIfF09js=Test the passphrase on the OSD using cryptsetup command. The key above is for our Node05 OSD drive.
So, let’s verify!
sudo cryptsetup luksOpen --test-passphrase /dev/ceph-77ed4102-9aa3-46bb-a15c-ea153402a145/osd-block-032e3d0c-852a-47d7-9d8e-cb5edb5e9385Prompt for passphrase!
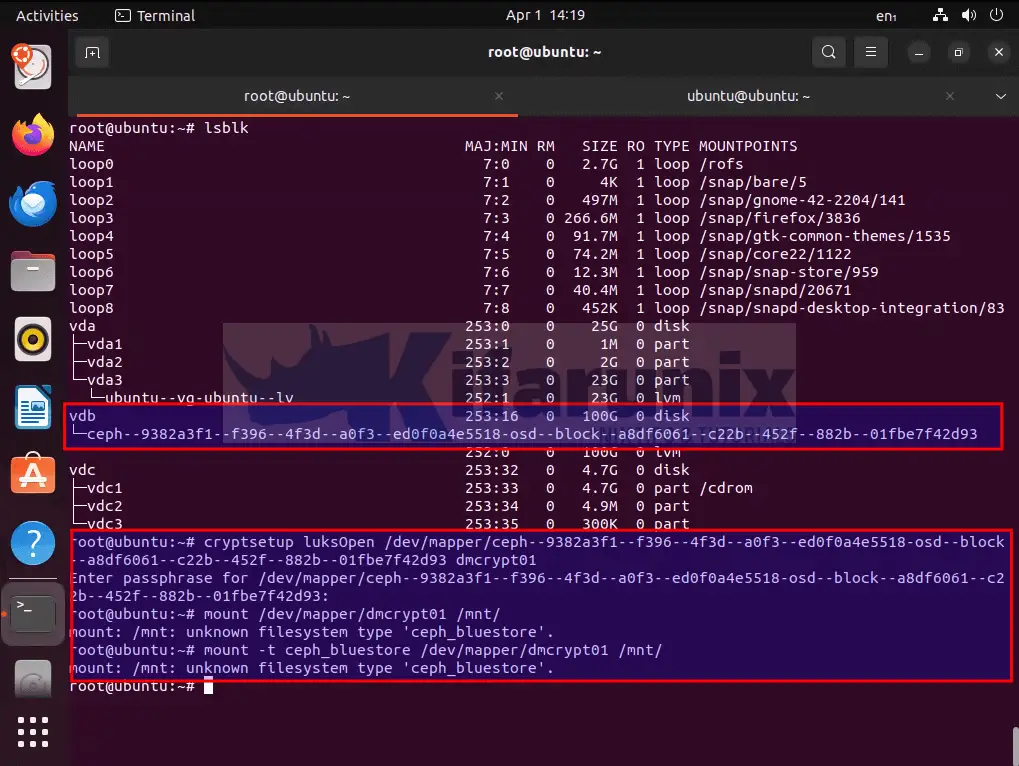
Enter passphrase for /dev/ceph-77ed4102-9aa3-46bb-a15c-ea153402a145/osd-block-032e3d0c-852a-47d7-9d8e-cb5edb5e9385: <paste the extracted base64 code above>You can even try to mount the drive on live Ubuntu or any other live OS.
See our live Ubuntu ISO trying to mount the encrypted OSD drive. If you have the right key, then open the LUKS device and mount.

And voila! that is it.
You can then check further how to mount the Ceph bluestore filesystem!
Conclusion
That concludes our guide! So, you need to ensure a restricted access to the Ceph cluster at all cost!
Read more on Ceph Encryption.

