Sometimes it is easier to connect to an OpenVPN server from the graphical user interface using the Network Manager. In this guide, we are going to show you how you can so easily connect to OpenVPN using Network Manager on CentOS 8/Ubuntu 18.04.
Connect to OpenVPN using Network Manager on CentOS 8/Ubuntu 18.04
Install NetworkManager VPN Plugin for OpenVPN
In order to be able to connect to create OpenVPN network profile and connect to an OpenVPN server via gui, you need to install NetworkManager vpn plugin for OpenVPN which provides the necessary software for integrating VPN capabilities with the OpenVPN server with NetworkManager.
On Ubuntu 18.04, the NetworkManager VPN plugin is available on the default repos and can be installed by running the command;
apt install network-manager-openvpnOn CentOS 8, you need to install EPEL repos to enable you install the NetworkManager VPN plugins;
dnf install epel-releaseThen install install the plugins;
dnf install NetworkManager-openvpnInstall NetworkManager VPN Plugin for GNOME
Apart from the OpenVPN NetworkManager plugin installed above, you as well need the plugin which provides GNOME bits of NetworkManager’s OpenVPN plugin otherwise you may get an error, Unable to load VPN connection editor, while adding OpenVPN connection profile.
On Ubuntu 18.04, you can install GNOME OpenVPN Network Manager plugin by running the command;
apt install network-manager-openvpn-gnomeOn CentOS 8, you as well need EPEL repos to install GNOME network manager openvpn plugin. Since we already installed them, you can simply execute the command below;
dnf install NetworkManager-openvpn-gnomeObtain OpenVPN Configuration File
In most cases, you would usually receive the CA certificate, the respective client certificate and key, the HMAC authentication key, below are examples of these files in the respective order for user koromicha that were generated on an OpenVPN server.
ca.crt
koromicha.crt
koromicha.key
ta.key
It is also possible to receive an OpenVPN configuration file (.ovpn) with all the above file contents put in-line.
koromicha.ovpnConnect to OpenVPN using Network Manager on CentOS 8/Ubuntu 18.04
Both CentOS 8 and Ubuntu 18.04 uses Gnome display environment by default and thus, how you connect to OpenVPN using NetworkManager is similar.
Launch the Network Settings and click the plus sign (+) on VPN section to add the VPN connection. You should see such a screen.
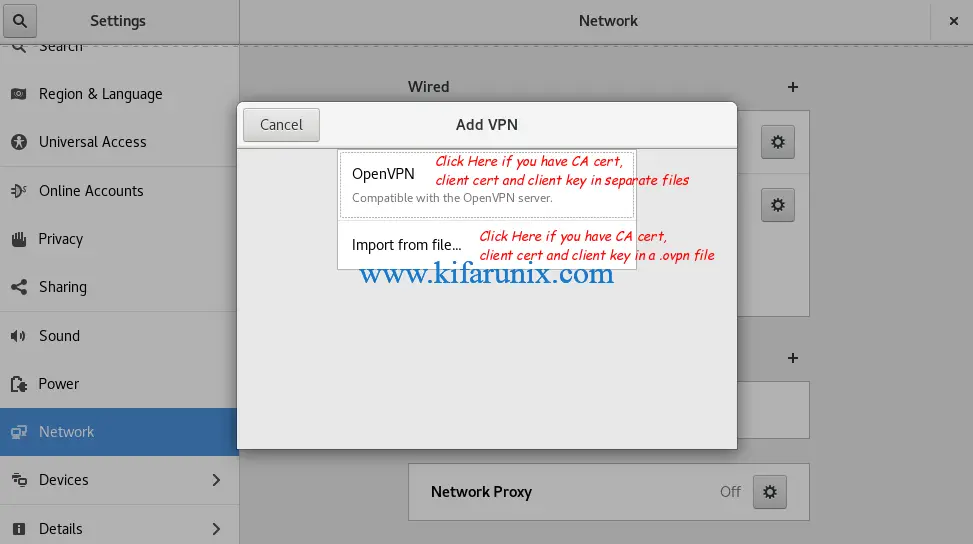
Two things here: if you have, the CA cert, the client cert and the client key in separate files, click OpenVPN otherwise click Import from file... as commented in the screenshot above.
When you click OpenVPN, such a screen as in below screenshot opens up. Set the name of the VPN connection, enter the VPN server IP and port on the Gateway bar, choose TLS Certificates for authentication type, import the CA cert, the client cert and the client key.
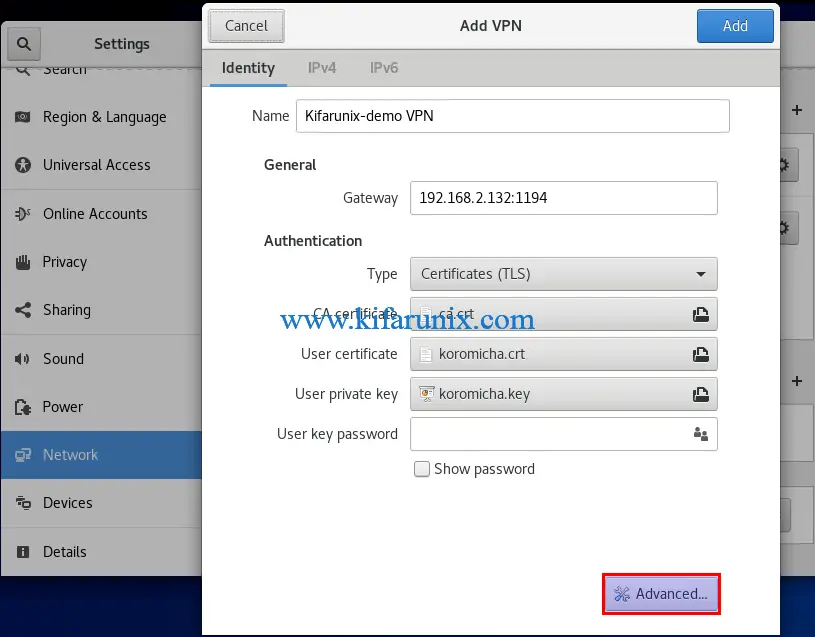
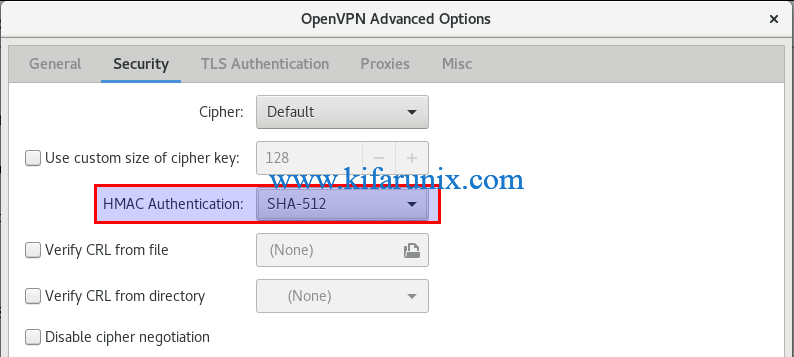
Pay attention to HMAC authentication (the use of ta.key). If your OpenVPN Server HMAC authentication enabled, click Advanced settings.
Click Security tab and set the HMAC algorithm to the value defined on the OpenVPN server.
Click on TLS Authentication tab and under additional TLS authentication or encryption, choose TLS Auth, select the ta.key file and set Key direction to 1.
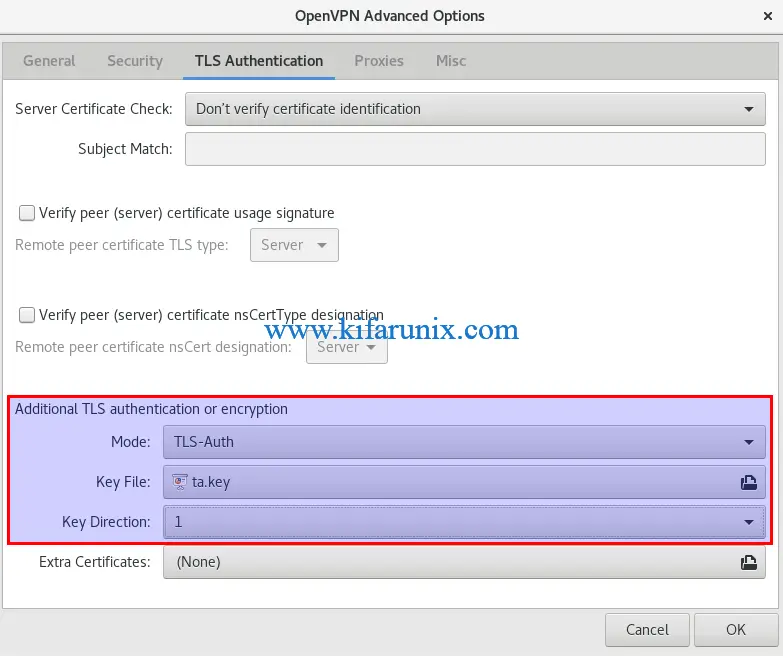
Click Ok when finished.
Ensure that the configurations sync with what is defined on the OpenVPN server configuration. Otherwise, connection will fail.
Once done, click Add to create VPN connection when done setting up the options.
Connect to VPN by toggling the ON/OFF switch button or from network connection icon.
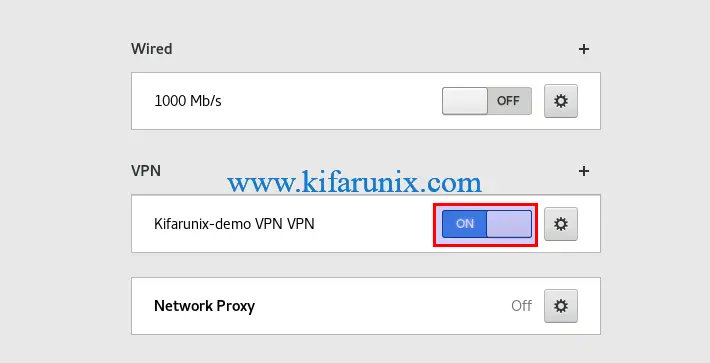
On CentOS 8, if SELinux is enforcing, the VPN interface may fail to turn on. Be sure to check the logs.
You can check assigned IP address;
[koromicha@centos8 ~]$ ip add show tun0
5: tun0: <POINTOPOINT,MULTICAST,NOARP,UP,LOWER_UP> mtu 1500 qdisc fq_codel state UNKNOWN group default qlen 100
    link/none
    inet 10.8.0.3/24 brd 10.8.0.255 scope global noprefixroute tun0
       valid_lft forever preferred_lft forever
    inet6 fe80::d4c6:3ff0:e4e6:ee04/64 scope link stable-privacy
       valid_lft forever preferred_lft forever
If you have a .ovpn config file, you can simly click Import from file. All other settings will be populates automatically.
You can as well use the openvpn or nmcli command to connect to VPN.
sudo openvpn --config koromicha.ovpnTo use NMCLI command;
nmcli connection import type openvpn file koromicha.ovpnCheck the connection;
nmcli con sNAME UUID TYPE DEVICE
Wired connection 1 ae6debaf-8fdd-34b5-8b6c-52e04b7b9e0e ethernet enp0s3
koromicha 474ef516-f077-4570-b87e-17342551400d vpn -- Bring up the VPN connection;
sudo nmcli con up koromichaWhen you bring it up, it creates a tun Interface with VPN IP;
nmcli con sNAME UUID TYPE DEVICE
Wired connection 1 ae6debaf-8fdd-34b5-8b6c-52e04b7b9e0e ethernet enp0s3
koromicha 474ef516-f077-4570-b87e-17342551400d vpn enp0s3
tun0 bb8044ed-90f3-4dd6-9ff0-86180edba4c6 tun tun0Great, That is all on how to connect to OpenVPN using Network Manager on CentOS 8/Ubuntu 18.04. Enjoy.
Related Tutorials
Assign Static IP Addresses for OpenVPN Clients
Install and Configure OpenVPN Client on CentOS 8/Ubuntu 18.04
Setup OpenVPN Server on CentOS 8


Hi Can you also do an autoconnect, with the conf method, directly from a new boot ? Like to open a terminal windows and ask for credential directly.. ?
thanks