In this tutorial, you will learn how to configure HTPasswd Identity Provider in OpenShift 4.x. The HTPasswd IdP is one of the many authentication options available in OpenShift, providing a simple way to manage user authentication through a password file. This method is particularly useful for smaller clusters or environments where LDAP or other complex identity providers aren’t required. By the end of this guide, you’ll have a fully working HTPasswd configuration in your OpenShift 4.x environment, ensuring secure and easy access for your users.
Table of Contents
How to Configure HTPasswd Identity Provider in OpenShift 4.x
By default, when OpenShift is installed, it creates a temporary admin account called kubeadmin for the initial administration of the cluster. This account is crucial for the first login and setup process but is not recommended for managing production, or even development/uat environments in the long run. As an administrator, one of your first tasks after installing OpenShift is configuring the OAuth server and specifying the identity provider (IdP) that will handle user authentication.
Managing user authentication is essential for the secure and efficient operation of your cluster. By specifying the correct identity provider, you ensure that only authorized users can access and manage resources, mitigating risks of unauthorized access and potential security breaches.
While production environments typically rely on robust identity providers like LDAP or OpenID Connect, the HTPasswd identity provider offers a simple, file-based solution that is ideal for development, testing, or proof-of-concept setups. This approach enables administrators to quickly set up authentication without the need for complex external systems, making it a fast and effective solution for non-production environments.
Supported Identity Providers in OpenShift 4.x
OpenShift 4.x supports a wide range of identity providers, each suited for different use cases. Below is a list of the supported identity providers in OpenShift:
- HTPasswd: Configures the HTPasswd identity provider to validate usernames and passwords against a flat file generated using
htpasswd. Ideal for small-scale, development, or testing environments. - Keystone: Configures the Keystone identity provider to integrate your OpenShift Container Platform cluster with OpenStack’s Keystone service, enabling shared authentication with a Keystone v3 server that stores users in an internal database.
- LDAP: Configures the LDAP identity provider to validate usernames and passwords against an LDAPv3 server using simple bind authentication. This is commonly used in enterprise environments with existing LDAP/AD infrastructure.
- Basic Authentication: Configures a basic-authentication identity provider to authenticate users based on credentials validated by a remote identity provider. This method offers a simple backend integration mechanism for various external systems.
- Request Header: Configures a request-header identity provider to identify users from request header values (e.g.,
X-Remote-User). This is typically used with an authenticating proxy that sets the header. - GitHub / GitHub Enterprise: Configures a GitHub identity provider to validate usernames and passwords against GitHub or GitHub Enterprise’s OAuth authentication server. This is useful for developers and organizations that rely on GitHub for identity management.
- GitLab: Configures a GitLab identity provider to use GitLab.com or any self-hosted GitLab instance for authentication.
- Google: Configures the Google identity provider using Google’s OpenID Connect integration for users to authenticate with their Google accounts.
- OpenID Connect (OIDC): Configures an OpenID Connect identity provider for integrating with any external OIDC provider using an Authorization Code Flow. This allows seamless authentication with third-party identity systems.
If you are looking at setting up and integrating with your Windows AD, check the guide below:
Integrate OpenShift with Active Directory for Authentication
Prerequisites
Before you begin configuring the HTPasswd Identity Provider, ensure you have the following:
- Cluster Administrator Access: Log in as a cluster administrator using the
kubeadmincredentials or akubeconfigfile with the appropriate X.509 certificate. ocCLI Installed and Configured: The OpenShift CLI (oc) must be installed and configured. If you’re not already using it, set yourKUBECONFIGenvironment variable:export KUBECONFIG=/path/to/your/kubeconfightpasswdUtility Installed: Thehtpasswdtool is required to create and manage the flat file of usernames and passwords. Install it based on your OS distro:- RHEL / CentOS / Fedora:
sudo yum install httpd-tools - Ubuntu / Debian:
sudo apt install apache2-utils
- RHEL / CentOS / Fedora:
Step-by-Step: Configure HTPassword IdP on OpenShift 4.x (CLI)
Assuming all prerequisites are met (cluster admin access, oc CLI configured, and the htpasswd utility installed), follow these steps to configure the HTPasswd Identity Provider using the CLI.
Step 1: Create the HTPasswd File
Create a password file and add users using the htpasswd utility. If this is your first user, use the -c flag to create the file (Replace the usernames accordingly, and set appropriate password for each one of them):
htpasswd -c -B ./ocp4-htpasswd ocp-adminThe -B option uses bcrypt for password hashing (recommended).
To add more users later (without overwriting the file), omit the -c flag:
htpasswd -B ./ocp4-htpasswd devuserStep 2: Create a Secret from the HTPasswd File
Next, store the htpasswd file create above as a Kubernetes secret in the openshift-config namespace. The secret key must be htpasswd:
oc create secret generic htpasswd-secret \
  --from-file=htpasswd=./ocp4-htpasswd \
  -n openshift-config
You can confirm the secret creation with the command below:
oc get secrets -n openshift-configYou should see a secret named htpasswd-secret.
To view the details:
oc get secret htpasswd-secret -n openshift-config -o yamlSample output;
apiVersion: v1
data:
  htpasswd: b2NwLWFkbWluOiQyeSQwNSRwSDd6U1NsVk5vMGlZRlF2YlY0dnVlYi5ZcnRCZ2ZXVjZ6MmkxN3VWei41WmlqaGxpTzUxMgo=
kind: Secret
metadata:
  creationTimestamp: "2025-10-10T12:18:11Z"
  name: htpasswd-secret
  namespace: openshift-config
  resourceVersion: "1238848"
  uid: c479ba0a-ea79-475e-9e88-89c687833a95
type: Opaque
Step 3. Update the OAuth Configuration
There are different methods you can use to update the OpenShift OAuth configuration to add the HTPasswd identity provider.
Backup the current OAuth cluster configuration first:
oc get oauth cluster -o yaml > oauth-cluster-default-backup.yamlBy default, the default OAuth cluster configuration looks like:
oc get oauth cluster -o yamlapiVersion: config.openshift.io/v1
kind: OAuth
metadata:
annotations:
include.release.openshift.io/ibm-cloud-managed: "true"
include.release.openshift.io/self-managed-high-availability: "true"
release.openshift.io/create-only: "true"
creationTimestamp: "2025-10-06T14:00:53Z"
generation: 1
name: cluster
ownerReferences:
- apiVersion: config.openshift.io/v1
kind: ClusterVersion
name: version
uid: 9aaae838-452c-4cea-ba8a-3478f238f8aa
resourceVersion: "1535"
uid: 73d5758b-1c14-4993-8c41-80b69a226330
spec: {}Then proceed:
- Option 1: Edit the OAuth Resource Directly
You can edit the OAuth resource directly using theoc editcommand:
Then, under theoc edit oauth clusterspecsection, add the following YAML:
Your updated OAuth cluster should be like:identityProviders:
- name: htpasswd_idp
mappingMethod: claim
type: HTPasswd
htpasswd:
fileData:
name: htpasswd-secret
Save and exit to apply the changes.# Please edit the object below. Lines beginning with a '#' will be ignored,
# and an empty file will abort the edit. If an error occurs while saving this file will be
# reopened with the relevant failures.
#
apiVersion: config.openshift.io/v1
kind: OAuth
metadata:
annotations:
include.release.openshift.io/ibm-cloud-managed: "true"
include.release.openshift.io/self-managed-high-availability: "true"
release.openshift.io/create-only: "true"
creationTimestamp: "2025-10-06T14:00:53Z"
generation: 1
name: cluster
ownerReferences:
- apiVersion: config.openshift.io/v1
kind: ClusterVersion
name: version
uid: 9aaae838-452c-4cea-ba8a-3478f238f8aa
resourceVersion: "1535"
uid: 73d5758b-1c14-4993-8c41-80b69a226330
spec:
  identityProviders:
  - name: htpasswd_idp
    mappingMethod: claim
    type: HTPasswd
    htpasswd:
      fileData:
name: htpasswd-secret - Option 2: Patch the OAuth Configuration
You can useoc patchto apply a targeted update without editing the whole object. Hence, update the patch configuration below to much your setup before you can apply:oc patch oauth cluster --type=merge --patch='{
"spec": {
"identityProviders": [{
"name": "htpasswd-idp",
"mappingMethod": "claim",
"type": "HTPasswd",
"htpasswd": {
"fileData": {
"name": "htpasswd-secret"
}
}
}]
}
}' - Option 3: Export, Edit, Replace:
If you prefer working with full YAML manifests, then export the current OAuth cluster configuration:
Edit the file and add the configuration we used above underoc get oauth cluster -o yaml > oauth.yamlspecsuch that the updated config may look like:
Apply the updated configuration:apiVersion: config.openshift.io/v1
kind: OAuth
metadata:
name: cluster
spec:
identityProviders:
- name: htpasswd_idp
mappingMethod: claim
type: HTPasswd
htpasswd:
fileData:
name: htpasswd-secretoc replace -f oauth.yaml
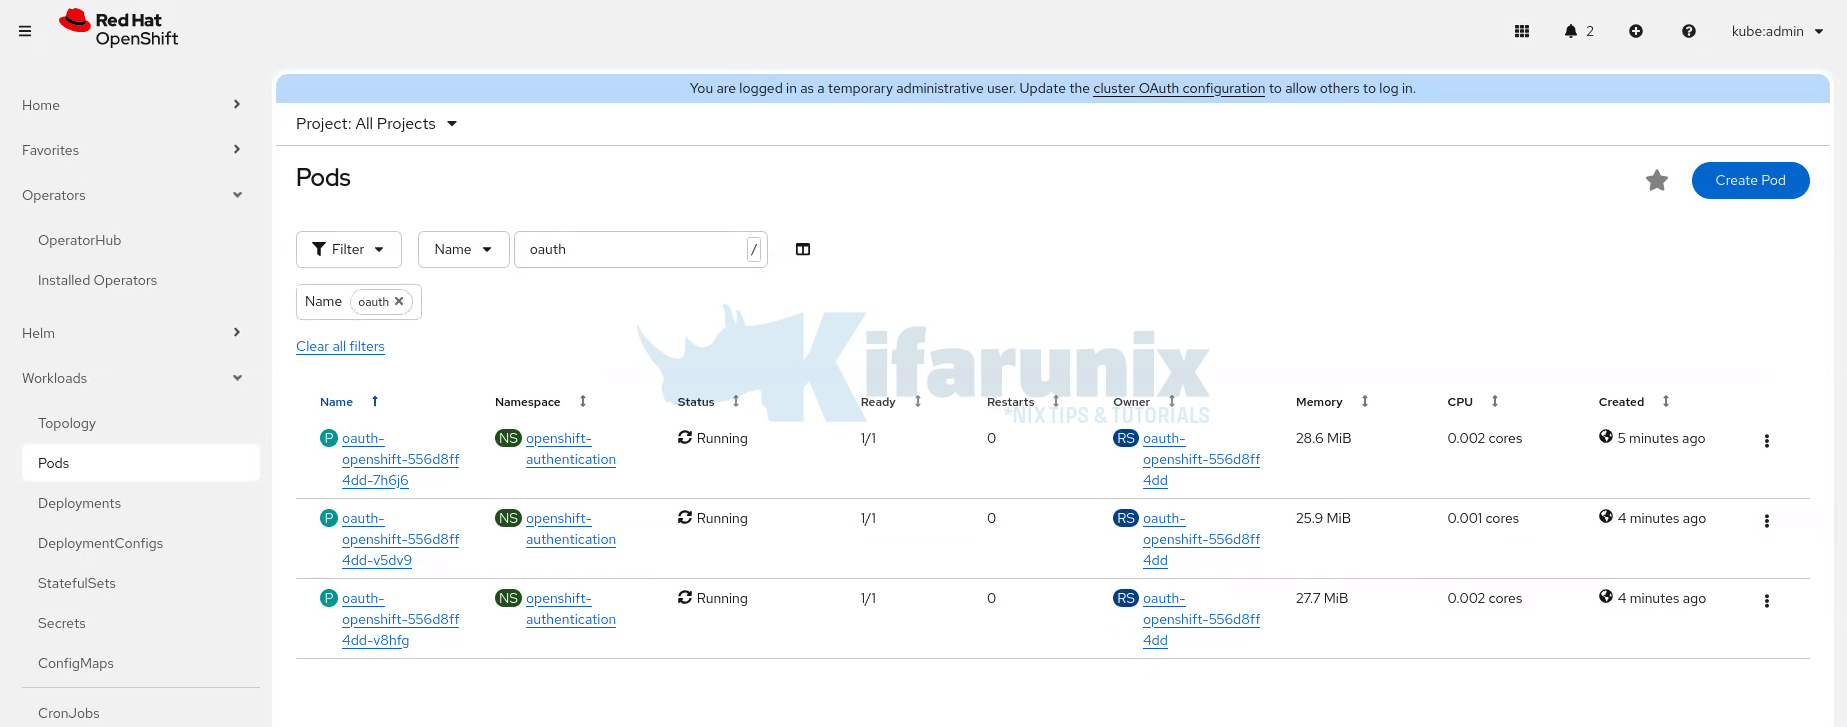
After applying the changes, the authentication pods in the openshift-authentication namespace will automatically restart to apply the new identity provider configuration.
You can monitor the restart with:
oc get pods -n openshift-authentication -wOr just;
oc get pods -n openshift-authenticationNAME READY STATUS RESTARTS AGE
oauth-openshift-899855479-8hh5v 1/1 Running 0 82s
oauth-openshift-899855479-hgzs7 1/1 Running 0 28s
oauth-openshift-899855479-q5jcn 1/1 Running 0 55s
Step 4: Assign Roles and Verify
Once you’ve successfully configured your identity provider (like HTPasswd), you can assign the cluster-admin role to the respective users so they have administrative privileges in OpenShift.
You can do this using the oc adm policy command:
oc adm policy add-cluster-role-to-user cluster-admin <username>Replace <username> with the user you want to grant the cluster-admin role to (e.g., ocp-admin).
For example:
oc adm policy add-cluster-role-to-user cluster-admin ocp-adminNow that the user has been assigned cluster-admin privileges, test their login.
Use the following command to log in with the user credentials:
oc login -u <username> If you’re currently logged in as kubeadmin and still using the default, self-signed OpenShift TLS certificates (i.e., you haven’t configured a trusted CA or custom certificates yet), your oc client may fail to verify the cluster’s certificate when attempting to log in as a new user.
In such cases, you can bypass certificate verification (for non-production or testing environments) by appending the --insecure-skip-tls-verify flag to your login command.
oc login -u <username> --insecure-skip-tls-verifyEnter the password associated with this user when prompted.
Example:
oc login -u ocp-admin --insecure-skip-tls-verifySample login output;
WARNING: Using insecure TLS client config. Setting this option is not supported!

Console URL: https://api.ocp.kifarunix.com:6443/console
Authentication required for https://api.ocp.kifarunix.com:6443 (openshift)
Username: ocp-admin
Password:
Login successful.

You have access to 73 projects, the list has been suppressed. You can list all projects with 'oc projects'

Using project "default".
Once logged in, verify the logged-in user with:
oc whoamiThis should return the username you logged in as, confirming that the login was successful and the identity is now recognized by OpenShift.
You should now also be able to view the configured identities:
oc get identitiesNAME IDP NAME IDP USER NAME USER NAME USER UID
htpasswd_idp:ocp-admin htpasswd_idp ocp-admin ocp-admin df7698d2-012a-431e-95aa-24d3e5a65fd3Check users:
oc get usersNAME UID FULL NAME IDENTITIES
ocp-admin 79c7e11f-3555-4db8-9407-00d8be194c9b htpasswd_idp:ocp-adminFinally, to verify in the Web Console:
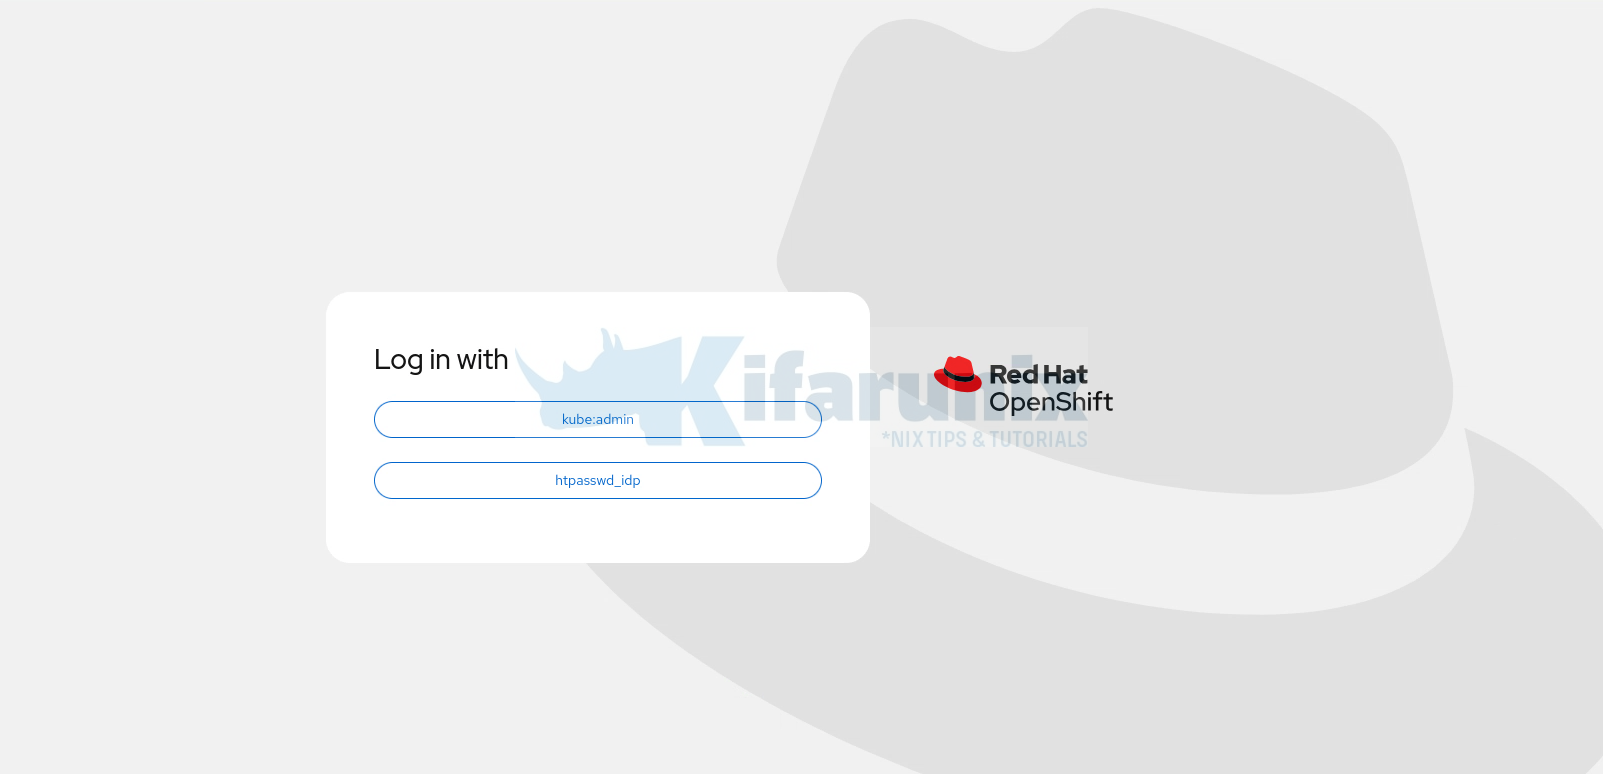
- Log out from the current session or open a new incognito window access the console from there.
- On the login page, select the new identity provider.
- Log in using the HTPassword user credentials.
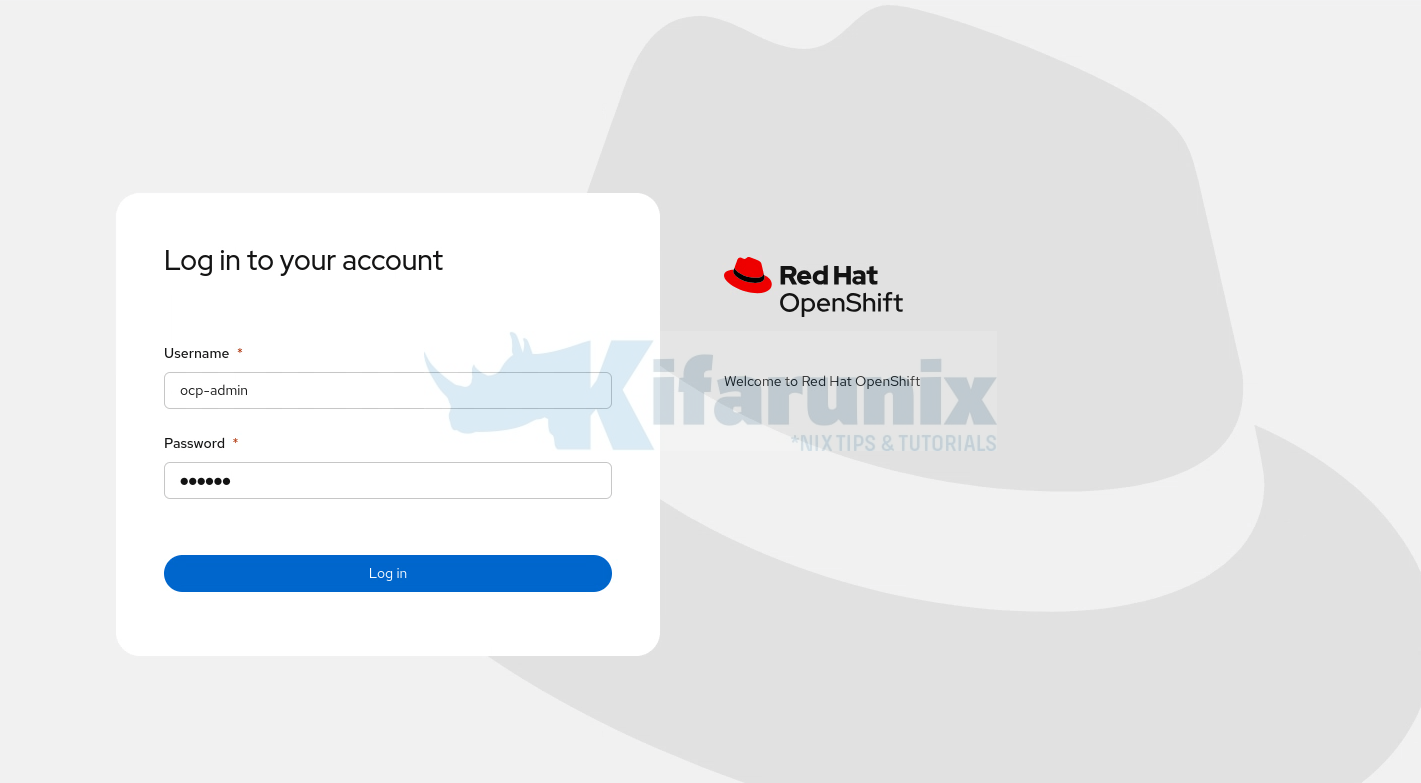
- And you should no longer see the temporary admin warning if the identity has been correctly mapped and the role was assigned successfully.
Configure HTPassword IdP via Web Console
If you prefer using the OpenShift Web Console instead of the CLI, you can easily configure the HTPasswd identity provider through the UI.
Just ensure that the HTPassword file is stored in a place you can access easily.
Configure the HTPasswd IdP
Therefore:
- Log in as cluster admin. We are using kubeadmin in our setup.
- Go to Administration > Cluster Settings > Configuration > OAuth.
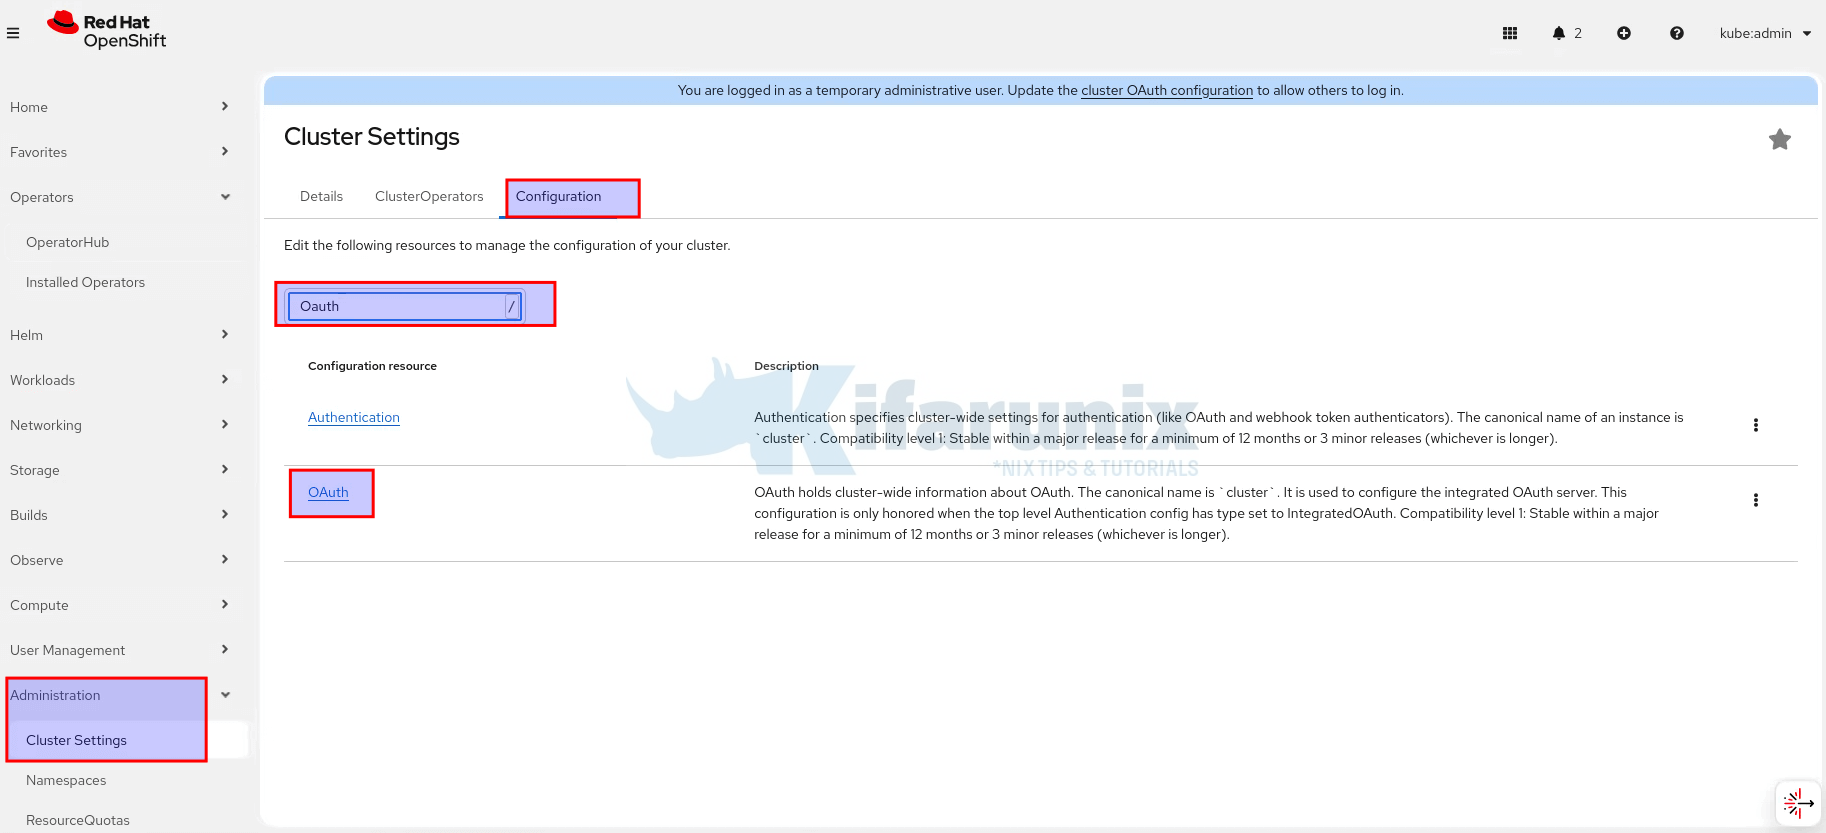
- Click OAuth and scroll down to Identity Providers, click Add > HTPasswd.
- Enter the name of your IdP
- Upload your users.htpasswd file.
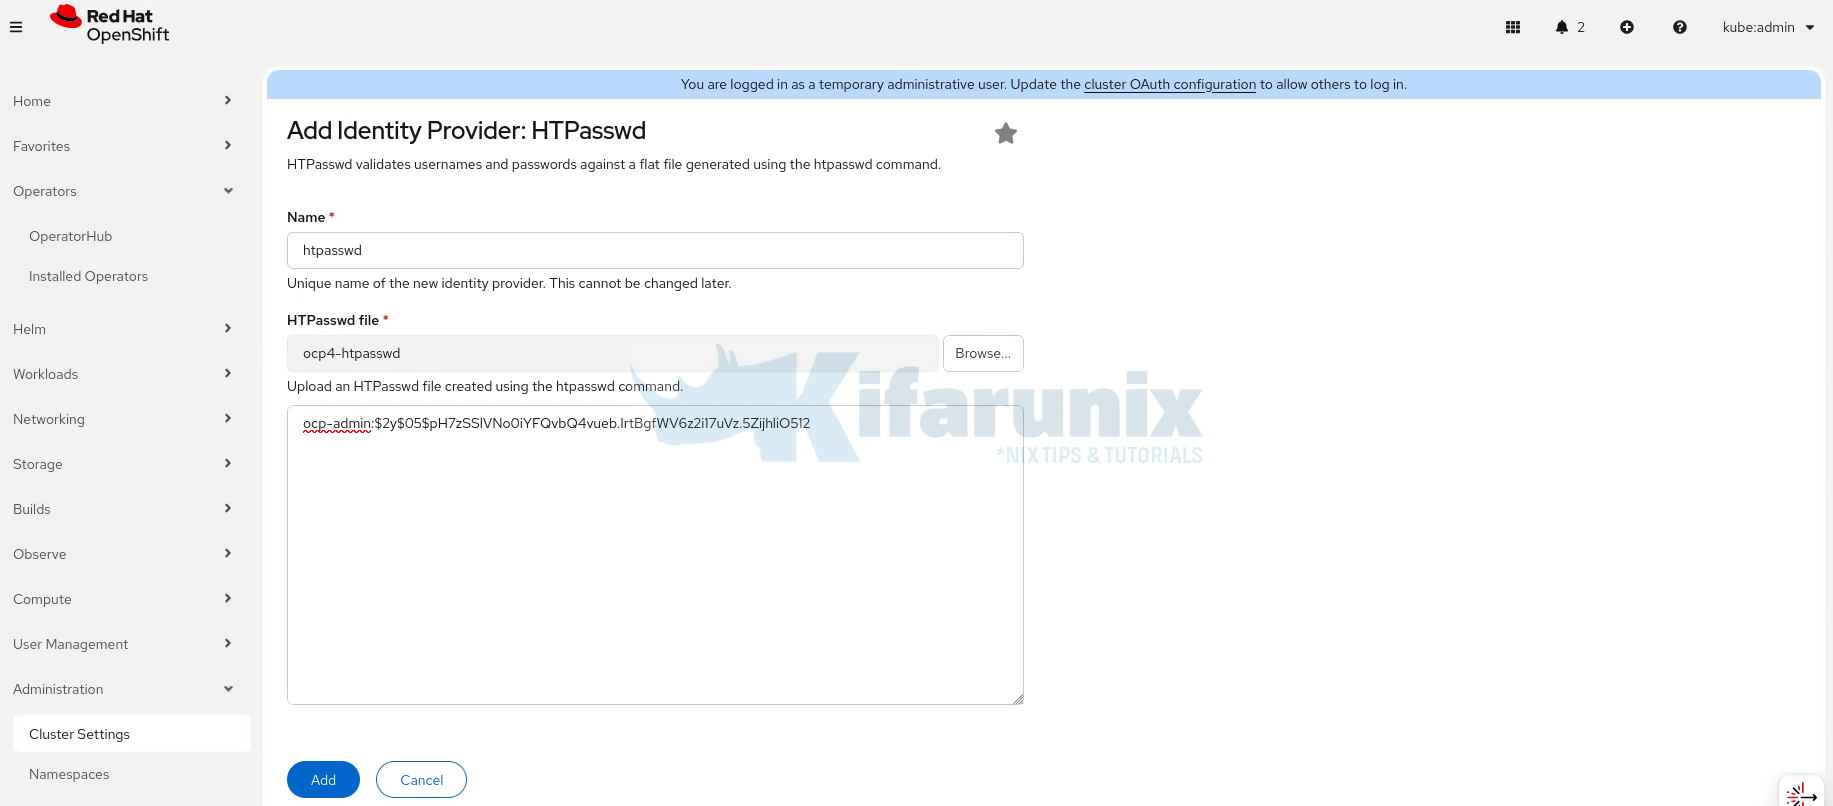
- Click Add.
You should see an alert about the new IdP:
New identity provider added.
Authentication is being reconfigured. The new identity provider will be available once reconfiguration is complete. View authentication conditions for reconfiguration status.
This creates the secret and updates the CR automatically.
Check the pods after a few:
Grant Cluster Admin Role to the New User
To grant the HTPasswd user cluster admin role from the console:
- Log out of the Web Console if you are currently logged in as
kubeadminor any other admin. - Log in as the new HTPasswd user using the identity provider you configured (e.g.,
htpasswd_idp).NoteIn OpenShift, users do not exist as Kubernetes/OpenShift resources until they have successfully authenticated at least once via a configured Identity Provider (IdP). Logging in creates the corresponding User and Identity objects in the cluster. - After logging in, log out again.
- Log back in as
kubeadmin(or another existing cluster-admin user). - Navigate to User Management > Users.
- Find the user you just logged in with (e.g.,
ocp-admin) in the list.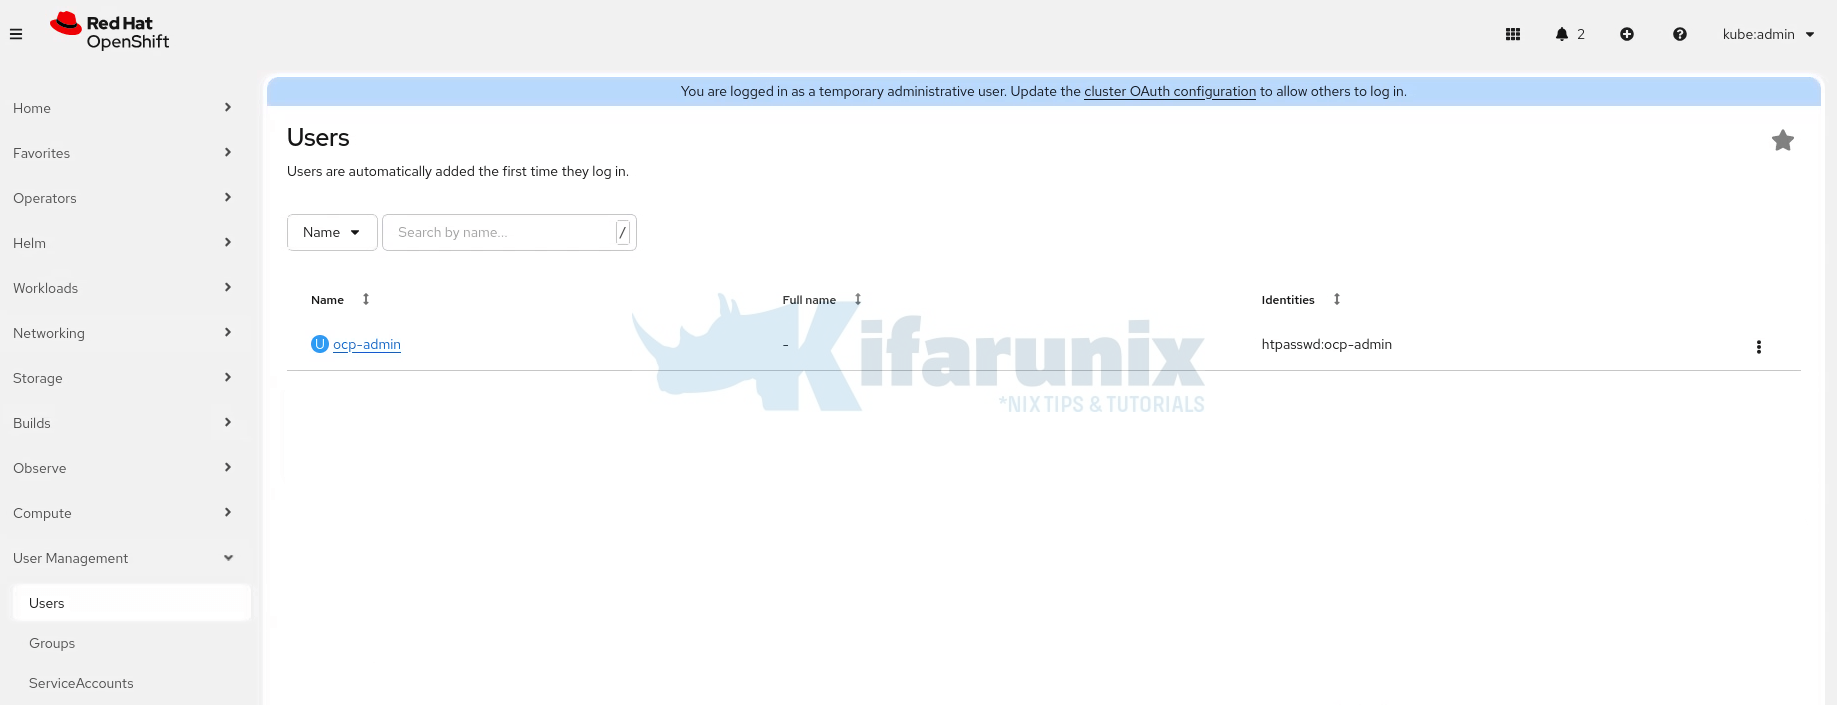
- Click on the user then go to the RolesBinding tab > Create binding.
- In the form:
- Select Cluster-wide role binding
- Enter the name of the RoleBinding you are creating
- For the Role, select cluster-admin
- Subject > subject name (auto-populate, but you can update)
- Click Add to create the role binding.
Once completed, your HTPasswd user now has full administrative rights across the cluster.
Log out as the previously admin user, both from CLI and Web console. The log back in as the new HTPasswd user.
From CLI:
oc login -u ocp-admin --insecure-skip-tls-verifyCheck who you are:
oc whoamiocp-adminRun some administration commands:
oc get nodesNAME STATUS ROLES AGE VERSION
ms-01.ocp.kifarunix.com Ready control-plane,master 4d2h v1.32.6
ms-02.ocp.kifarunix.com Ready control-plane,master 4d2h v1.32.6
ms-03.ocp.kifarunix.com Ready control-plane,master 4d2h v1.32.6
wk-01.ocp.kifarunix.com Ready worker 4d1h v1.32.6
wk-02.ocp.kifarunix.com Ready worker 4d1h v1.32.6
wk-03.ocp.kifarunix.com Ready worker 4d1h v1.32.6To explicitly check if a user can perform admin-level actions:
oc auth can-i '*' '*' --all-namespacesIf you’re a cluster-admin, this will return: yes
Managing HTPasswd Users (Add/Remove)
Once you’ve configured the HTPasswd Identity Provider, you can manage users by updating the underlying htpasswd file and reapplying the secret.
Retrieve the Current HTPasswd users:
oc get secret htpasswd-secret -n openshift-config -o jsonpath="{.data.htpasswd}" | base64 --decode > users.htpasswdAdd a new user:
htpasswd -B users.htpasswd <username>Remove an existing user
htpasswd -D users.htpasswd <username>After modifying the file, update the secret:
oc create secret generic htpasswd-secret \
  --from-file=htpasswd=users.htpasswd \
  --dry-run=client -o yaml -n openshift-config | oc replace -f -
This will update the secret in place without disrupting the running cluster.
If you’ve removed a user from the htpasswd file, also remove their OpenShift resources to prevent stale tokens from being used until they expire:
oc delete user <username>oc delete identity <idp-name>:<username>Troubleshooting Common Issues
Setting up authentication in OpenShift can sometimes lead to issues like failed logins or permission errors. You can find out what the issue might be by:
Checking logs in the Oauth NS (openshift-authentication):
oc logs -n openshift-authentication -l app=oauth-openshift -fCheck logs form specific pod:
oc get pods -n openshift-authentication -l app=oauth-openshiftoc logs <pod-name> -n openshift-authenticationYou can inspect the OAuth resource for changes or errors:
oc get oauth cluster -o yamlEnsure the identityProviders section is correctly structured and points to a valid secret.
Remove the Default kubeadmin User (Optional)
Once your Identity Provider is fully configured and alternative admin users are in place, you can delete the temporary kubeadmin credentials to harden security:
oc delete secret kubeadmin -n kube-systemConclusion
Configuring HTPasswd in OpenShift 4.x is straightforward yet powerful for non-production needs. By following this guide, you’ve got a setup that’s secure, verifiable, and easy to maintain.

