In this tutorial, you’ll learn how to upgrade RHEL 9 to RHEL 10 using the LEAPP tool with Red Hat Satellite Server integration. Staying up to date with the latest RHEL version ensures your systems benefit from enhanced security, improved performance, and access to new enterprise-grade features.
Table of Contents
Upgrade RHEL 9 to RHEL 10 using LEAPP
Prerequisites for Upgrading RHEL OS
- Backup Your Data: Always start with a full backup of your system to prevent data loss in case of any issues during the upgrade. This can even include taking a snapshot of the current system state. Anything can go wrong with the upgrade (refer to Murphy’s law) and you should be able to recover your system.
- Subscription Access: Verify that your Red Hat subscription is active and provides access to required RHEL repositories.
- System Requirements : Confirm you have enough free storage space for both the root filesystem and boot partition. Remember, enough is used relatively here. But ideally you should have at least 2-4 GB of free disk space available on your primary partition. The preupgrade report may show the requirements.
- Ensure correct paths for critical shared libraries before an OS upgrade. Before upgrading an OS, it is critical to verify system-managed shared libraries paths are correct. Misconfigured paths, especially for fundamental libraries like OpenSSL, glibc, and ld.so, can lead to severe failures, including a kernel panic.
- Extensive Application Testing: Perform comprehensive testing of all critical applications and services in a dedicated test environment that mirrors production. This ensures compatibility with the new OS version and helps identify potential issues before the actual upgrade on the production system.
What is LEAPP on RHEL?
Leapp is the official Red Hat Enterprise Linux (RHEL) upgrade framework designed to automate in-place upgrades from one major version of RHEL to another (e.g. RHEL 9 to RHEL 10). Leapp helps administrators migrate their systems safely while minimizing downtime and reducing the risk of breaking critical applications.
You maybe asking yourself, but what does LEAPP stands for? Well, as per Vinzenz:
Understanding System Updates vs Upgrades
Before diving into the process, it’s essential to understand the difference between updates and upgrades:
- Update : An update refers to applying patches, bug fixes, or minor improvements within the same major version. For example, updating RHEL 9.8 to RHEL 9.10.
- Upgrade : An upgrade involves moving to a newer major version of the operating system. In this case, we are upgrading from RHEL 9.8 to RHEL 10.6.
Upgrades often include significant changes that may affect system configurations, software compatibility, and hardware support. Therefore, proper planning and testing are crucial before proceeding.
Types of RHEL OS Upgrade
There are two primary methods for performing an OS upgrade:
- In-Place Upgrade (recommended) : This method upgrades the existing installation without erasing data or requiring a fresh setup. It retains user settings, applications, and configurations while replacing core components with those of the new version. Leapp facilitates in-place upgrades by analyzing dependencies and resolving conflicts automatically.
- Clean Install : A clean install involves wiping out the current OS and installing the new version from scratch. While this approach ensures a pristine environment free of legacy issues, it requires reconfiguring the system and reinstalling all necessary software.
For most users, especially in production environments, an in-place upgrade is preferred due to minimal downtime and preserved configurations.
Supported RHEL In-Place Upgrade Paths
The chart below summarizes upgrade paths from RHEL 9 to RHEL 10. It highlights the structured upgrade paths, depicted as a staircase of minor version pairs, such as 9.6 to 10.0 and 9.10 to 10.4, spanning from 2023 to 2029. This design ensures businesses can plan seamless upgrades with stability and extended support.
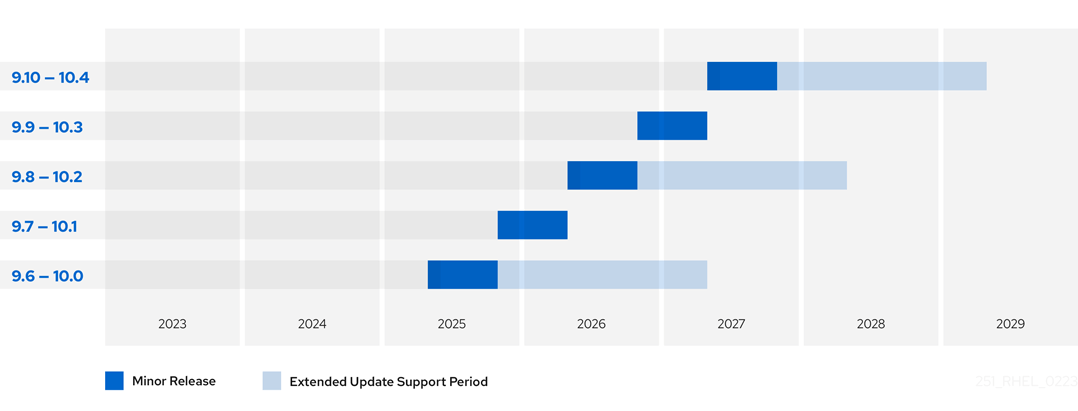
As of late August 2025, Red Hat’s upgrade strategy for RHEL (Red Hat Enterprise Linux) continues to evolve, offering a clear roadmap for transitioning from RHEL 9 to the newly released RHEL 10.
The chart features two key elements:
- the Minor Release (blue bars), marking the 6-month window when each RHEL 9 minor version becomes available for upgrade
- the Extended Update Support Period (light blue bars), providing up to 24 months (or longer with Enhanced EUS) of additional support for target RHEL 10 versions. For instance, upgrading from 9.6 to 10.0, available since mid-2025, offers support until mid-2027, while the 9.10 to 10.4 path, starting in 2027, extends to 2029.
The staircase approach on the chart above means newer RHEL 9 versions unlock upgrades to newer RHEL 10 versions with longer support windows, but only even-numbered minors (e.g., 10.0, 10.2, 10.4) qualify for Extended Update Support (EUS), while odd-numbered ones do not.
For the latest details, consult Red Hat’s official documentation.
Determine Content Access Mechanism
Before starting the upgrade process, you need to decide how your system will access the required content for the upgrade. This decision determines whether you’ll pull content directly from Red Hat’s Content Delivery Network (CDN) or use a Red Hat Satellite server for centralized management.
Using Red Hat CDN Repositories:
- This mechanism is ideal for standalone systems or smaller environments with direct internet access. To proceed with this method;
- Register your system directly with the Red Hat CDN.
- Enable the necessary repositories.
Register your system:
sudo subscription-manager registerProvide your Red Hat account username and password when prompted.
Check status of your subscription:
sudo subscription-manager status+-------------------------------------------+
System Status Details
+-------------------------------------------+
Overall Status: Disabled
Content Access Mode is set to Simple Content Access. This host has access to content, regardless of subscription status.
System Purpose Status: Disabled
As shown, the content access mode is configured as Simple Content Access (SCA), allowing systems to retrieve Red Hat repositories without requiring individual system subscriptions.
Check enabled repos;
sudo subscription-manager repos --list-enabled+----------------------------------------------------------+
Available Repositories in /etc/yum.repos.d/redhat.repo
+----------------------------------------------------------+
Repo ID: rhel-9-for-x86_64-baseos-rpms
Repo Name: Red Hat Enterprise Linux 9 for x86_64 - BaseOS (RPMs)
Repo URL: https://cdn.redhat.com/content/dist/rhel9/$releasever/x86_64/baseos/os
Enabled: 1
Repo ID: rhel-9-for-x86_64-appstream-rpms
Repo Name: Red Hat Enterprise Linux 9 for x86_64 - AppStream (RPMs)
Repo URL: https://cdn.redhat.com/content/dist/rhel9/$releasever/x86_64/appstream/os
Enabled: 1
From the command output above, only the RHEL 9 BaseOS and AppStream repositories are enabled, which is sufficient to perform updates and upgrades when connecting directly to Red Hat CDN repositories.
If you needed to manually enable these repositories, use the following command:
sudo subscription-manager repos \
	--enable rhel-9-for-x86_64-baseos-rpms \
	--enable rhel-9-for-x86_64-appstream-rpms
Using Red Hat Satellite:
- Best suited for enterprise environments where content is managed centrally.
- Enable required repositories for source and target OS versions in Satellite.
- Sync repositories to download and store packages/content in Satellite.
- Create Content Views (CVs/CCVs) with the synced repos and publish them.
- Create activation keys linked to the appropriate Content Views and lifecycle environments.
- Register systems to Satellite using the activation key.
In this guide, we’ll use Red Hat Satellite to manage repositories and updates rather than connecting directly to the Red Hat CDN.
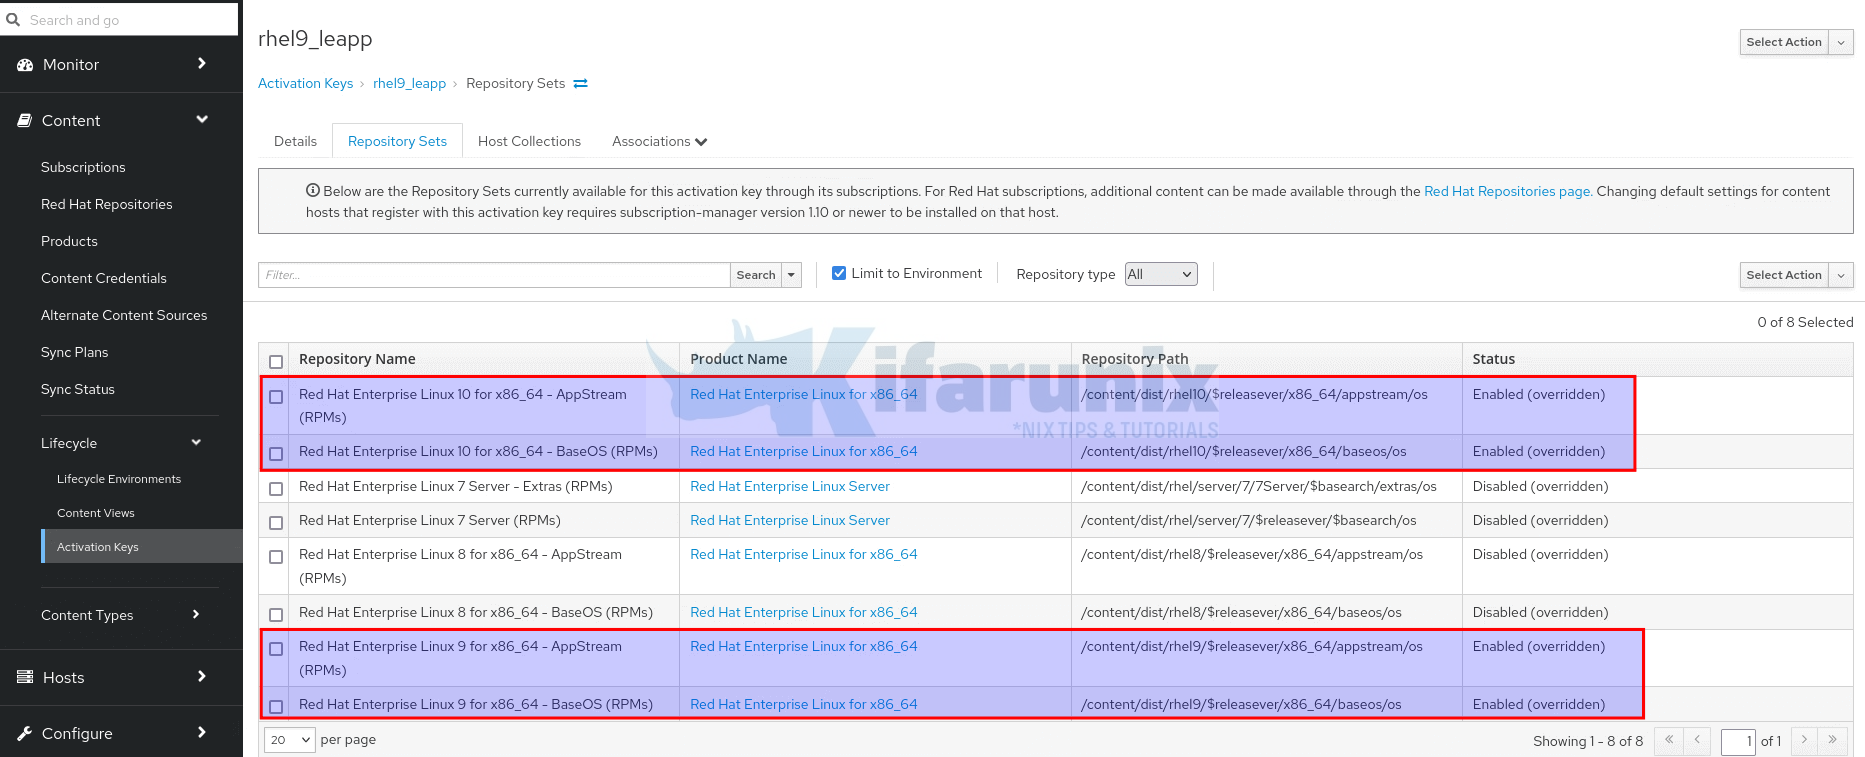
Important: Ensure your Leapp upgrade Activation Key’s Content Views include the exact minor version repositories for both the source and target RHEL versions. For example, upgrading from 9.6 to 10.0 requires the RHEL 9.6 BaseOS and AppStream repos, along with the corresponding RHEL 10.0 target repos. These contain the necessary packages for Leapp to complete the upgrade. Missing or unsynced target repos will cause the upgrade to fail.
Sample error for missing repositories:
============================================================
                           ERRORS
============================================================

2025-08-29 18:05:55.245017 [ERROR] Actor: target_userspace_creator
Message: Unable to install RHEL 10 userspace packages.
Summary:
    Details: Command ...
    Stderr: Host and machine ids are equal (9827a8a19c2e4726956984510292fbe8): refusing to link journals
            Errors during downloading metadata for repository 'rhel-10-for-x86_64-baseos-rpms':
              - Status code: 404 for https://satellite.kifarunix.com/pulp/content/Kifarunix_IT/uat/uat/content/dist/rhel10/10.0/x86_64/baseos/os/repodata/repomd.xml (IP: 192.168.122.234)
            Error: Failed to download metadata for repo 'rhel-10-for-x86_64-baseos-rpms': Cannot download repomd.xml: Cannot download repodata/repomd.xml: All mirrors were tried
Create Content Views and Activation Keys
To run the LEAPP upgrade via the Satellite, navigate to Satellite, create content view and the associated activation key for the LEAPP upgrade.
Check the link below on how to enable RHEL 10 repositories on Satellite.
Enable RHEL 10 Repositories in Red Hat Satellite: A Step-by-Step Guide
Sample activation key with relevant repositories:
Register RHEL OS to Satellite
Next, register the RHEL system to Satellite server. Read more on how to register the host on Satellite by following the link below.
Register RHEL Hosts to Satellite Server
Note that registration is two way depending on the task:
- For initial updates (e.g., patching RHEL 9): Subscribe with an Activation Key (AK) that includes only the RHEL 9 repositories. This ensures the system receives the latest updates within its current major version.
- For the Leapp in-place upgrade (e.g., from 9.6 to 10.0): Use an Activation Key configured with a Content View like rhel9_leapp in our case, which contains both RHEL 9.x (source) and RHEL 10.x (target) minor version repositories. This provides the necessary packages for the upgrade.
Upgrade RHEL 9 to RHEL 10 Using Leapp
Before starting the upgrade process, ensure all necessary prerequisites are met!
Remove Explicit OS Release Version Lock
If you had previously explicitly lock your system to a specific minor version of RHEL, you need to unlock it so that it is able to receive updates or upgrades to the latest available version.
You can check if the lock is defined;
sudo subscription-manager release --showThen empty the contents of the release version variable file using the command:
> /etc/yum/vars/releaserver> /etc/dnf/vars/releaseverOr:
sudo subscription-manager release --unsetStop Critical Applications/Services
If there is any critical applications/services running on you host, stop them and disable them from starting on system boot. Replace <SERVICE-NAME> accordingly.
sudo systemctl disable --now <SERVICE-NAME>Clear DNF Version Locks Before Upgrade
If you use the dnf versionlock plugin to lock packages to specific versions, clear these locks to prevent conflicts during the OS upgrade:
sudo dnf versionlock clearThis ensures all packages can be updated freely to newer versions as required by the upgrade process.
Unmount and Comment Out Non-System File Systems
Before performing an OS upgrade, it’s best practice to unmount and temporarily disable non-system file systems that aren’t required for the upgrade. This helps:
- Reduce upgrade time
- Prevent delays caused by network-related mounts
- Avoid issues with third-party or custom-mounted storage
Examples of Non-System File Systems:
- Network file systems:
NFS,CIFS/SMB,SSHFS,GlusterFS,CephFS - External or secondary drives mounted for data
- Custom mount points unrelated to the OS (e.g.,
/mnt/storage,/data,/backup,/media/nas)
Run the command below to check mounted filesystem:
df -hTIf you have an NFS mount at /mnt/teamdata for example:
sudo umount /mnt/teamdataIf you get a “device is busy” error:
sudo umount -l /mnt/teamdata-l performs a lazy unmount, detaching the filesystem immediately and cleaning up after it’s no longer in use.
Next, to prevent the filesystem from auto-mounting on reboot during the upgrade, comment out the entry in FSTAB:
sudo sed -i '/nfs/s/^/#/' /etc/fstabThis command comments out all lines in /etc/fstab that include “nfs”. Adjust the keyword (e.g., cifs, sshfs) as needed for other types.
Do I Need to Disable SELinux for a Leapp Upgrade?
No, you do not need to disable SELinux manually when performing a Leapp-based OS upgrade. The Leapp utility is designed to handle SELinux automatically:
- During the upgrade, Leapp temporarily switches SELinux to permissive mode to prevent enforcement-related issues.
- This change is made dynamically and does not require manual intervention.
- Post-upgrade, manually switch SELinux back to enforcing mode and persist that setting across reboots
Verify Subscription and Repository Configuration
Ensure your system is properly subscribed and has the correct repositories enabled.
sudo subscription-manager statusThis confirms whether your system has a valid Red Hat subscription.
+-------------------------------------------+
   System Status Details
+-------------------------------------------+
Overall Status: Registered
Content Access Mode is set to Simple Content Access. This host has access to content, regardless of subscription status.
Make sure the correct repositories for your current RHEL version (e.g., RHEL 9) are enabled;
sudo dnf repolistUpdating Subscription Management repositories.
repo id repo name
rhel-9-for-x86_64-appstream-rpms Red Hat Enterprise Linux 9 for x86_64 - AppStream (RPMs)
rhel-9-for-x86_64-baseos-rpms Red Hat Enterprise Linux 9 for x86_64 - BaseOS (RPMs)If repos are not enabled, counter check your subscription steps.
Update RHEL OS to the Required Minor Version
Before initiating the RHEL 9 upgrade to RHEL 10, it’s crucial to update your RHEL 9 system to the appropriate minor version. See upgrade paths section above.
For example, my node is currently on minor version of RHEL 9 (9.4);
cat /etc/redhat-releaseRed Hat Enterprise Linux release 9.4 (Plow)So, for me to upgrade to 10.x, the OS minor version must be at 9.6.
Hence, update your system to the latest minor version.
sudo dnf update -yReboot the OS after the update.
sudo rebootVerify the updated OS version:
cat /etc/redhat-releaseRed Hat Enterprise Linux release 9.6 (Plow)Once your system is updated to the appropriate minor version, proceed to the next step.
Install RHEL LEAPP Utility on RHEL 9
Run the command below to install LEAPP utility.
sudo dnf install leapp-upgrade -yRe-Subscribe the System Using the Leapp Activation Key
Re-subscribe it using the appropriate Leapp activation key.
sudo subscription-manager register --org "ORG_LABEL" --activationkey <AK> --forceE.g.
sudo subscription-manager register --org "Kifarunix IT" --activationkey rhel9_leapp --forceRun Pre-upgrade Analysis
Run the Leapp preupgrade tool to analyze your system and identify potential issues:
sudo su -leapp preupgradeThe command will target the latest release version of RHEL 10 by default, which is RHEL 10.0 as of this writing.
In future when other minor releases are supported, If you want to go to a specific RHEL 10 minor release version, then specify using the –target option.
Watch the values of inhibitors and errors on the leapp preupgrade report.
Sample output report;
Debug output written to /var/log/leapp/leapp-preupgrade.log

============================================================
                      REPORT OVERVIEW
============================================================

Upgrade has been inhibited due to the following problems:
    1. Legacy network configuration found

HIGH and MEDIUM severity reports:
    1. Leapp detected loaded kernel drivers which are no longer maintained in RHEL 10.
    2. GRUB2 core will be automatically updated during the upgrade
    3. Berkeley DB (libdb) has been detected on your system

Reports summary:
    Errors:                      0
    Inhibitors:                  1
    HIGH severity reports:       2
    MEDIUM severity reports:     1
    LOW severity reports:        3
    INFO severity reports:       3

Before continuing, review the full report below for details about discovered problems and possible remediation instructions:
    A report has been generated at /var/log/leapp/leapp-report.txt
    A report has been generated at /var/log/leapp/leapp-report.json

============================================================
                   END OF REPORT OVERVIEW
============================================================

Answerfile has been generated at /var/log/leapp/answerfile
The report shows a scenario where the upgrade is blocked due to the presence of legacy network configuration, which is no longer supported in RHEL 10. See:
Upgrade has been inhibited due to the following problems:
    1. Legacy network configuration found
The report is written to, /var/log/leapp/leapp-report.txt.
The most common cause of this inhibitor is the use of legacy network-scripts, such as:
/etc/sysconfig/network-scripts/ifcfg-enp1s0These scripts are no longer supported in RHEL 10.
To resolve this issue, you must migrate your network configuration to use NetworkManager, which is the default in RHEL 8+.
You can open the report and check for the hints on how to remediate this issue.
less /var/log/leapp/leapp-report.txtRisk Factor: high (inhibitor)
Title: Legacy network configuration found
Summary: Network configuration files in legacy "ifcfg" format are present.In Red Hat Enterprise Linux 10, support for these files is no longer enabled and the configuration will be ignored. The following files were found:
- /etc/sysconfig/network-scripts/ifcfg-enp1s0
Related links:
- How to migrate the connection from ifcfg to NetworkManager keyfile plugin?: https://access.redhat.com/solutions/7083803
- nmcli(1) manual, describes "connection migrate" sub-command.: https://networkmanager.dev/docs/api/latest/nmcli.html
- nm-settings-ifcfg-rh(5), description of the "ifcfg" format: https://networkmanager.dev/docs/api/latest/nm-settings-ifcfg-rh.html
- nm-settings-keyfile(5), description of the "keyfile" format: https://networkmanager.dev/docs/api/latest/nm-settings-keyfile.html
Remediation: [hint] Convert the configuration into NetworkManager native "keyfile" format.
[command] nmcli connection migrate /etc/sysconfig/network-scripts/ifcfg-enp1s0
Key: 7de70b43c3c9d20075e30894ac24a4c4e2d70837
----------------------------------------
Run the suggested command to migrate the legacy configurations to the supported configs:
sudo nmcli connection migrate /etc/sysconfig/network-scripts/ifcfg-enp1s0Replace the path with the actual file shown in your report.
You can simply use the name of the connection from the output of the command: nmcli con show;
sudo nmcli con migrate enp1s0Sample output;
Connection 'enp1s0' (c400d068-ad27-4db0-839a-8443fbfca1f0) successfully migrated.The legacy network script is converted into a NetworkManager “keyfile”, and the new configuration is saved under:
/etc/NetworkManager/system-connections/For example, the enp1s0 connection is now:
/etc/NetworkManager/system-connections/enp1s0.nmconnectionOnce you’ve migrated your legacy network configuration and ensured it is working properly, re-run the Leapp pre-upgrade check to verify that the issue has been resolved.
Ensure the report shows 0 errors/inhibitors. If any errors or inhibitors still show up, fix them first before running the upgrade.
Upgrade from RHEL 9 to RHEL 10
Once all inhibitors from the pre-upgrade analysis are resolved, you’re ready to upgrade.
sudo leapp upgradeIf you want to automatically reboot the OS just after the upgrade, you can run the leapp upgrade command with the --reboot option.
This will take the OS to the latest minor release version, e.g RHEL 10.0, the latest release as of this writing.
To specify the target manually:
sudo leapp upgrade --target 10.0If all goes well and there is no error/inhibitor detected, you should get an output confirming the same;
====> * add_upgrade_boot_entry
        Add new boot entry for Leapp provided initramfs.
A reboot is required to continue. Please reboot your system.


Debug output written to /var/log/leapp/leapp-upgrade.log

============================================================
                      REPORT OVERVIEW
============================================================

HIGH and MEDIUM severity reports:
    1. Leapp detected loaded kernel drivers which are no longer maintained in RHEL 10.
    2. GRUB2 core will be automatically updated during the upgrade
    3. Berkeley DB (libdb) has been detected on your system

Reports summary:
    Errors:                      0
    Inhibitors:                  0
    HIGH severity reports:       2
    MEDIUM severity reports:     1
    LOW severity reports:        3
    INFO severity reports:       3

Before continuing, review the full report below for details about discovered problems and possible remediation instructions:
    A report has been generated at /var/log/leapp/leapp-report.txt
    A report has been generated at /var/log/leapp/leapp-report.json

============================================================
                   END OF REPORT OVERVIEW
============================================================

Answerfile has been generated at /var/log/leapp/answerfile
Reboot the system to continue with the upgrade. This might take a while depending on the system configuration.
Make sure you have console access to view the actual upgrade process.
You will also see a message asking you to reboot the OS, if at all you didn’t include the --reboot option on the leapp command.
Reboot the system to continue with the upgrade. This might take a while depending on the system configuration.
Make sure you have console access to view the actual upgrade process.
Before you can proceed, access the VM/Server console and then issue a reboot.
sudo rebootFrom the console, you will see that the system boots into a RHEL 10-based initial RAM disk image, initramfs.
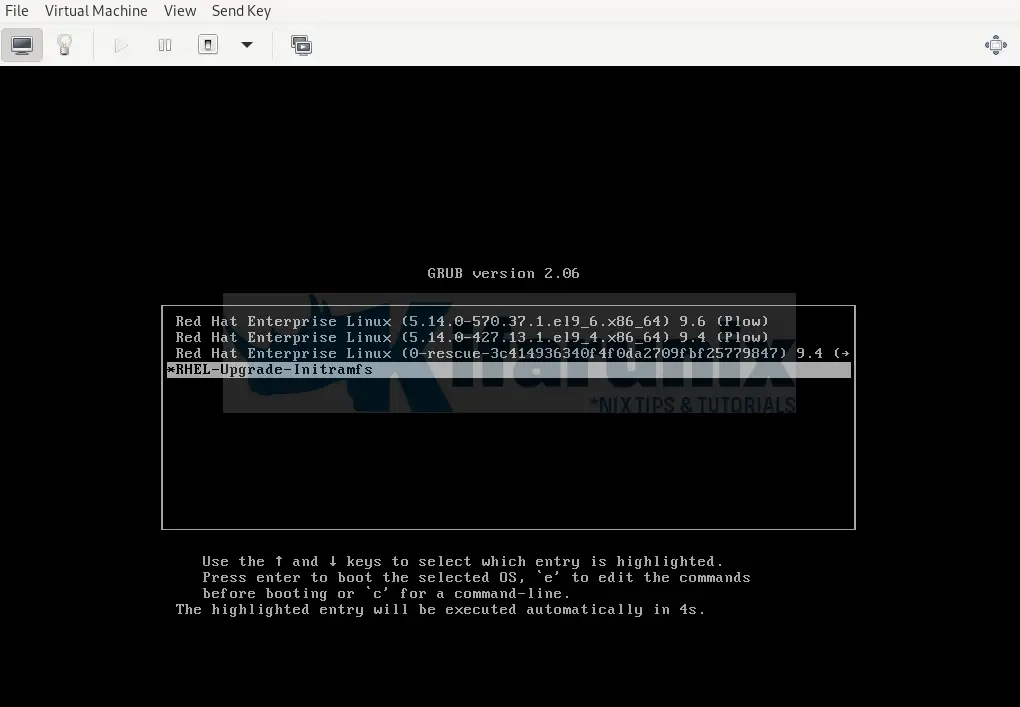
Leapp will then proceed to upgrade all the packages and automatically reboots to the RHEL 10 system.
Sample grub menu after upgrade:
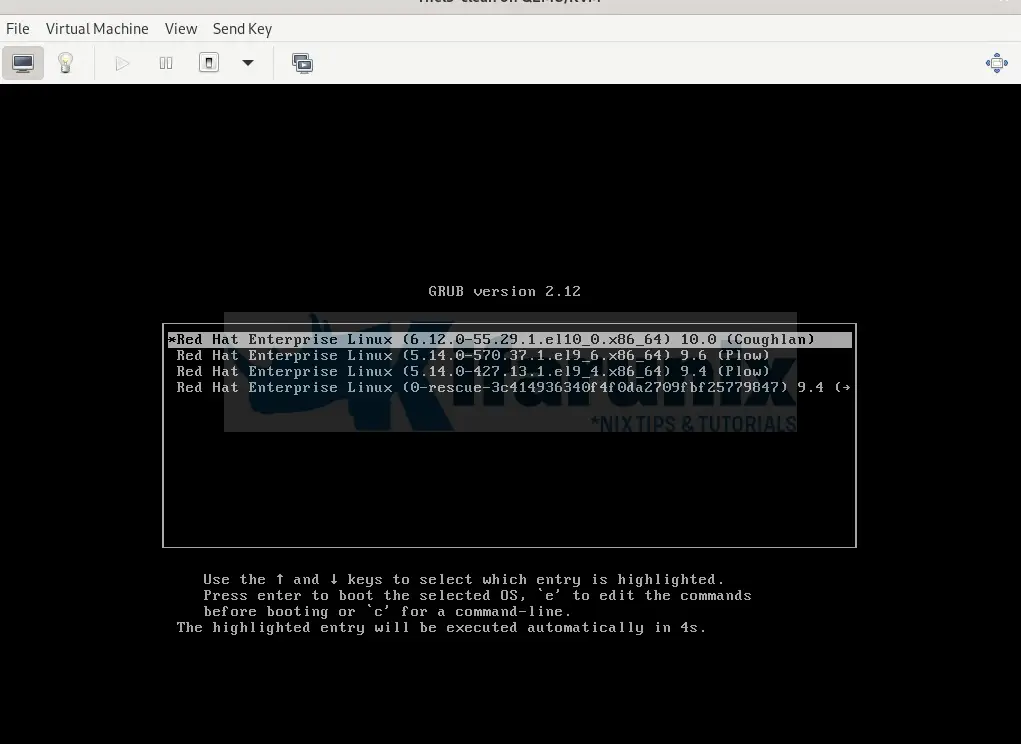
The OS is booting into RHEL 10.0, right from RHEL 9.4!
Post-Upgrade Verification for RHEL 10
After completing the in-place upgrade and logging back into RHEL 10, verify the system is in the expected state:
Basic System Checks
Confirm OS version:
cat /etc/redhat-releaseExample output:
Red Hat Enterprise Linux release 10.0 (Coughlan)Check kernel version:
uname -r6.12.0-55.29.1.el10_0.x86_64Ensure it includes .el10 and is 6.12.0 or newer.
Subscription Validation
Check installed product:
sudo subscription-manager list --installedConfirm it’s RHEL 10.
+-------------------------------------------+
    Installed Product Status
+-------------------------------------------+
Product Name: Red Hat Enterprise Linux for x86_64
Product ID:   479
Version:      10.0
Arch:         x86_64
Verify release version:
sudo subscription-manager releaseOutput should match the target version (e.g., 10.0).
You can unset the release version:
sudo subscription-manager release --unsetNetwork and Application Status
Confirm network services are working (e.g., test SSH connectivity).
Check applications and services some may require manual reconfiguration post-upgrade.
Remove Excluded Packages from DNF Configuration
Clear any remaining excluded packages that were set during the upgrade process:
sudo dnf config-manager --save --setopt exclude=''Remove Legacy RHEL 8/9 Packages
Check for any remaining .el8 or .el9 packages:
rpm -qa | grep -e '\.el[89]' | grep -vE '^(gpg-pubkey|libmodulemd|katello-ca-consumer)' | sortSample output;
gpm-libs-1.20.7-29.el9.x86_64
iprutils-2.4.19-5.el9.x86_64
kernel-5.14.0-427.13.1.el9_4.x86_64
kernel-5.14.0-570.37.1.el9_6.x86_64
kernel-core-5.14.0-427.13.1.el9_4.x86_64
kernel-core-5.14.0-570.37.1.el9_6.x86_64
kernel-modules-5.14.0-427.13.1.el9_4.x86_64
kernel-modules-5.14.0-570.37.1.el9_6.x86_64
kernel-modules-core-5.14.0-427.13.1.el9_4.x86_64
kernel-modules-core-5.14.0-570.37.1.el9_6.x86_64
leapp-0.19.0-1.el9.noarch
leapp-upgrade-el9toel10-0.22.0-1.el9.noarch
python3-leapp-0.19.0-1.el9.noarch
python3-setuptools-wheel-53.0.0-13.el9_6.1.noarch
If the list looks clean and safe to remove, proceed:
sudo dnf remove $(rpm -qa | grep \.el[89] | grep -vE 'gpg-pubkey|libmodulemd|katello-ca-consumer')Otherwise, if you want to keep a specific package, simply add them to the exclusion list in the grep -vE pattern.
Remove Leapp-Specific Packages and Temporary Data
Clean up Leapp tools and temporary files:
sudo dnf remove leapp-deps-el9 leapp-repository-deps-el9 -ysudo rm -rf /var/log/leapp /root/tmp_leapp_py3 /var/lib/leappRebuild the Rescue Kernel for RHEL 10
Remove outdated rescue kernels:
sudo rm -rf /boot/vmlinuz-*rescue* /boot/initramfs-*rescue*Recreate the rescue kernel for the current RHEL 10 kernel:
sudo /usr/lib/kernel/install.d/51-dracut-rescue.install add "$(uname -r)" /boot "/boot/vmlinuz-$(uname -r)"Verify the rescue images:
sudo ls -1 /boot/vmlinuz-*rescue* /boot/initramfs-*rescue*/boot/initramfs-0-rescue-3c414936340f4f0da2709fbf25779847.img
/boot/vmlinuz-0-rescue-3c414936340f4f0da2709fbf25779847Check if the rescue initramfs image contains the kernel version currently running
sudo lsinitrd /boot/initramfs-*rescue*.img | grep -qm1 "$(uname -r)/kernel/" && echo "OK" || echo "FAIL"- If the output is
OK, then the rescue initramfs image includes the current kernel and is correctly set up for recovery. - If the output is
FAIL, then the rescue image does not include the current kernel. In this case, you should recreate the rescue image.
Confirm and Clean Bootloader Entries
Check the rescue boot entry and make sure it points to the correct kernel:
sudo grubby --info $(ls /boot/vmlinuz-*rescue*)Sample output;
index=1
kernel="/boot/vmlinuz-0-rescue-3c414936340f4f0da2709fbf25779847"
args="ro resume=/dev/mapper/rhel-swap rd.lvm.lv=rhel/root rd.lvm.lv=rhel/swap rhgb quiet crashkernel=2G-64G:256M,64G-:512M $tuned_params"
root="/dev/mapper/rhel-root"
initrd="/boot/initramfs-0-rescue-3c414936340f4f0da2709fbf25779847.img $tuned_initrd"
title="Red Hat Enterprise Linux (0-rescue-3c414936340f4f0da2709fbf25779847) 10.0 (Coughlan)"
id="3c414936340f4f0da2709fbf25779847-0-rescue"
Verify no RHEL 7 or RHEL 9 kernels remain:
sudo grubby --info=ALL | grep -E "\.el8|\.el9" || echo "Old kernels are not present in the boot loader."Sample output when no old kernels are available:
Old kernels are not present in the boot loader.If any old entries exist (e.g., from RHEL 8 or 9), remove them. Replace the path accordingly:
sudo grubby --remove-kernel=/boot/vmlinuz-KERNEL-VERSIONConfirm cleanup:
sudo grep -rE ".el8|.el9" "/boot/loader/entries/" || echo "Everything seems ok."Sample output;
Everything seems ok.Re-enable SELinux After the Upgrade
During the in-place upgrade, Leapp sets SELinux to permissive mode. After the upgrade completes, you should manually restore it to enforcing for full security enforcement.
sudo sed -i 's/^SELINUX=permissive/SELINUX=enforcing/' /etc/selinux/configThis command updates the SELinux config file to set enforcing mode.
Apply the Change Immediately (Without Reboot):
sudo setenforce 1Reboot the OS to Apply the Changes:
sudo rebootWhen it boots, you should see that old kernels are not showing up the grub now after the clean up.
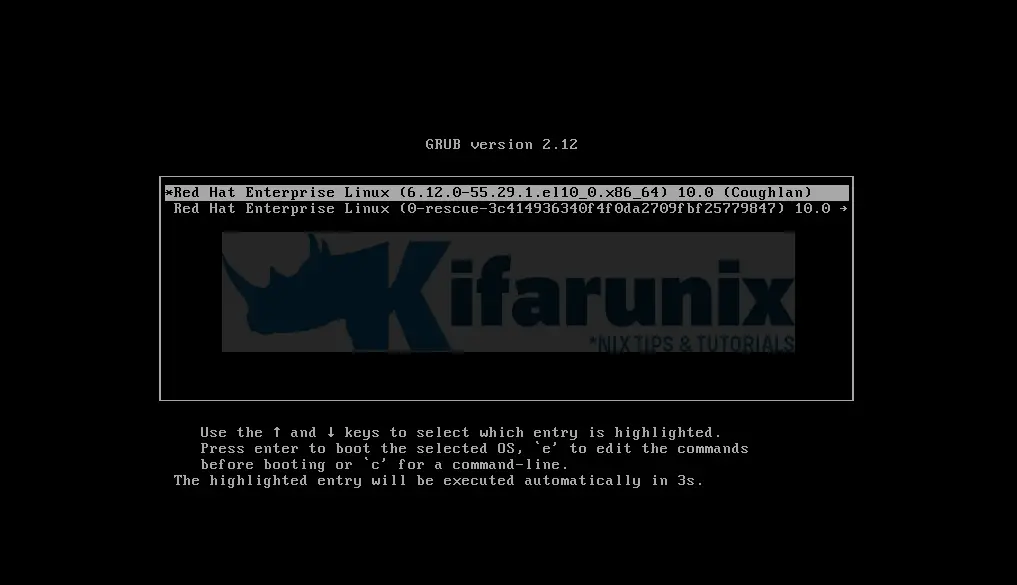
From here, you can now continue to test your applications, monitor system behavior, and validate that all services are functioning as expected on RHEL 10. If any issues arise that cannot be resolved, you may choose to revert to your pre-upgrade snapshot or backup.
Once you’re confident the system is stable and compliant, you can proceed with rolling out the upgrade process to other systems.
Automating RHEL OS Upgrades Using Ansible
When the task of upgrading involves enterprise servers at scale, manual upgrades quickly become unmanageable. In such environments, automation isn’t just helpful, it’s essential.
Fortunately, the Red Hat Community of Practice (redhat-cop) maintains the infra.leapp Ansible collection, which includes a set of community-supported roles and playbooks designed to automate in-place RHEL OS upgrades using the Leapp framework.
Using this collection, organizations can:
- Automate pre-upgrade checks and system analysis
- Apply necessary remediations consistently
- Perform in-place OS upgrades across multiple systems
- Validate systems post-upgrade for stability and compliance
Check the guide below to learn how you can utilize Red Hat CoP infra.leapp playbooks to automate RHEL OS upgrade.
Automate RHEL OS Upgrades using Ansible infra.leapp Playbooks
Conclusion
That marks the end of our tutorial on how to upgrade RHEL 9 to RHEL 10 using Leapp with Satellite Server integration. The system is now updated, cleaned, and configured for use on RHEL 10.
Thorough testing and validation of applications and services are essential to ensure full compatibility and stability in the new environment. If issues arise that cannot be resolved, consider reverting to your pre-upgrade snapshot or backup.

