
This guide will take you through how to install Ubuntu 24.04 on VirtualBox. Ubuntu 24.04, code name Noble Numbat, has finally been released on April 25, 2024. It is the latest Long Term Support (LTS) version of Ubuntu. Noble Numbat ships with a lot of improvements/features/bug fixes/security updates. If you want to test it out in in the meantime, then it is best if you install it in a virtualization tool such as VirtualBox.
Table of Contents
Installing Ubuntu 24.04 on VirtualBox
Download Ubuntu 24.04 ISO
Navigate to Ubuntu images download page and grab your Ubuntu 24.04 ISO file for your specific system architecture.
We are using the amd version in this guide.
If you do not know how to check your system architecture, then run this command below;
uname -mIf it returns x86_64, it’s an AMD or Intel processor. If it returns aarch64, it’s an ARM processor.
You can run the command below to download the installation ISO file;
wget https://releases.ubuntu.com/24.04/ubuntu-24.04-desktop-amd64.iso -P ~/Downloads/
Create New Virtual Machine
Next, launch VirtualBox manager and create a new Virtual Machine with your preferred settings such as networking, disk size, system resources etc.
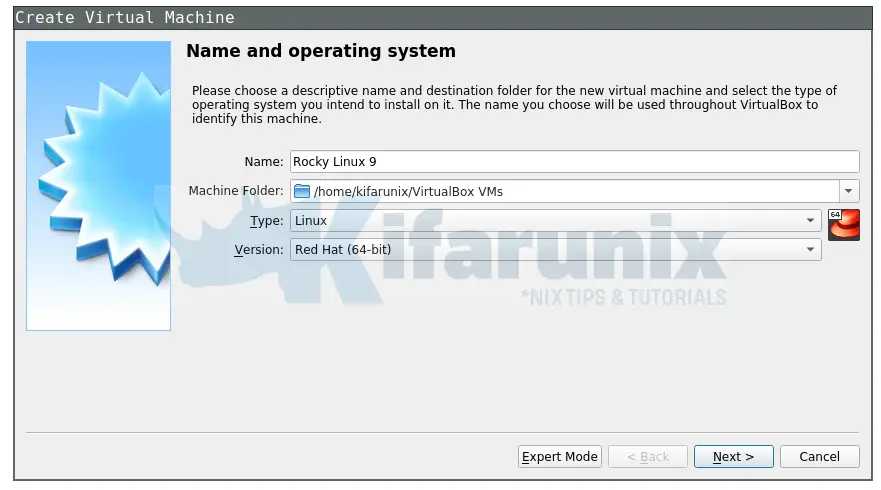
Name and Operating System of the VM
To begin with;
- define the name of the virtual machine and the Operating system.
- set the installation folder
- Select the ISO image that will be used to install your Ubuntu 24.04 vm on VirtualBox.
Note that we will be using VirtualBox 7, which supports unattended guest VM installation. Unfortunately, Ubuntu 24.04 desktop doesn’t support unattended installation as of this writing. So let’s skip unattended guest installation.

Set the VM Hardware
Next, assign the VM required RAM and vCPUs.

VM Virtual Hard Disk
Create a Virtual hard disk for your Ubuntu 24.04 vm. Choose the disk size of your preference.

Virtual Machine Setup Summary
Go through the virtual machine setup summary and when you are happy with the configuration press Finish to create the virtual machine. Alternatively you can go back and modify the configuration.

Attach Network Interfaces to Ubuntu 24.04 VM
Open the virtual machines settings and navigate to the Network settings.
By default, first interface attached is NAT. This is required to give the VM Internet access.
Next, attach a host-only interface to allow you access the vm from the host!

You can create the networks from Network manager.
Install Ubuntu on VirtualBox
Click Ok after attaching network interfaces.
You can do more pre-install configs if you want! Otherwise, click Start to start the installation of Ubuntu 24.04 desktop on VirtualBox.
- When the VM starts, select Try or Install Ubuntu from the grub menu!
- Choose you installation language.
- Configure your system accessibility options as you wish! We go with the default settings here.
- Select your keyboard layout. We with the default English US layout.
- Choose whether to connect your VM to the internet (via the host NAT netwoking) for package updates during installation.
- Choose, Install Ubuntu otherwise, if you want to boot live without actiually writing changes to disk, just select Try Ubuntu.
- How would you like to install Ubuntu 24.04? Via Interactive or automated installtion mode? We chose interactive mode in this guide.
- What Applications you want to install at the beginning? Choose default installation with essential packages and utilities.
- Install recommended proprietary software? We skipped this option. Choose accordingly.
- Type of installation: We will use LVM hence, we choose Erase disk and install Ubuntu and choose LVM (no disk encryption here for now, if you like to encrupt your drive, click advanced features to see more options!)
- Setup your account on Ubuntu 24.04 VM:
- Your Name
- Computer’s name
- Your username
- Password
- Choose whether or not to disable need for password during login!
- If you want, you can integrate with AD for authentication and authorization.
- Select your Timezone.
- Review your installation option/choices.
- If you are happy, click Install to Install Ubuntu on VirtualBox.
Installation in progress.

When installation is complete, restart the VM;

Press Enter to remove installation media when prompted.
Booting into Ubuntu 24.04 on VirtualBox
Once your VM reboots, login using the account details created before.
Login interface

Go through initial setup and start using Ubuntu 24.04 on VirtualBox.

And that is it!
Install Neofetch to check system information;
sudo apt updatesudo apt install neofetchThen;
neofetch .-/+oossssoo+/-. kifarunix@noble
`:+ssssssssssssssssss+:` ---------------
-+ssssssssssssssssssyyssss+- OS: Ubuntu 24.04 LTS x86_64
.ossssssssssssssssssdMMMNysssso. Host: VirtualBox 1.2
/ssssssssssshdmmNNmmyNMMMMhssssss/ Kernel: 6.8.0-31-generic
+ssssssssshmydMMMMMMMNddddyssssssss+ Uptime: 8 mins
/sssssssshNMMMyhhyyyyhmNMMMNhssssssss/ Packages: 1529 (dpkg), 10 (snap)
.ssssssssdMMMNhsssssssssshNMMMdssssssss. Shell: bash 5.2.21
+sssshhhyNMMNyssssssssssssyNMMMysssssss+ Resolution: 1280x800
ossyNMMMNyMMhsssssssssssssshmmmhssssssso Terminal: /dev/pts/1
ossyNMMMNyMMhsssssssssssssshmmmhssssssso CPU: Intel i9-9900K (2) @ 3.599GHz
+sssshhhyNMMNyssssssssssssyNMMMysssssss+ GPU: 00:02.0 VMware SVGA II Adapter
.ssssssssdMMMNhsssssssssshNMMMdssssssss. Memory: 1255MiB / 3916MiB
/sssssssshNMMMyhhyyyyhdNMMMNhssssssss/
+sssssssssdmydMMMMMMMMddddyssssssss+
/ssssssssssshdmNNNNmyNMMMMhssssss/
.ossssssssssssssssssdMMMNysssso.
-+sssssssssssssssssyyyssss+-
`:+ssssssssssssssssss+:`
.-/+oossssoo+/-.
Your Ubuntu 24.04 is now installed on VirtualBox and ready for your use!
If you want to use it in full screen and enjoy other things like shared clipboard for copying and pasting between the vm and the host, please install guest additions.
Install VirtualBox Guest Additions on Ubuntu 24.04

Where you say “that’s it” is where the hard stuff just starts: How do I get the clipboard to work? How do I get shared folders to work? I’ve been struggling with this on Ubuntu 20.04 (but got it to work, finally), but gave up with 22.04. Now my hope is on 24.04…
And please, if I forget to enter my e-mail address and press “post”, I don’t want to have to type my comment again. Thank you!
You can install guest additions and enable shared clipboard.
We have updated the guide. Enjoy.