Hello there. Welcome to our guide on how to protect Apache web directories with password on Ubuntu 18.04. This will enable you to restrict access to various sections of your web site. In this regard, Apache supports two contexts in which Authentication directives can be applied and these are; Directory and htaccess.
While the authentication directives can be used within <Directory>, <Location>, <Files> and even <Proxy> blocks in the Apache configuration file, the htaccess context authentication directives can be used within .htaccess files.
In this guide, we are going to learn how setup password Apache protected directories in both contexts.
Well, before you can proceed, ensure that you have Apache HTTP server utility program installed in your server. This utility provides the htpasswd command. To verify that this packages is already installed,run the command below;
sudo dpkg -s apache2-utils | grep -i status
Status: install ok installed
If for some reasons it is not installed, you can just install it by running the following command;
sudo apt install apache2-utils
Setting up Password Protected Directory using Directory Context
So to kick off with, let us assume that you want to password protect the web site root directory located at /var/www/html/example.
To proceed, you have to create a flat-file that is used to store usernames and password for basic authentication of HTTP users. The password file is generated using the htpasswd utility and can be stored just about anywhere in your server. htpasswd encrypts passwords using either bcrypt, a version of MD5 modified for Apache, SHA1, or the system’s crypt() routine.
Create a Password File
To create a password file, run the command below.
sudo htpasswd -c /etc/apache2/.webroot amos
This will create a hidden flat-file called webroot under /etc/apache2/. The -c tells htpasswd to create a password file. If the file already exists, it will be rewritten and truncated. Therefore, to add another user to the same file, run the same command without option -c. For example, to add user mibey,
sudo htpasswd /etc/apache2/.webroot mibey
You now have two users who can authenticate to the specific web root directories and whose passwords are hashed.
sudo less /etc/apache2/.webroot
amos:$apr1$FJuti2Ok$4apPG6wrlrhV0lexnRLoA1
mibey:$apr1$Hqc217.G$d2rzs8d9SbzE1ap/v7jbP/
Note that if htpasswd utility is not located in your PATH, you can find its location with which command and specify the full path when running i.e /full/path/to/htpasswd.
Ensure that Apache has access to the password file. Thus you can set ownership and permissions as follows.
sudo chown www-data.www-data /etc/apache2/.webroot
sudo chmod 644 /etc/apache2/.webroot
Protect Apache Directory
Now that we have generated the authentication details, you can now set the directory authentication directives within the main Apache config file or your virtual host config file as follows;
vim /etc/apache2/sites-available/example.conf
<VirtualHost *:80>
  # Admin email, Server Name (domain name) and any aliases
  ServerAdmin [email protected]
  ServerName  example.com
  ServerAlias www.example.com

  DirectoryIndex index.html
  DocumentRoot /var/www/html
  # Custom log file locations
  LogLevel warn
  ErrorLog /var/log/apache2/error-example.com.log
  CustomLog /var/log/apache2/access-example.com.log combined

  <Directory "/var/www/html/example">
    AuthType Basic
    AuthName "Authentication Required"
    AuthUserFile "/etc/apache2/.webroot"
    Require valid-user
  </Directory>
</VirtualHost>
The directives used above are;
AuthType– Defines the type of authentication, basic in this exampleAuthName– Defines the message displayed on the password prompt from the browser.AuthUserFile– Defines the location of the password file.Require– Specifies that only authenticates users are granted access.
Once you are done with the configuration, save the file and restart Apache.
sudo apachectl -t
Syntax OK
sudo systemctl restart apache2
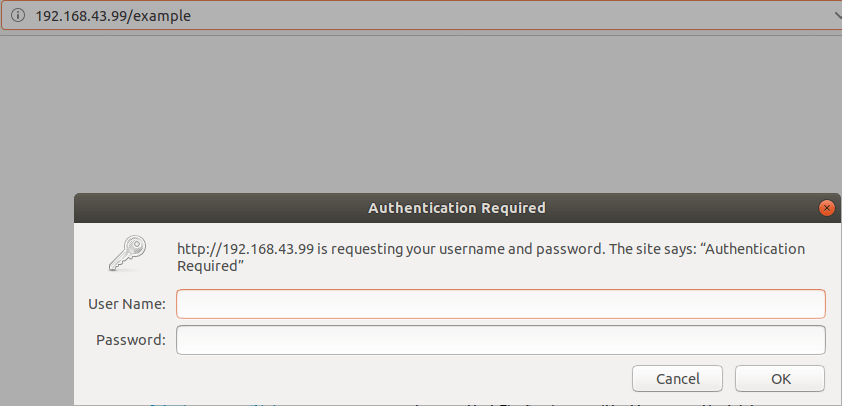
When you try to access your page on your browser, you should get a password prompt.
http://192.168.43.99/example
When you enter your Password, you can be able to see your site contents.

Setting up Password Protected Directory using .htaccess File
The .htaccess files also known as distributed configuration files, provide a way to make configuration changes on a per-directory basis. If it is possible, do not use this file at all as it will slow down your Apache HTTP server.
To use htaccess, create .htaccess file in the directory whose access is to be protected with the following content.
sudo vim /var/www/html/example/.htaccess
sudo chown www-data.www-data /var/www/html/example/.htaccess
 AuthType Basic
 AuthName "Restricted Content"
 AuthUserFile "/etc/apache2/.webroot"
 Require valid-user
After that, edit the main Apache config file or your virtual host config file and create a <Directory> block with the following content;
vim /etc/apache2/sites-available/example.conf
...
  ErrorLog /var/log/apache2/error-test.com.log
  CustomLog /var/log/apache2/access-test.com.log combined
  <Directory "/var/www/html/example">
    Options Indexes FollowSymLinks
    AllowOverride All
    Require all granted
  </Directory>
</VirtualHost>
Save and close the file when you are done making changes. After that, you need to restart you web server in order to effect the changes. When you navigate to the browser and try to access your site content, you should be prompted to authenticate.

Well, that is all about how to password protect an Apache directory using basic authentication. We hope this was informative.


Great, appreciate the guide. Thanks!
Perfect! Thank You!