In this tutorial, you will learn how to install Red Hat Satellite on RHEL 9. Red Hat Satellite is a powerful systems management tool that helps organizations efficiently manage Red Hat Enterprise Linux (RHEL) environments. With the latest release, Red Hat Satellite 6.16, administrators can now deploy, configure, and maintain RHEL systems with enhanced features and improved performance. Whether you’re managing software deployments, applying patches, or configuring systems, Red Hat Satellite offers powerful tools to streamline these tasks.
Table of Contents
How to Install Red Hat Satellite on RHEL 9
Prerequisites
Before diving into the installation, ensure you have the following:
1. System Requirements
- Architecture: x86_64
- Operating System: Latest versions of Red Hat Enterprise Linux (RHEL) 9 or RHEL 8 at the time of installation.
- CPU: Minimum 4-core, 2.0 GHz processor.
- RAM: Minimum 20 GB RAM (with an additional 4 GB swap space recommended).
- Storage: Sufficient disk space for the operating system and Satellite data (see detailed storage requirements below).
- Hostname: Unique hostname using lowercase letters, numbers, dots (
.), and hyphens (-). - Subscription: Active Red Hat Satellite subscription with the Infrastructure Subscription manifest in the Customer Portal. We’re using Red Hat Enterprise Linux Server 60-day self-supported trial subscription which provides access to Red Hat Satellite and Red Hat Insights.
- DNS Resolution: Full forward and reverse DNS resolution using a fully-qualified domain name (FQDN).
- Locale Settings: UTF-8 encoding is required; use
en_US.utf-8for USA/English environments. - Administrative Access: Root access is required for installation and configuration tasks. Or an account with sudo rights should suffice!
- SELinux Mode: SELinux must be enabled, either in enforcing or permissive mode (disabled SELinux is not supported).
- Synchronized Clock: The system clock must be synchronized across the network to ensure SSL certificate verification works correctly.
2. FIPS Mode
- Satellite can be installed on a RHEL system operating in FIPS mode. However, FIPS mode cannot be enabled after the installation of Satellite.
- Supported crypto-policies:
DEFAULTandFIPS. TheFUTUREcrypto-policy is not supported for Satellite and Capsule installations.
3. Storage Requirements
The following table outlines storage requirements for specific directories:
| Directory | Installation Size | Runtime Size |
|---|---|---|
/var/log | 10 MB | 10 GB |
/var/lib/pgsql | 100 MB | 20 GB |
/usr | 10 GB | Not Applicable |
/opt/puppetlabs | 500 MB | Not Applicable |
/var/lib/pulp | 1 MB | 300 GB |
For external database servers:
/var/lib/pgsql: Installation size of 100 MB, runtime size of 20 GB.
This is how our storage configuration is like;
lsblkNAME MAJ:MIN RM SIZE RO TYPE MOUNTPOINTS
sr0 11:0 1 1024M 0 rom
vda 252:0 0 60G 0 disk
├─vda1 252:1 0 1G 0 part /boot
└─vda2 252:2 0 59G 0 part
├─rhel-root 253:0 0 55G 0 lvm /
└─rhel-swap 253:1 0 4G 0 lvm [SWAP]
vdb 252:16 0 330G 0 disk
└─vdb1 252:17 0 330G 0 part
├─sat-pulb 253:2 0 309G 0 lvm /var/lib/pulp
├─sat-pubbetlabs 253:3 0 1G 0 lvm /opt/puppetlabs
└─sat-pgsql 253:4 0 20G 0 lvm /var/lib/pgsql
4. Storage Guidelines
- If
/tmpis mounted as a separate file system, ensure it uses theexecmount option in/etc/fstab. Avoid using thenoexecoption, as this is required for thepuppetserverservice to function. - Mount
/varon Logical Volume Manager (LVM) storage to improve scalability. - Use high-bandwidth, low-latency storage for
/var/lib/pulp/and PostgreSQL (/var/lib/pgsql) directories to avoid performance degradation. - Do not use the GFS2 file system due to high input-output latency.
- Manage log file sizes using
logrotate. Logs are written to/var/log/messages/,/var/log/httpd/, and/var/lib/foreman-proxy/openscap/content/. - Symbolic links are not supported for
/var/lib/pulp/.
5. Supported Operating Systems
- Red Hat Satellite Server is supported on:
- RHEL 9 (x86_64 only)
- RHEL 8 (x86_64 only)
Red Hat advises against installing Satellite on existing systems. A fresh RHEL installation with the @Base package group is required, without third-party configurations or software.
7. Port and Firewall Requirements
Incoming Traffic
| Destination Port | Protocol | Service | Source | Required For | Description |
|---|---|---|---|---|---|
| 53 | TCP/UDP | DNS | DNS Servers | Name resolution (optional) | Optional DNS service |
| 67 | UDP | DHCP | Clients | Dynamic IP (optional) | Optional DHCP service |
| 69 | UDP | TFTP | Clients | TFTP Server (optional) | |
| 443 | TCP | HTTPS | Capsule | API communication | Communication from Capsule |
| 443, 80 | TCP | HTTPS, HTTP | Clients | Global Registration | Registering hosts |
| 1883 | TCP | MQTT | Clients | Pull-based REX (optional) | Content hosts for REX job notification |
| 5910–5930 | TCP | HTTPS | Browsers | Compute Resource virtual console | |
| 8000 | TCP | HTTP | Clients | Provisioning templates | Template retrieval |
| 8000 | TCP | HTTPS | Clients | PXE Boot | Installation |
| 8140 | TCP | HTTPS | Clients | Puppet agent | Client updates |
| 9090 | TCP | HTTPS | Clients | OpenSCAP | Configure clients |
Outgoing Traffic
| Destination Port | Protocol | Service | Destination | Required For | Description |
|---|---|---|---|---|---|
| ICMP | ping | Free IP check | Clients | DHCP (optional) | Check free IPs |
| 7 | TCP | Echo | Clients | Free IP check (optional) | |
| 22 | TCP | SSH | Target host | Remote execution | Run jobs |
| 22, 16514 | TCP | SSH/TLS | Compute Resource | Libvirt communication | |
| 53 | TCP/UDP | DNS | DNS Servers | Resolve DNS records (optional) | |
| 80 | TCP | HTTP | Remote repo | Content Sync | Remote repositories |
| 389, 636 | TCP | LDAP/LDAPS | External LDAP | Authentication (optional) | |
| 443 | TCP | HTTPS | CDN | Content Sync | Red Hat CDN |
| 443 | TCP | HTTPS | Cloud plugins | API calls |
8. Configuring the Firewall
To enable incoming connections from clients:
firewall-cmd --add-port={8000,9090}/tcp --permanentfirewall-cmd --add-service={dns,dhcp,tftp,http,https,puppetmaster} --permanentfirewall-cmd --reloadVerify the configuration:
firewall-cmd --list-allpublic (active)
target: default
icmp-block-inversion: no
interfaces: eth0
sources:
services: cockpit dhcp dhcpv6-client dns http https puppetmaster ssh tftp
ports: 8000/tcp 9090/tcp
protocols:
forward: yes
masquerade: no
forward-ports:
source-ports:
icmp-blocks:
rich rules:
9. Verifying DNS Resolution
Ensure full forward and reverse DNS resolution using a fully-qualified domain name (FQDN). Test with the following commands:
Check hostname;
hostnamectl Static hostname: satellite.kifarunix-demo.com
Icon name: computer-vm
Chassis: vm 🖴
Machine ID: b8357e9f59cb4f41a48269ec4c1a6b31
Boot ID: 42f9b0e45c0343b0b5e48d2164f9b246
Virtualization: kvm
Operating System: Red Hat Enterprise Linux 9.4 (Plow)
CPE OS Name: cpe:/o:redhat:enterprise_linux:9::baseos
Kernel: Linux 5.14.0-427.13.1.el9_4.x86_64
Architecture: x86-64
Hardware Vendor: QEMU
Hardware Model: Standard PC _Q35 + ICH9, 2009_
Firmware Version: 1.16.2-debian-1.16.2-1
Check DNS forward and reverse resolution;
dig satellite.kifarunix-demo.com +short192.168.122.234dig -x 192.168.122.234 +shortsatellite.kifarunix-demo.com.10. Additional Considerations
- Inter-Satellite Synchronization (ISS): In air-gapped environments, all Satellite Servers must be on the same version for ISS Export Sync to work. ISS Network Sync works across all supported versions.
- Synchronized RHEL ISOs: If you plan to synchronize RHEL content ISOs, note that all minor versions will also be synchronized. Plan for adequate storage.
- Certified Hypervisors: Satellite is fully supported on physical systems and virtual machines running on certified hypervisors (e.g., Red Hat Virtualization, KVM).
Read more on the documentation.
Allow Access to Red Hat CDN via HTTP Proxy
If your network requires an HTTP proxy to access external resources, you must configure Satellite Server to connect through the proxy. Ensure that your network gateway and HTTP proxy allow access to the following hosts via port 443 (HTTPS), and that these hosts are added to your proxy’s allowlist:
subscription.rhsm.redhat.comcdn.redhat.comcert.console.redhat.com(if using Red Hat Insights)api.access.redhat.com(if using Red Hat Insights)cert-api.access.redhat.com(if using Red Hat Insights)
Then, configure the Satellite Server’s /etc/rhsm/rhsm.conf file with the proxy settings. If no proxy is used, this configuration is not necessary.
vim /etc/rhsm/rhsm.conf# Fully Qualified Domain Name (FQDN) of the HTTP proxy server
proxy_hostname = http-proxy.example.com
# Port number for the HTTP proxy server
proxy_port = 8080
# Username for authenticating to the HTTP proxy (if required)
proxy_user =
# Password for basic HTTP proxy authentication (if required)
proxy_password =
Replace http-proxy.example.com and 8080 with your proxy server’s FQDN and port. If authentication is required, provide the appropriate credentials.
subscription-manager register \
  --proxy=http-proxy.example.com \
--proxyport=8080--proxyuser and --proxypassword if your proxy requires authentication.
Refer to subscription-manager register --help for more optionsRegister Satellite Server to Red Hat Subscription Management
Registering the Satellite Server with Red Hat Subscription Management allows the system to access the necessary Red Hat repositories, which are required to install and update Satellite and other Red Hat Enterprise Linux (RHEL) packages. To do this, use the subscription-manager register command. You’ll be prompted to enter your Customer Portal username and password.
subscription-manager registerOnce registered, the server will be able to subscribe to and consume content from the available subscriptions, including RHEL and Satellite content.
Registering to: subscription.rhsm.redhat.com:443/subscription
Username: USERNAME
Password: PASSWORD
The system has been registered with ID: 82ce2a55-9771-487e-9385-e183cddf7074
The registered system name is: satellite.kifarunix-demo.com
You can confirm which subscriptions are available;
subscription-manager list --availableSample output;
+-------------------------------------------+
    Available Subscriptions
+-------------------------------------------+
Subscription Name:   Red Hat Beta Access
Provides:            Red Hat Satellite Capsule Beta
                     Red Hat Enterprise Linux for SAP Applications for IBM z Systems Beta
                     Red Hat Enterprise Linux for SAP Applications for Power, little endian Beta
                     Red Hat Enterprise Linux Fast Datapath Beta for Power, little endian
                     Red Hat Enterprise Linux Resilient Storage Beta
                     Red Hat Enterprise Linux for SAP Applications for x86_64 Beta
                     Red Hat CodeReady Linux Builder for IBM z Systems Beta
                     Red Hat Enterprise Linux for SAP HANA for x86_64 Beta
                     Red Hat Enterprise Linux Advanced Virtualization Beta (for RHEL Server for IBM System Z)
                     Red Hat CodeReady Linux Builder for x86_64 Beta
                     Red Hat Enterprise Linux for SAP HANA for Power, little endian Beta
                     Red Hat Directory Server Beta
                     Red Hat Enterprise Linux for Power, little endian Beta
                     Red Hat Certificate System Beta
                     Red Hat Enterprise Linux for Real Time for NFV Beta
                     Red Hat Satellite Beta
                     Red Hat Enterprise Linux for Real Time Beta
                     Red Hat Enterprise Linux Fast Datapath Beta for x86_64
                     Red Hat Enterprise Linux for x86_64 Beta
                     Red Hat Enterprise Linux for IBM z Systems Beta
                     Red Hat Enterprise Linux for ARM 64 Beta
                     Red Hat CodeReady Linux Builder for ARM 64 Beta
                     Red Hat CodeReady Linux Builder for Power, little endian Beta
                     Red Hat Enterprise Linux High Availability Beta
SKU:                 RH00069
Contract:
Pool ID:             2c9477d895156f53019534574805466b
Provides Management: No
Available:           Unlimited
Suggested:           1
Service Type:        L1-L3
Roles:
Service Level:       Self-Support
Usage:
Add-ons:
Subscription Type:   Standard
Starts:              02/23/2025
Ends:                04/23/2025
Entitlement Type:    Physical

Subscription Name:   60 Day Product Trial of Red Hat Enterprise Linux Server with Satellite and all Add-Ons, Self-Supported (Physical or Virtual Nodes)
Provides:            Red Hat Beta
                     Red Hat Software Collections (for RHEL Server)
                     Red Hat Enterprise Linux for x86_64
                     Red Hat CodeReady Linux Builder for x86_64
                     Red Hat Ansible Engine
                     Red Hat Enterprise Linux High Performance Networking (for RHEL Server) - Extended Update Support
                     Oracle Java (for RHEL Server)
                     Red Hat CodeReady Linux Builder for x86_64 - Extended Update Support
                     Red Hat Container Images Beta
                     Red Hat Developer Tools (for RHEL Server)
                     Red Hat Satellite Capsule
                     Red Hat Developer Tools Beta (for RHEL Server)
                     Oracle Java (for RHEL Server) - Extended Update Support
                     Red Hat Enterprise Linux Server
                     dotNET on RHEL (for RHEL Server)
                     Red Hat Software Collections Beta (for RHEL Server)
                     Red Hat Enterprise Linux Load Balancer (for RHEL Server) - Extended Update Support
                     Red Hat Enterprise Linux High Availability for x86_64
                     Red Hat Enterprise Linux Atomic Host Beta
                     Red Hat Satellite
                     Red Hat Container Images
                     Red Hat Enterprise Linux Scalable File System (for RHEL Server) - Extended Update Support
                     Red Hat Enterprise Linux Scalable File System (for RHEL Server)
                     Red Hat Enterprise Linux Load Balancer (for RHEL Server)
                     Red Hat Enterprise Linux Atomic Host
                     Red Hat Enterprise Linux High Availability for x86_64 - Extended Update Support
                     Red Hat Developer Toolset (for RHEL Server)
                     Red Hat Enterprise Linux Resilient Storage for x86_64 - Extended Update Support
                     Red Hat Enterprise Linux Resilient Storage for x86_64
                     Red Hat Enterprise Linux High Performance Networking (for RHEL Server)
                     Red Hat Enterprise Linux for x86_64 - Extended Update Support
                     dotNET on RHEL Beta (for RHEL Server)
SKU:                 RH00066
Contract:
Pool ID:             2c94e27b94d777c0019534570b0e37d8
Provides Management: Yes
Available:           2
Suggested:           1
Service Type:
Roles:               Red Hat Enterprise Linux Server
Service Level:       Self-Support
Usage:               Development/Test
Add-ons:
Subscription Type:   Instance Based
Starts:              02/23/2025
Ends:                04/23/2025
Entitlement Type:    Physical
You should be able to see what content your subscription gives you access to. For our case, see our 60 Day Product Trial subscription.
Enable Required Repositories on Satellite Server
Ensure that the correct repositories are enabled on your system to install and maintain Red Hat Satellite 6.16 on Red Hat Enterprise Linux (RHEL) 9.
By default, BaseOS and AppStream repos are enabled when you register your server to the subscription management;
subscription-manager repos --list-enabled+----------------------------------------------------------+
Available Repositories in /etc/yum.repos.d/redhat.repo
+----------------------------------------------------------+
Repo ID: rhel-9-for-x86_64-appstream-rpms
Repo Name: Red Hat Enterprise Linux 9 for x86_64 - AppStream (RPMs)
Repo URL: https://cdn.redhat.com/content/dist/rhel9/$releasever/x86_64/appstream/os
Enabled: 1
Repo ID: rhel-9-for-x86_64-baseos-rpms
Repo Name: Red Hat Enterprise Linux 9 for x86_64 - BaseOS (RPMs)
Repo URL: https://cdn.redhat.com/content/dist/rhel9/$releasever/x86_64/baseos/os
Enabled: 1
So, you need to enable Red Hat Satellite for RHEL 9 repositories by running the command below;
subscription-manager repos \
--enable=satellite-6.16-for-rhel-9-x86_64-rpms \
--enable=satellite-maintenance-6.16-for-rhel-9-x86_64-rpms
Then verify again:
dnf repolist enabledrepo id repo name
rhel-9-for-x86_64-appstream-rpms Red Hat Enterprise Linux 9 for x86_64 - AppStream (RPMs)
rhel-9-for-x86_64-baseos-rpms Red Hat Enterprise Linux 9 for x86_64 - BaseOS (RPMs)
satellite-6.16-for-rhel-9-x86_64-rpms Red Hat Satellite 6.16 for RHEL 9 x86_64 (RPMs)
satellite-maintenance-6.16-for-rhel-9-x86_64-rpms Red Hat Satellite Maintenance 6.16 for RHEL 9 x86_64 (RPMs)
Update Satellite Server
Now that you have repos in place, update your Satellite server.
dnf update -yAfter the update, reboot the system;
rebootInstall Red Hat Satellite on RHEL 9
Next, run the command below to install Red Hat Satellite server on RHEL 9.
dnf install satelliteConfigure Satellite Server on RHEL 9
The configuration of Red Hat Satellite Server is performed using the satellite-installer script, which automates the setup process. This script allows you to configure Satellite by specifying command-line options that override default settings. These configurations are saved in the Satellite answer file for future reference or reconfiguration.
During the initial setup, the installer creates essential entities such as an organization, location, administrator credentials, and installs PostgreSQL databases on the same server. While this configuration can be extended later (e.g., adding more organizations or locations), certain values, like the internal label for the organization, cannot be changed after creation.
The installation process may take several minutes to complete. If working remotely, it’s recommended to use tools like tmux to maintain session persistence in case of disconnection. In the event of a lost connection, check the logs at /var/log/foreman-installer/satellite.log to verify the installation status.
Run the following command, replacing placeholders with your desired values:
satellite-installer --scenario satellite \
--foreman-initial-organization "My_Organization" \
--foreman-initial-location "My_Location" \
--foreman-initial-admin-username admin_user_name \
--foreman-initial-admin-password admin_password
Where:
--foreman-initial-organization: Specifies the name of the initial organization (e.g., your company name).--foreman-initial-location: Defines the initial location (e.g., data center or department).--foreman-initial-admin-username: Sets the username for the administrator account.--foreman-initial-admin-password: Sets the password for the administrator account.
Consult help page for more info: satellite-installer --scenario satellite --help
Sample installation output;
2025-02-23 20:40:59 [NOTICE] [root] Loading installer configuration. This will take some time.
2025-02-23 20:41:02 [NOTICE] [root] Running installer with log based terminal output at level NOTICE.
2025-02-23 20:41:02 [NOTICE] [root] Use -l to set the terminal output log level to ERROR, WARN, NOTICE, INFO, or DEBUG. See --full-help for definitions.
2025-02-23 20:41:52 [NOTICE] [configure] Starting system configuration.
2025-02-23 20:42:14 [NOTICE] [configure] 250 configuration steps out of 1523 steps complete.
2025-02-23 20:42:24 [NOTICE] [configure] 500 configuration steps out of 1525 steps complete.
2025-02-23 20:42:49 [NOTICE] [configure] 750 configuration steps out of 1527 steps complete.
2025-02-23 20:42:53 [NOTICE] [configure] 1000 configuration steps out of 1553 steps complete.
2025-02-23 20:43:07 [NOTICE] [configure] 1250 configuration steps out of 1553 steps complete.
2025-02-23 20:47:04 [NOTICE] [configure] 1500 configuration steps out of 1553 steps complete.
2025-02-23 20:47:15 [NOTICE] [configure] System configuration has finished.
  Success!
  * Satellite is running at https://satellite.kifarunix-demo.com
      Initial credentials are admin_user_name / admin_password

  * To install an additional Capsule on separate machine continue by running:

      capsule-certs-generate --foreman-proxy-fqdn "$CAPSULE" --certs-tar "/root/$CAPSULE-certs.tar"
  * Capsule is running at https://satellite.kifarunix-demo.com:9090

The full log is at /var/log/foreman-installer/satellite.log
Package versions are being locked.
Accessing Red Hat Satellite Web Interface
Once the setup is complete, you should now be able to access and login to Red Hat Satellite server web interface using the address and the credentials configured above.
Since the SSL generated is during setup is self signed, just accept the warning on browser and proceed to Satellite login page.
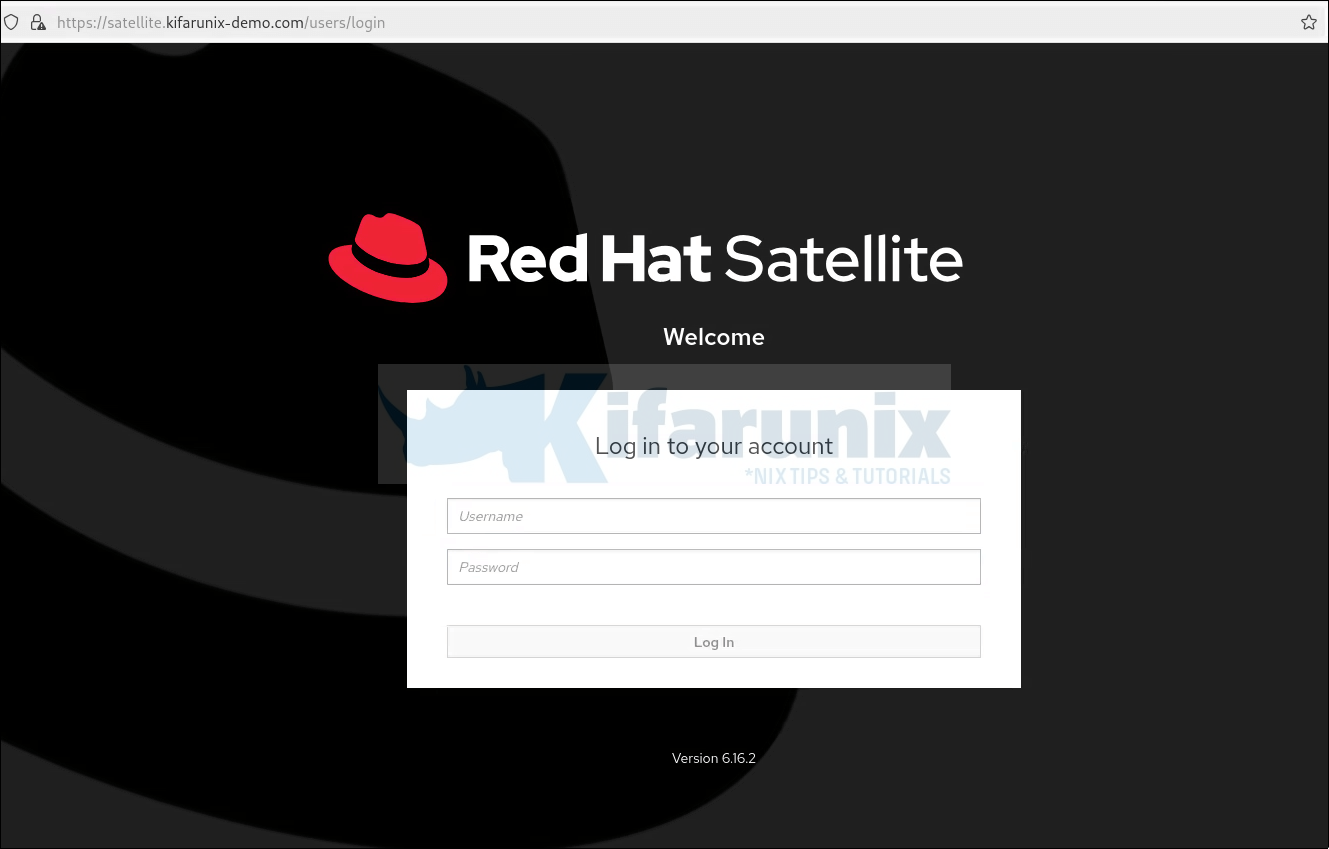
Login with your configured credentials.
Dashboard overview.
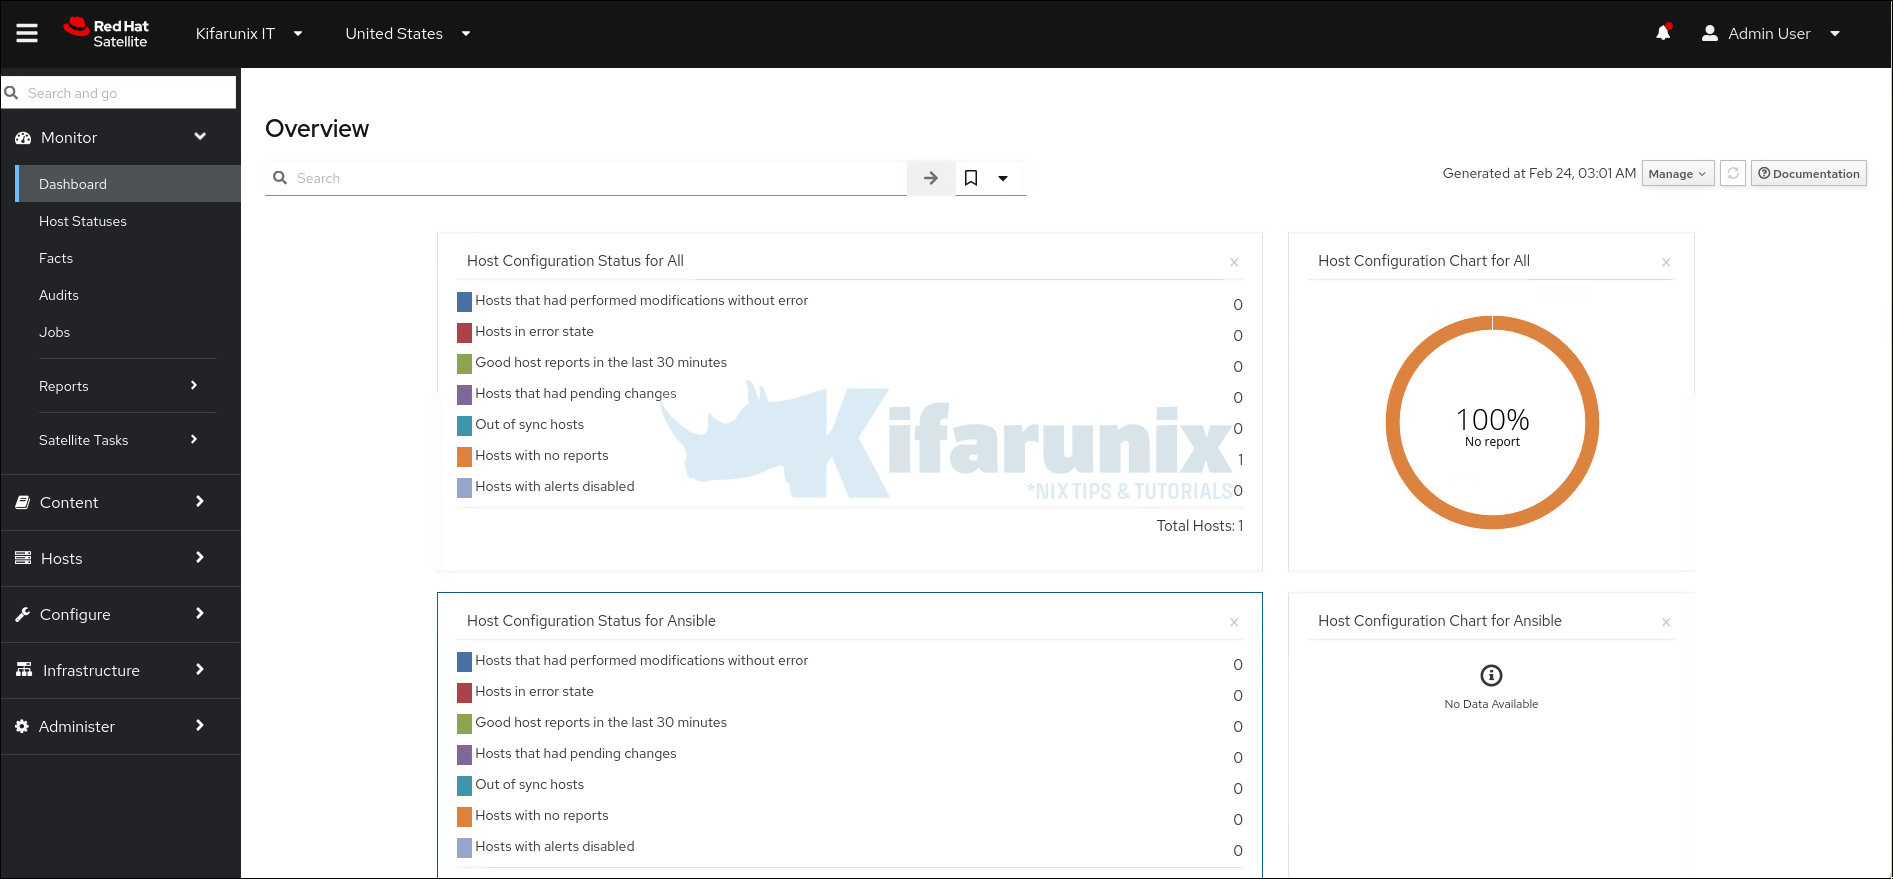
Import Red Hat Subscription Manifest into Satellite Server
A Red Hat Subscription manifest is a file that contains information about the subscriptions and entitlements associated with a Red Hat customer account. It acts as a bridge between the Red Hat Customer Portal and Red Hat Satellite, enabling Satellite to access and manage the subscriptions for registered systems within an organization.
Without a valid subscription manifest, Satellite cannot access Red Hat’s content delivery network (CDN) or manage subscriptions for client systems.
By default, there are no subscriptions imported into Satellite server.
You can check under Content > Subscriptions.
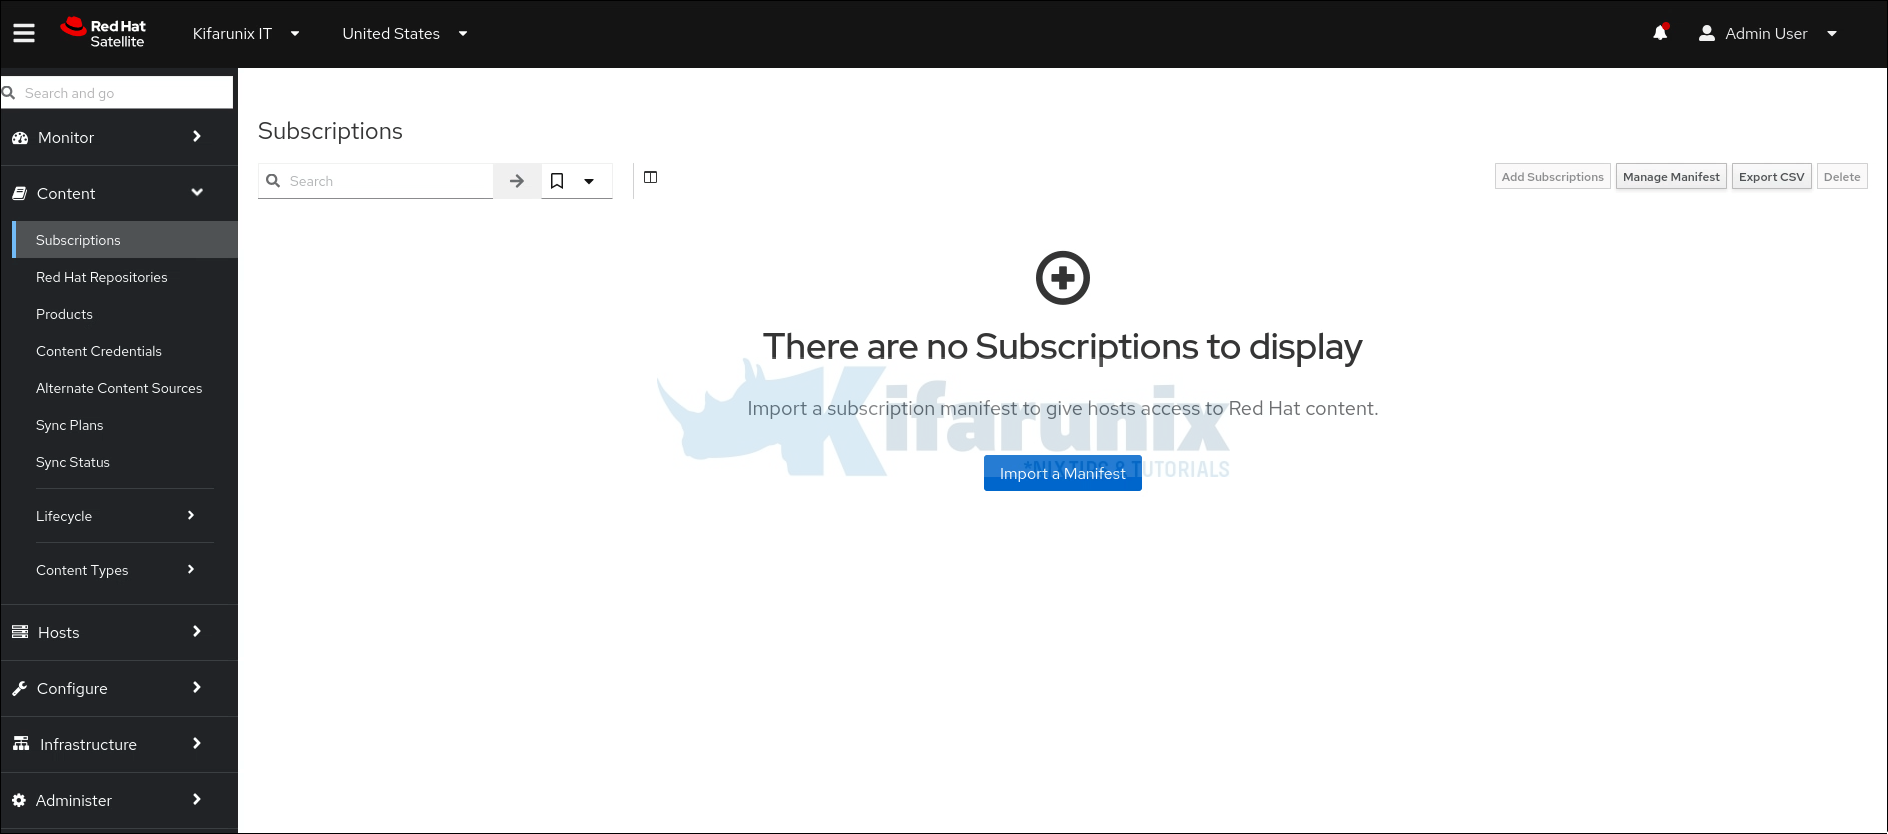
Create Manifest File on Red Hat Hybrid Cloud Console
We are running a connected Satellite server in our environment. If you are also running a connected Satellite server, then head over to Red Hat Hybrid Cloud Console.
But, what is the difference between connected and disconnected Satellite server?
- A Connected Satellite is one that has direct access to the Red Hat Content Delivery Network (CDN). This means the Satellite server can automatically download the latest updates, security patches, and software packages from Red Hat’s CDN.
- A Disconnected Satellite (also known as an air-gapped Satellite ) does not have direct access to the Red Hat CDN. Instead, content must be manually synchronized from another system that has access to the CDN, such as a different Satellite server or a Red Hat Insights instance. This mode is often used in environments where internet access is restricted or prohibited due to security policies, compliance requirements, or operational constraints (e.g., highly secure government or military networks). To update a disconnected Satellite, administrators typically use a process called Synchronization via Satellite Capsule or Manual Download and Transfer where content is downloaded on a separate system with internet access and then transferred to the disconnected Satellite using portable storage devices (e.g., USB drives) or secure network connections.
Therefore, navigate to the cloud console and create your manifest file.
On the console, navigate to Services > Subscriptions and Spend > Manifests.
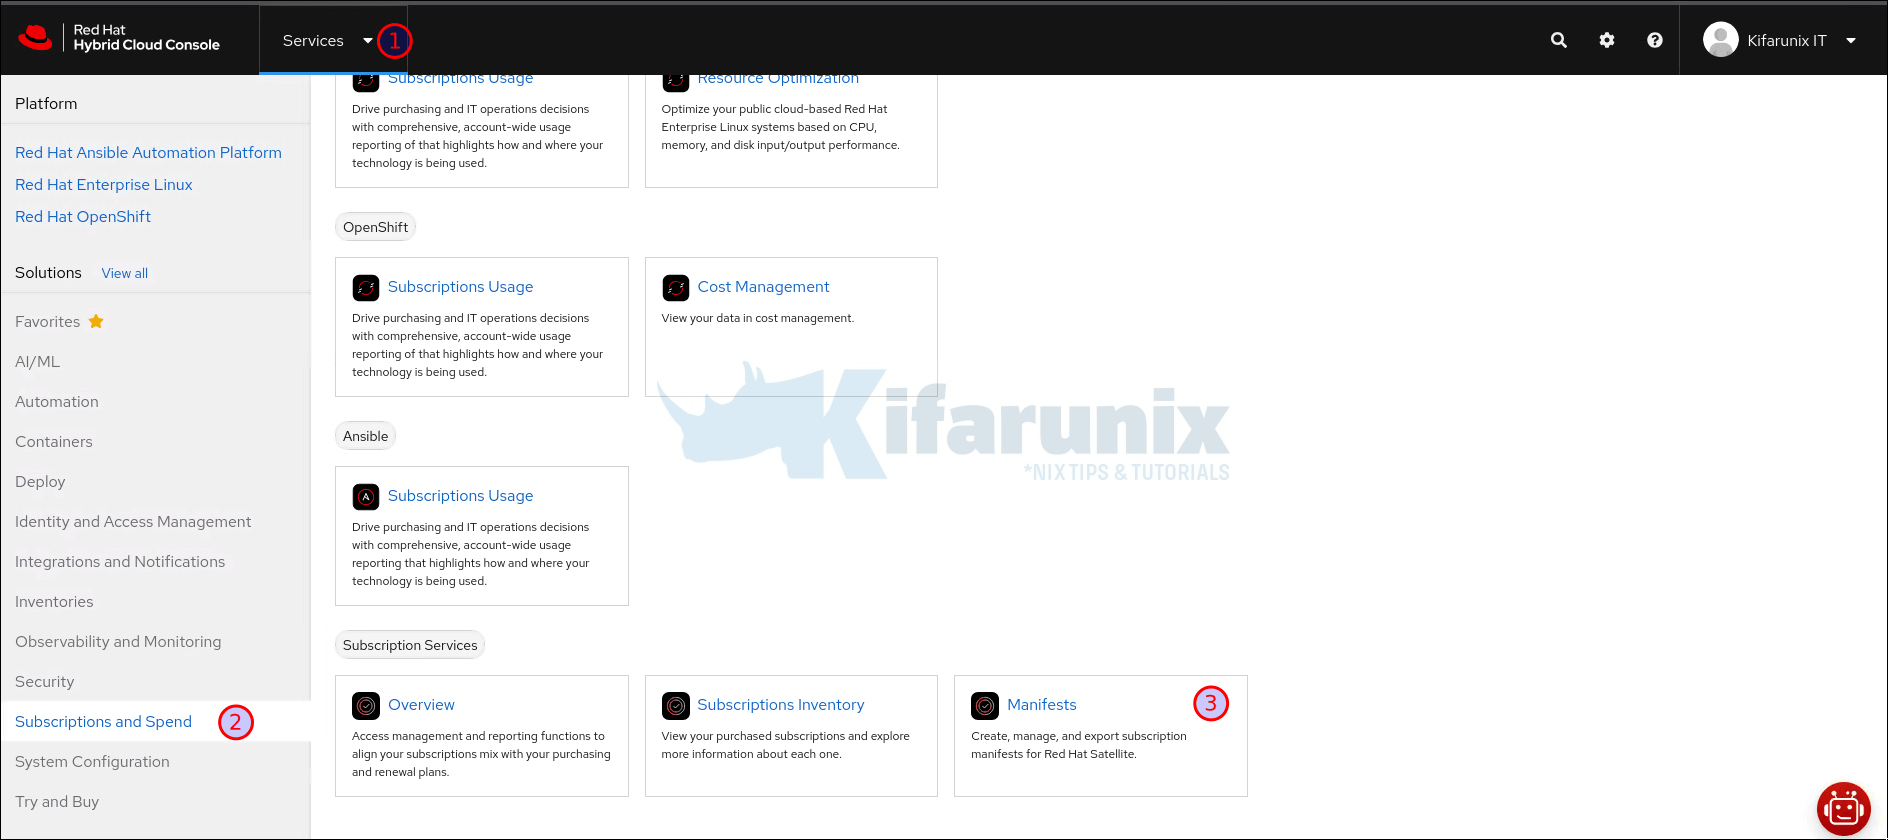
On the Manifests page:
- Click Create new manifest
- Set a unique name of the manifest
- Choose the correct version of Satellite server you are running e.g Satellite 6.16
- Click Create when done
Your manifest page now look like;
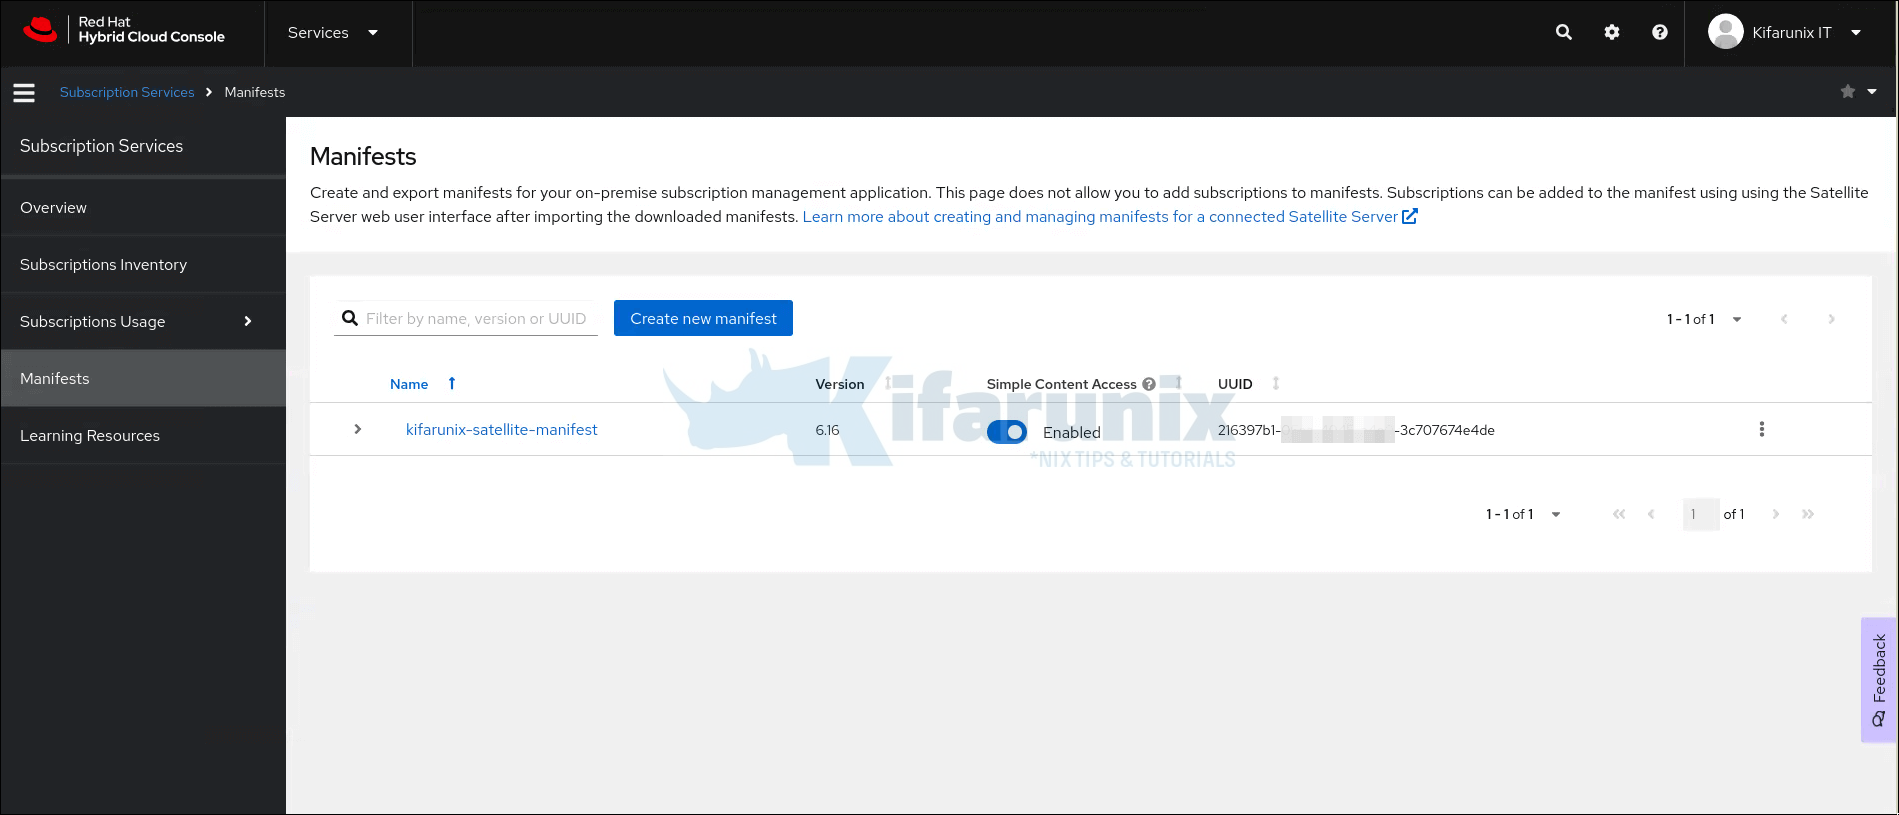
Click the three dots against the manifest and click Export to generate downloadable Manifest file. When export is completed, there will be a pop up window with the download link. From the notification window, click Download manifest to save the Manifest zip file to your system.
Import Manifest into Satellite Server
You can import the manifest into Satellite server using either:
- Satellite Web User Interface or
- Using CLI through the hammer command.
To import the manifest via the Satellite server web UI, login to the Satellite web UI and navigate to Content > Subscriptions > Import a Manifest.
When you click Import a Manifest option, Manage Manifest window pops up. You can then click Browse to be able choose your Manifest zip file from the location where you saved it on your system and import it.
You can check the progress under Monitor > Satellite Tasks.
If you want to use CLI tio import, then copy the Manifest zip file into Satellite server using SCP or RSYNC commands. After that, login to the Satellite server via SSH and navigate to the path where you copied to file.
hammer subscription upload \
--file ~/manifest-file.zip \
--organization "organization_name"
Add Subscriptions to Subscription Allocations in Satellite
Once you have imported the manifest, you have to add subscriptions to the subscriptions allocation in the Satellite. Hence, head over to Content > Subscriptions > add subscriptions.
You will be presented with the available subscriptions. On the row of each subscription you want to add, for example, my 60-day product trial, enter the quantity in the Quantity to Allocate column

Click Submit to add subscriptions.
You subscriptions should now be available under Content > Subscriptions.
You can also list subscriptions from the CLI on Satellite server.
hammer subscription list --organization "Kifarunix IT"Sample output;
---|----------------------------------|----------------------------------------------------------------------------------|----------|----------|----------|--------------|---------------------|---------------------|----------|---------
ID | UUID                             | NAME                                                                             | TYPE     | CONTRACT | ACCOUNT  | SUPPORT      | START DATE          | END DATE            | QUANTITY | CONSUMED
---|----------------------------------|----------------------------------------------------------------------------------|----------|----------|----------|--------------|---------------------|---------------------|----------|---------
1  | 4028fa6a95359fac0195385fe5d11d0d | 60 Day Product Trial of Red Hat Enterprise Linux Server with Satellite and al... | Physical |          | 12154778 | Self-Support | 2025/02/23 05:00:00 | 2025/04/24 03:59:59 | 1        | 0
---|----------------------------------|----------------------------------------------------------------------------------|----------|----------|----------|--------------|---------------------|---------------------|----------|---------
Enable Required Red Hat Repositories
Next, you need to enable the necessary repositories on the Satellite server. This ensures that client systems can access the required software packages, updates, and errata through the Satellite server.
Thus:
- Navigate to Satellite web interface and head over to Content > Red Hat Repositories. You will see a list of available repositories. You can toggle to Recommended repositories button to see only recommended ones.
- In this guide, we will add repos for RHEL 6, 7, 8 and 9.
- Thus, search for the repository you need, click a repository to expand the repository set. You can filter repos by the product name.
- Click the Enable (+) icon next to the base architecture to enable the repository.
- If you need to be able to server specific Minor OS version repos like 7.9, 8.8, 9.3, ensure you enable all the minor repositories as well.
This is how our enabled repos look like;
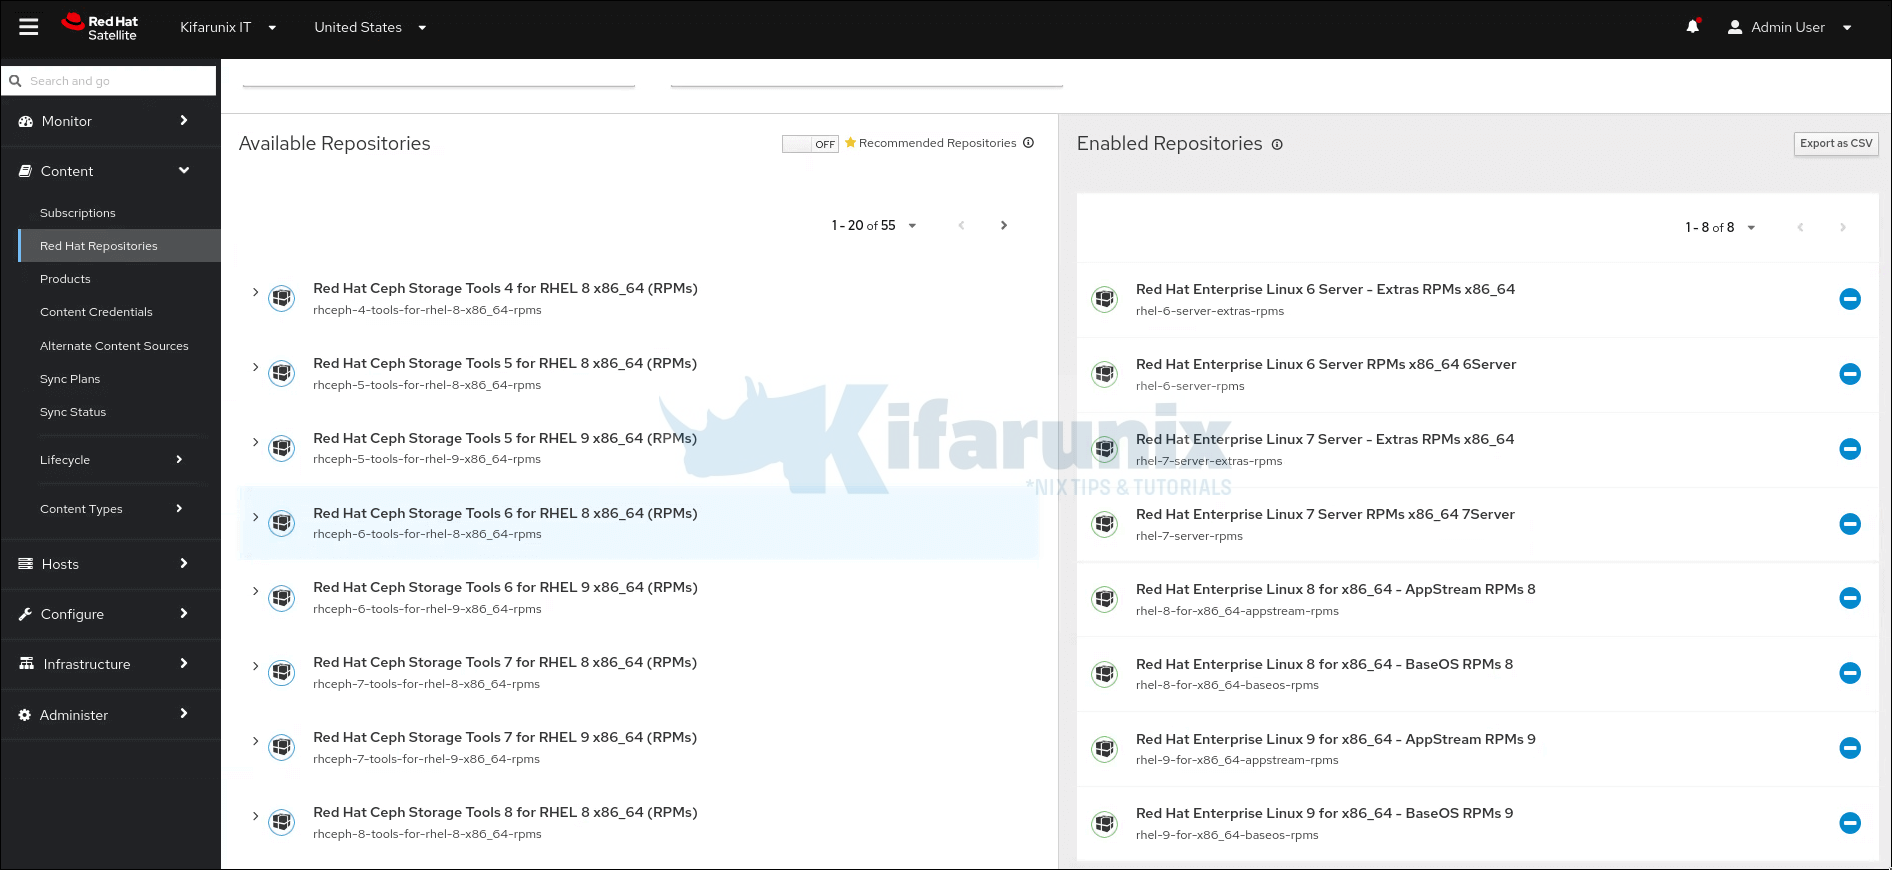
You can also do this from the CLI using hammer command (hammer product/repository-set) commands.
Create Red Hat Repositories Sync Plans
Repository sync plans in Red Hat Satellite are designed to schedule and automate the synchronization of content (e.g., software packages, updates, and errata) from the Red Hat Content Delivery Network (CDN) to your Satellite server. This ensures that your organization’s systems remain up-to-date with the latest software versions and security patches while providing centralized control over when and how content is synchronized.
To create a Sync plan, navigate to Content > Sync Plans > Create Sync Plan. On the Sync plan creation page, define:
- the name of the plan
- description of the plan
- internal of sync
- start date
- start time
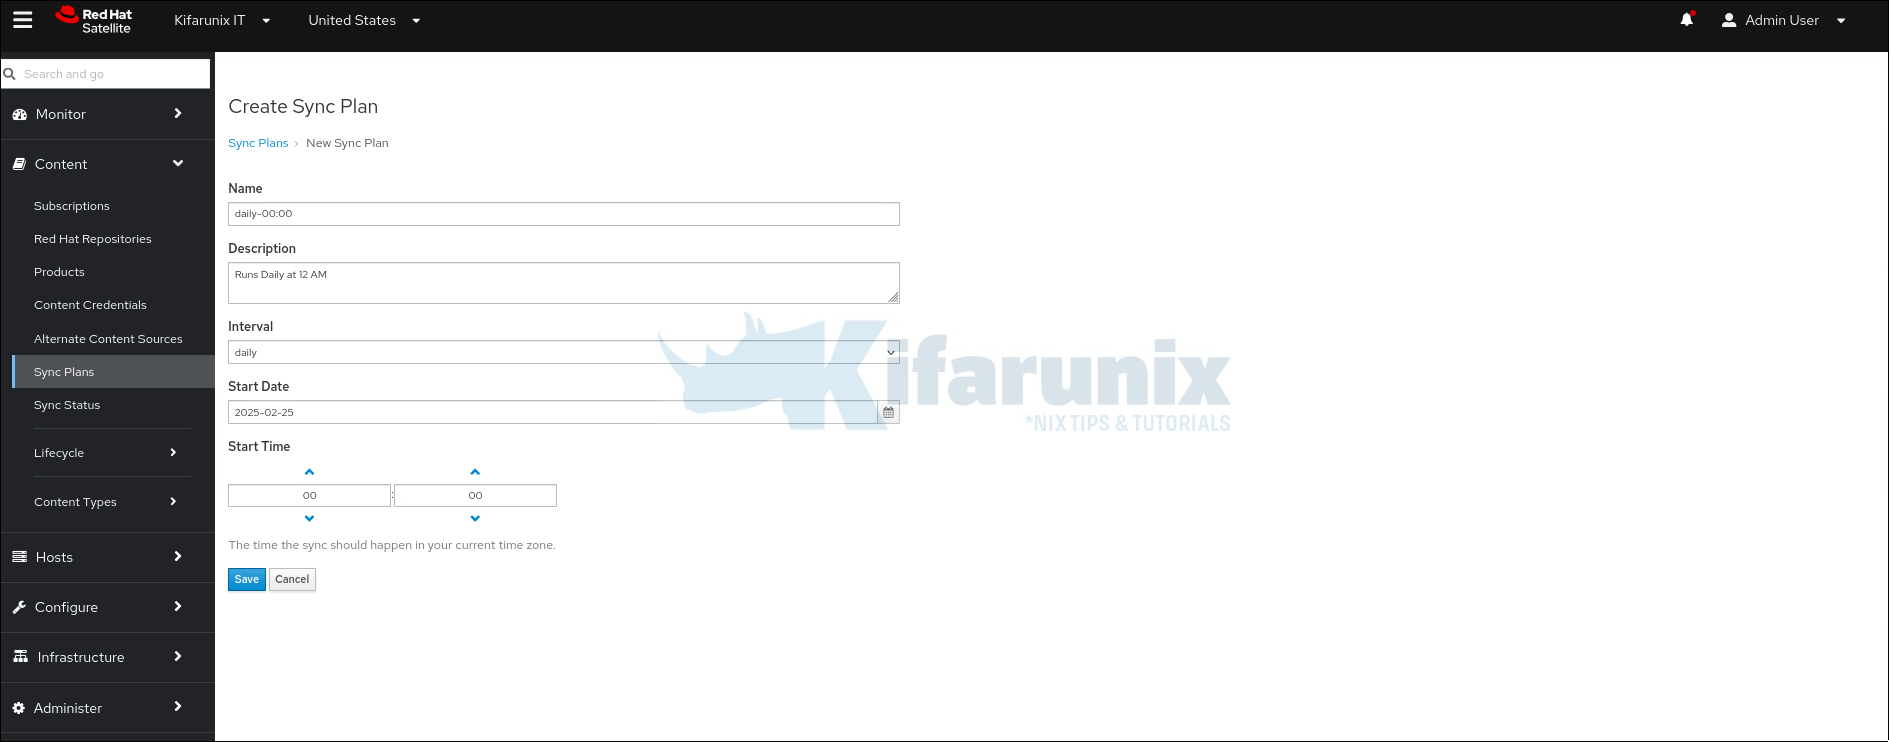
Click Save to save the plan.
Once the sync plan is created, click Products tab and click Add to add the repositories that you want to be synchronized using this schedule.

Once you select the repositories, click Add Selected at the far left. Once added, they should now be visible on List/Remove tab.
To initiate the repository sync right away, click Select Action at the far left and hit Run Sync Plan. You can check the sync progress under Content > Sync Status.
The synchronization duration depends on the size of each repository and the speed of your network connection.
Application Lifecycle Management
Lifecycle Environments define the stages through which content flows, such as Development, Testing, Staging, and Production. They enable staged deployment of content, allowing administrators to test updates in isolated environments before deploying them to production systems.
By default, all content hosted on Satellite is available under library lifecycle environment (Content > Lifecycle > Lifecycle Environments).
So, if you want, you can create your applications lifecycle environments. Navigate to Content > Lifecycle > Lifecycle Environments > Create Environment Path.
Provide the name, label and description of the environment. To create the next stage, click + Add New Environment and select respective prior environment.

Creating Content Views in Red Hat Satellite
A Content View is a curated collection of repositories, errata, and packages tailored for specific purposes or environments. It allows administrators to organize, filter, and customize content before delivering it to client systems.
They act as the bridge between Lifecycle Environments and client systems, ensuring that only approved content is promoted through the lifecycle.
Suppose your organization has three departments such as Development, Testing and QA, and Production. You can create separate Content Views for each department. You can also create specific OS content view like RHEL9, RHEL8, RHEL7…
Create content view from Content > Lifecycle > Content View > Create Content view. You can check the Solve dependencies check box.
Next, add the repositories into the content view by clicking Show repositories and selecting respective repos to add to the content view.

Once you have added the repositories, publish the new version of the content view (Click Publish new version). By default, the content view will be published to default Library. However, click the Promote button to be able to select to which environment you want to publish to.
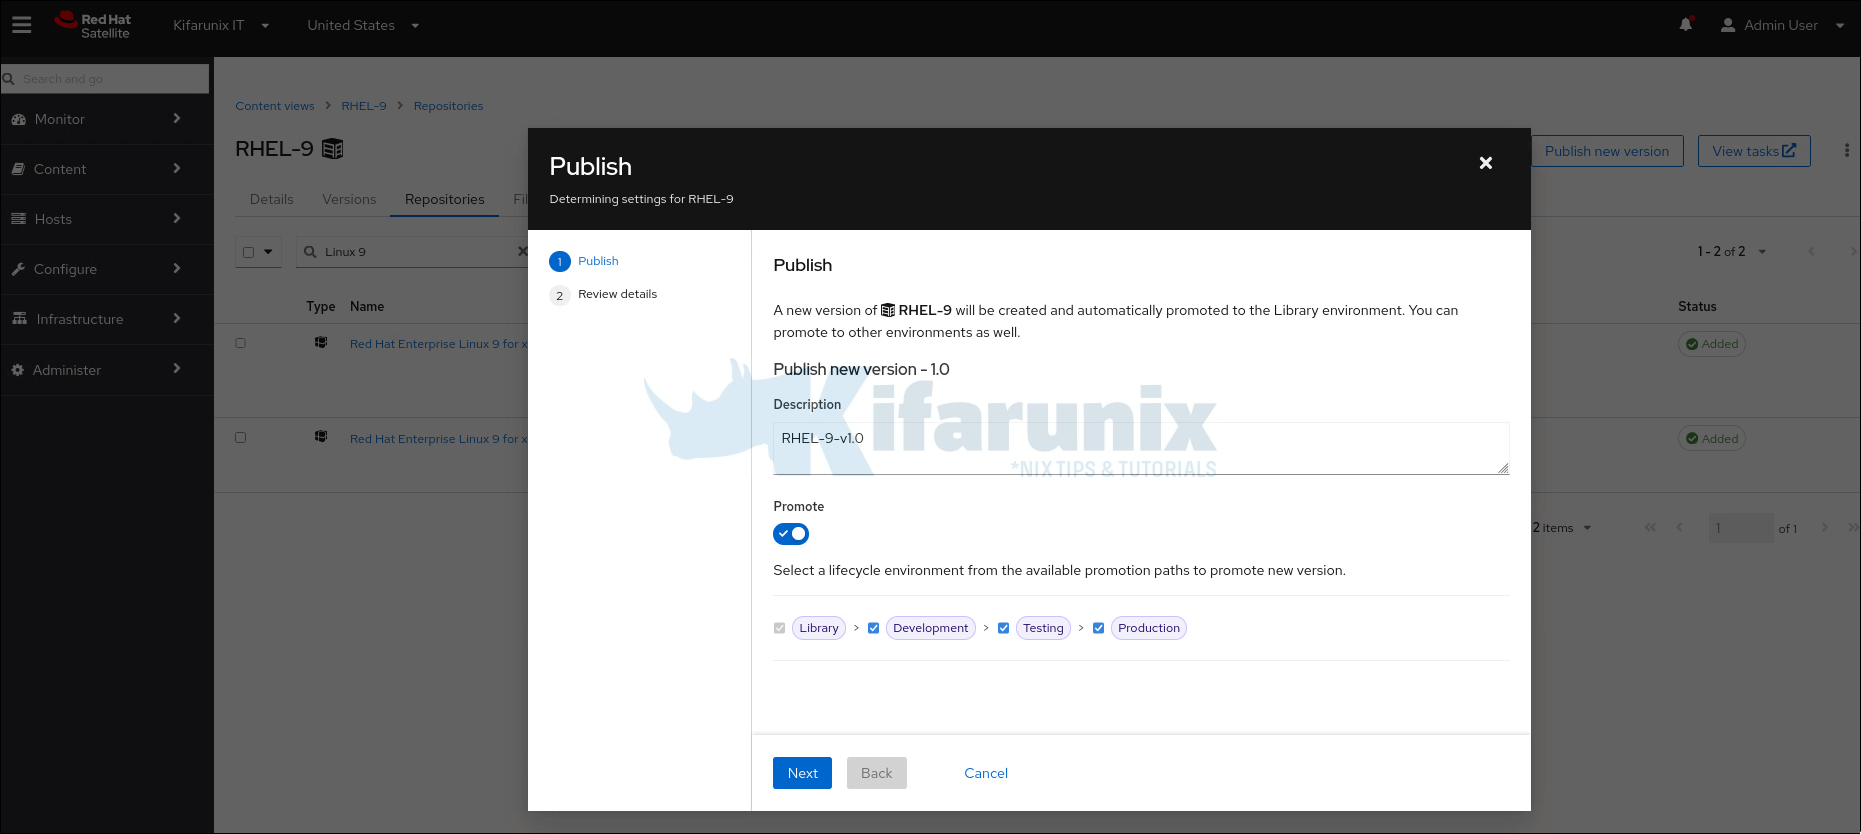
Review and Publish.
Create Satellite Activation Keys
Activation Keys automate the registration and configuration of client systems with Satellite. They streamline the process of assigning subscriptions, repositories, Content Views, and Lifecycle Environments to newly registered systems. They ensure that registered systems inherit the correct access to specific repositories and content defined in the associated Content View.
If you have created different lifecycle environments, you can create activation keys for each one of them.
Thus, head over to Content > Lifecycle > Activation Keys > Create Activation Key. Provide:
- The name of the key
- Choose if you want to limit the key usage to specific number of hosts (Unlimited by default).
- The description (optional)
- Environment to use.
- Content view for the respective environment.
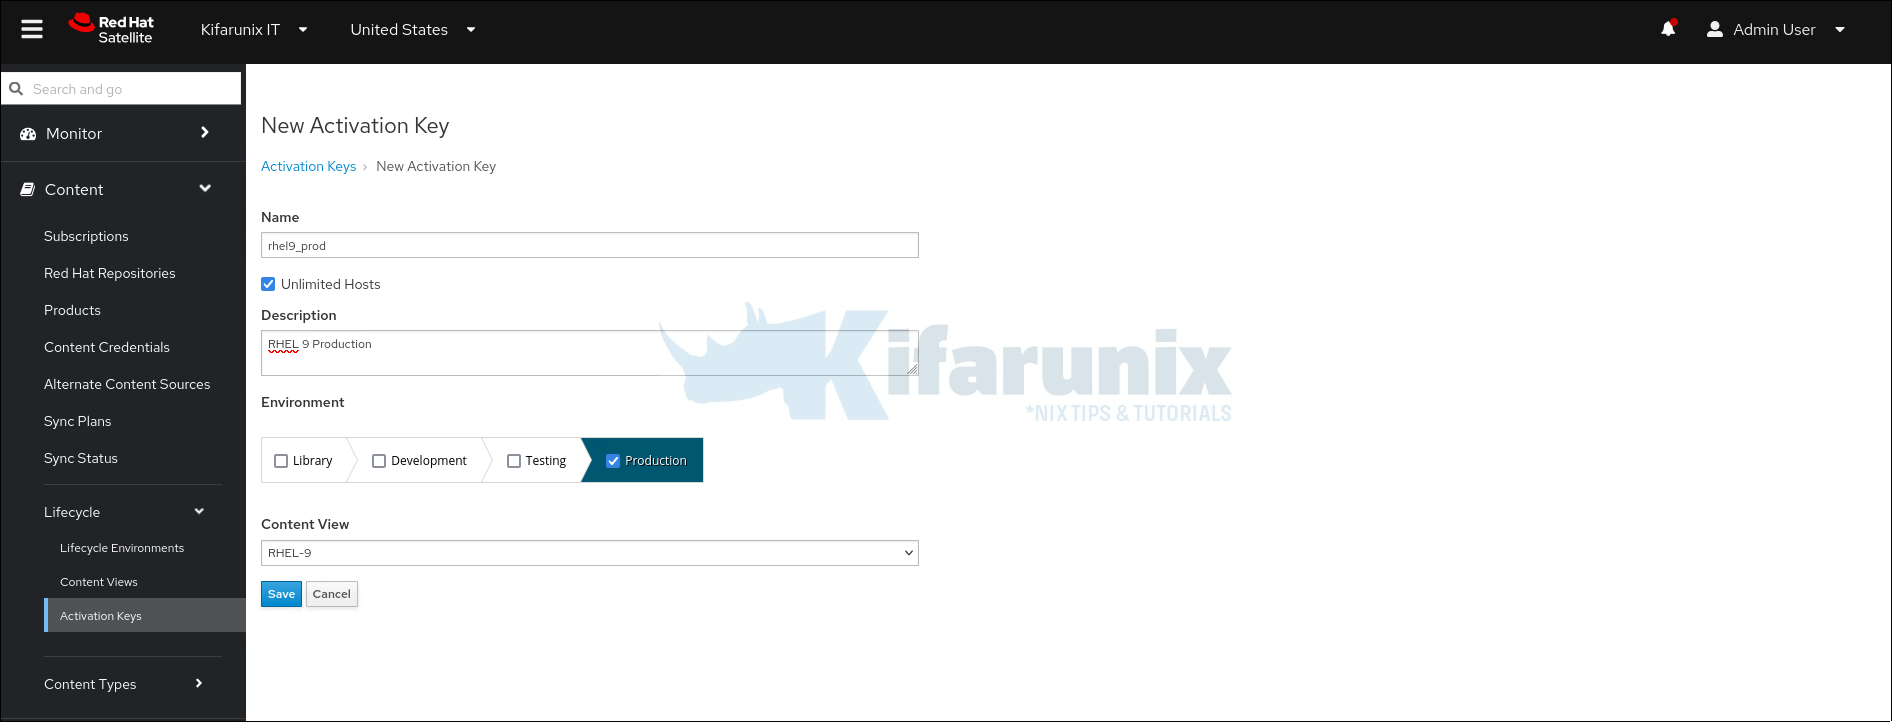
- Click Save.
- Details page will open up there after.
- Next, you need to check and enable required repositories that will be served by the key. Hence:
- Click Repository Sets tab
- Select all repos you need to enable
- Click Select Action drop down button
- Click Override to Enable
- Similarly, if you need to disable some repositories, select and click Override to Disable.
If you want, you can also use CLI to manage the activation keys.
hammer activation-key --helpRegister and Patch RHEL Servers using Satellite
You can follow the guide below to register your RHEL servers to Satellite and start patching them.
Register and Patch hosts using Satellite
Conclusion
At this point, the Satellite server is nearly setup and is ready to manage your hosts. In the next guide, we will discuss how to register hosts to Satellite and patch them using Satellite. That brings us to the end of our tutorial on how to install Red Hat Satellite on RHEL 9.
Other Tutorials
Understanding Red Hat Satellite: A Detailed Guide to Its Architecture and Key Features
Effortless CentOS to RHEL Migration with the Convert2RHEL Tool

