How to Automate RHEL OS Upgrades Using Ansible Automation Platform (AAP) is a question many Linux sysadmins and DevOps teams are asking as they face the challenge of upgrading Red Hat Enterprise Linux (RHEL) systems at scale. With over a decade of hands-on experience in Linux system administration and automation, I’ve seen how manual leapp-based upgrades may work for a few servers but quickly become cumbersome and time-consuming when performed one by one across dozens or hundreds of nodes. This is where AAP proves invaluable, offering centralized orchestration, version control integration, and repeatable workflows to simplify and scale the upgrade process.
Table of Contents
Automate RHEL OS Upgrades Using Ansible Automation Platform (AAP)
Why Use AAP for RHEL OS Upgrades?
While Ansible playbooks can run from any Ansible control node, AAP provides:
- Centralized management: run upgrades across your environment from a single dashboard.
- GitOps-style integration: directly sync playbooks from GitHub/GitLab.
- Role-based access control (RBAC): ensure only authorized teams can trigger upgrades.
- Scalability: run jobs across tens or hundreds of RHEL nodes simultaneously.
- Visibility: track results, logs, and compliance from a central UI.
In short AAP is purpose-built for enterprise sysadmins who want to manage upgrades at scale.
Prerequisites for Automating RHEL Upgrades with AAP
Before automating RHEL OS upgrades using AAP, make sure the following prerequisites are met:
- Ansible Automation Platform (AAP) is installed and operational
If you don’t have AAP already running, check out our step-by-step guide on installing AAP on RHEL 9 to get started. - Tested and validated Red Hat CoP Infra.Leapp Collection playbooks
In our previous guide, we extensively covered how to perform RHEL OS upgrades using the Red Hat CoPinfra.leappcollection playbooks via the command line. In this guide, we’ll take it a step further by demonstrating how to use Ansible Automation Platform (AAP) to centrally manage and orchestrate these OS upgrades replacing manual CLI execution with scalable, automated workflows. - An Ansible Automation Platform (AAP) Project is already created
An AAP Project serves as the source for your automation content, including playbooks, inventories, and supporting files. Ensure that a project is already set up and available to the AAP Controller. This project can be:- Created locally in the designated projects directory on the AAP controller server, or
- Imported from a source code management control system such as GitHub or GitLab
- Ensure access to the Git repository containing your project (if using Git repo to host the OS upgrade project). If the repo is private, configure authentication using Personal Access Token (for HTTPS-based access).
Automate RHEL OS Upgrades Using Ansible Automation Platform
Step 1: Prepare Your Ansible Project
As already mentioned in the prerequisites, you should have a working Ansible project that includes tested and validated playbooks from the infra.leapp collection. This project serves as the foundation for your OS upgrade automation.
In this guide, since we’re building upon the work covered in our previous tutorial, we’ve forked the official Red Hat CoP infra.leapp Git repository, customized it to suit our environment, and created our own GitHub project.
We’ll now demonstrate how to import Git-based automation project into AAP, so it can be used as the source for job templates and workflows.
This is how my main customized Leapp Ansible project structure is like:
tree ..
├── inventory
│ ├── group_vars
│ │ └── all.yml
│ └── rhel
├── playbooks
│ ├── analysis.yml
│ ├── preflight.yml
│ ├── remediate.yml
│ └── upgrade.yml
├── README.md
└── requirements.yml
4 directories, 8 filesWhere:
- inventory: Contains your inventory files:
group_vars/all.yml – variables applied to all groups or hostsrhel– host inventory file for RHEL systems
- playbooks; Main automation playbooks:
analysis.yml– runs pre-upgrade analysis checkspreflight.yml– prepares the system for upgraderemediate.yml– applies fixes based on analysisupgrade.yml– runs the actual upgrade process
- requirements.yml: Specifies collections to install, including our fork of the
infra.leappcollection:---
collections:
- name: https://github.com/mibeyki/infra.leapp.fork.git
type: git
- name: ansible.posix
version: ">=1.5.1"
- name: community.general
version: ">=6.6.0"
- name: fedora.linux_system_roles # or redhat.rhel_system_roles see upgrade readme for more details
version: ">=1.21.0"
Step 2: Create SCM Credentials (Optional)
If you are using Git to host your upgrade project playbooks and the repository is private, you must create SCM credentials in Ansible Automation Platform (AAP) to allow the system to access and pull from the repository.
If the repository is public, credentials are not required.
To create credentials:
- Log in to the AAP Dashboard.
- Navigate to Automation Execution (Automation Controller) > Infrastructure > Credentials.
- Click Create credential.
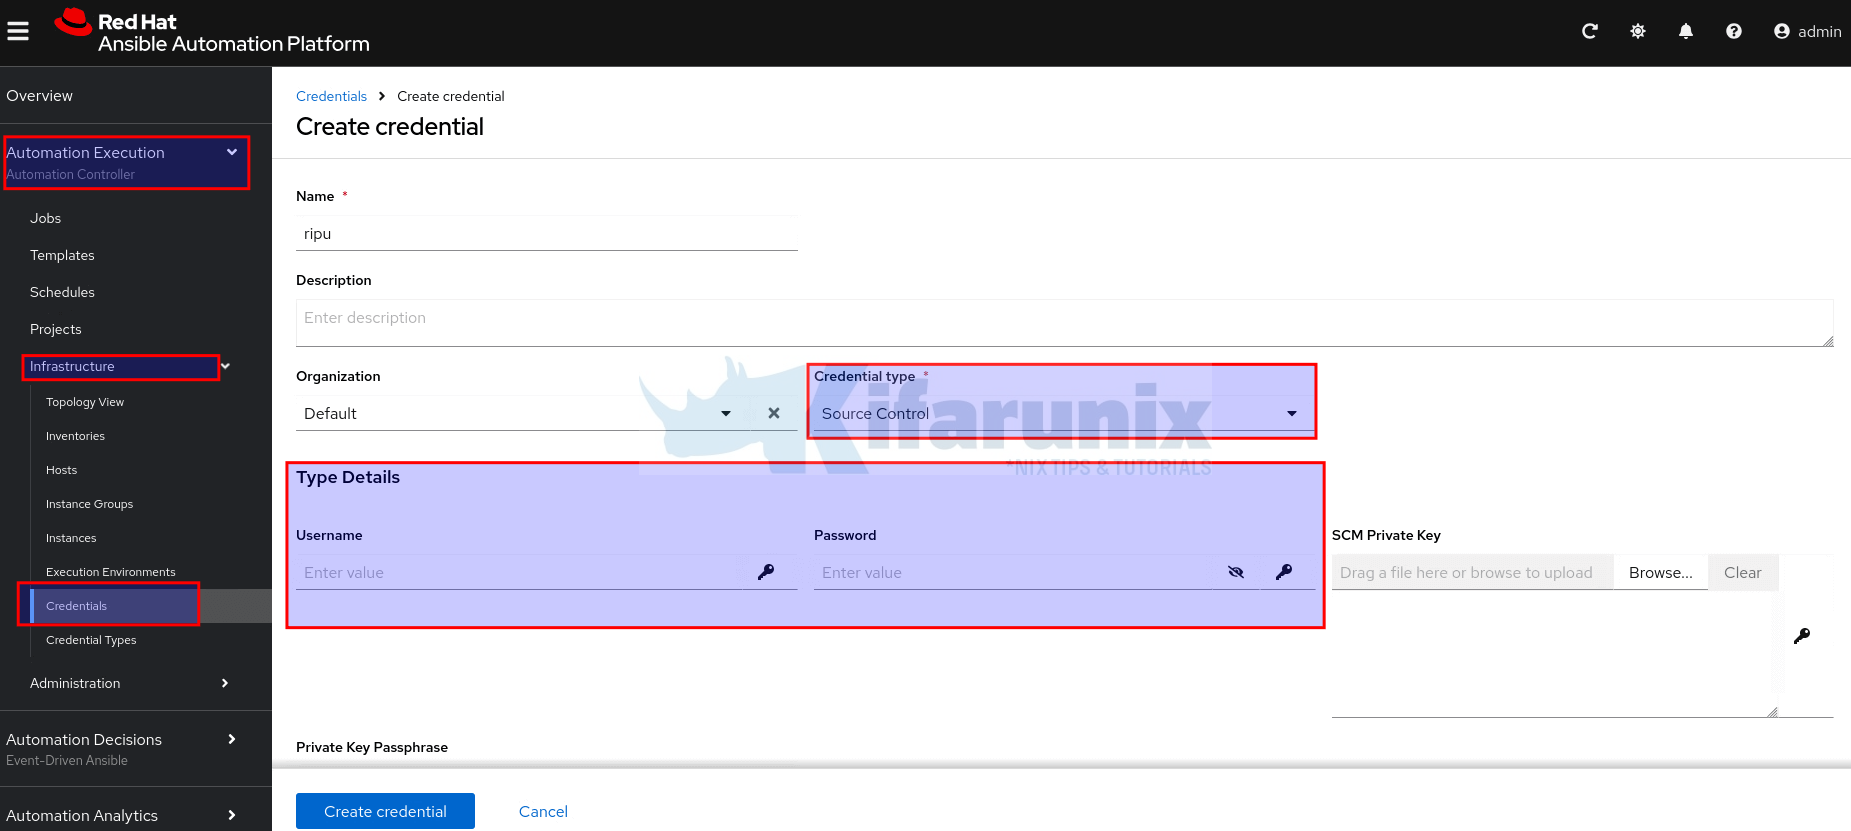
- Fill in the form with the following information:
- Name: Enter a meaningful name for the credential.
- Description (optional): Add a description if needed.
- Organization: Choose an organization from the list, or use Default.
- Credential Type: Select Source Control from the drop-down list (click load more if not visible from the list, or simply search with keyword “source”).
- After selecting the credential type, the Type Details section will appear with fields specific to that type. Complete the fields relevant to your selected type:
- For SSH-based access: Provide your private key and optional passphrase.
- For HTTPS-based access: Provide your Git username and either password or personal access token.
- Click Create credential to save.
After saving, the Credential Details page is displayed. From there, or from the Credentials list view, you can edit or delete the credential later if needed, manage access with teams/specific users…
Step 3: Create Automation Project on AAP
Once your project structure is ready and all required files (playbooks, inventory, requirements.yml) are in place, the next step is to create an automation project in Ansible Automation Platform (AAP).
This will allow AAP to pull your code (e.g., from GitHub) and run your playbooks within templates or workflows.
Therefore:
- Login to AAP gateway server web UI.
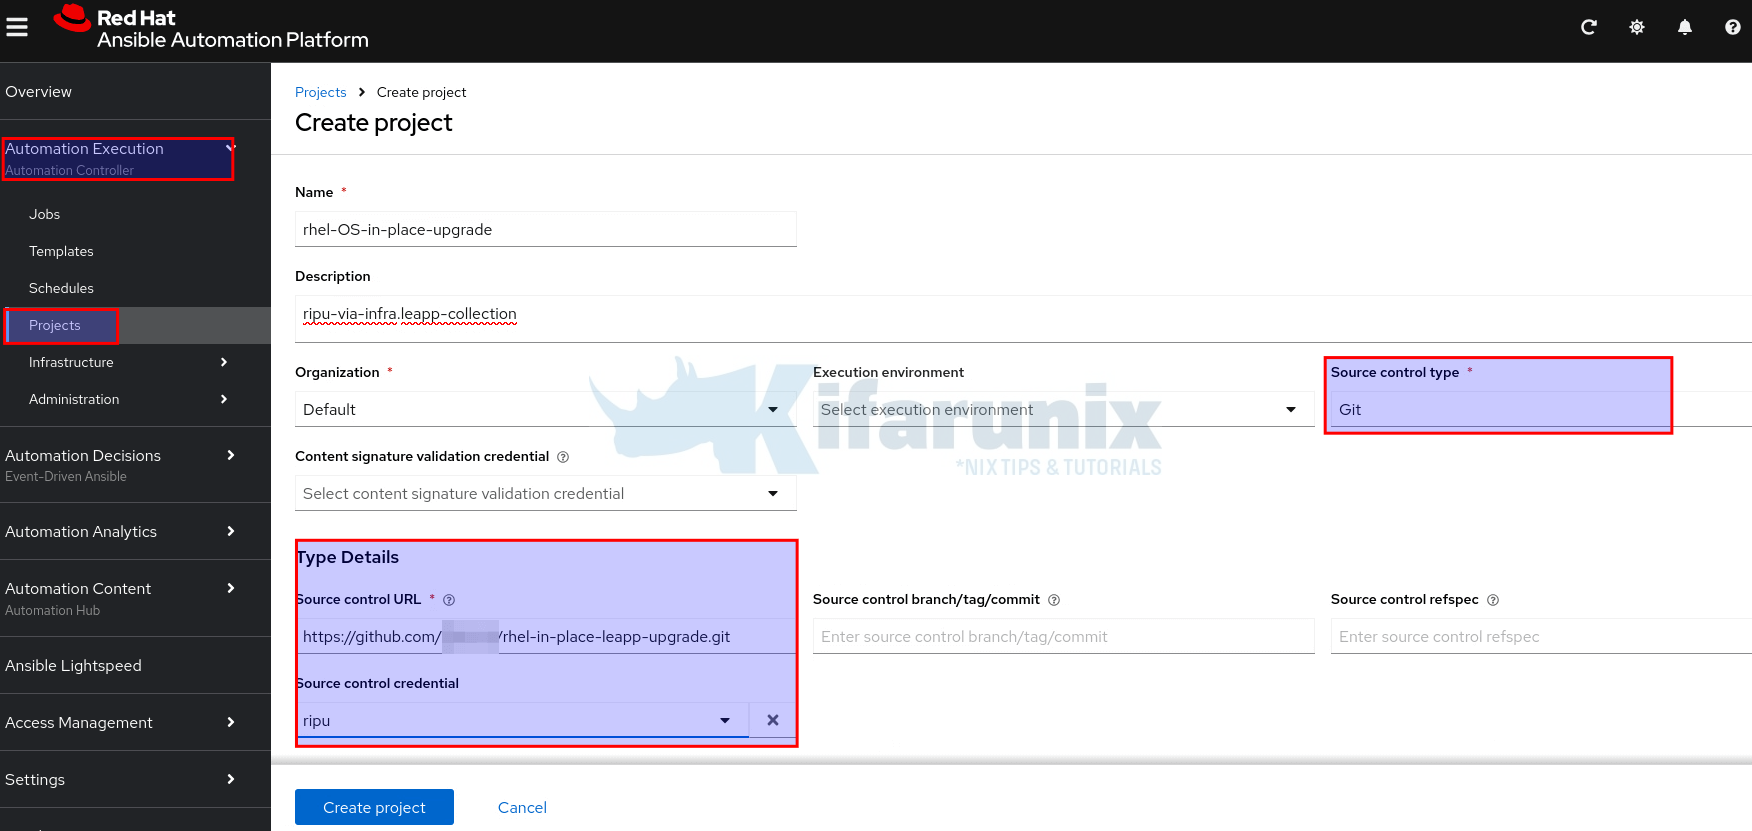
- Navigate to Automation Execution (Automation Controller) > Projects.
- Click Create project.
- Fill out the form:
- Name: Provide a unique name for the project.
- Description (optional): Add a short description if needed.
- Organization: Select the appropriate organization e.g Default
- Execution environment (optional): Select or enter the name of the execution environment this project should use. You can leave it out to use the default.
- Source Control Type: Choose your source control system (e.g., Git).
- After selecting the source control type, the Type Details section will appear with fields specific to that type. Complete the fields relevant to your selected type:
- Source control URL: Enter the URL of your Git repository.
- Source control Credential (optional): If using private Git repo, provide the required credential here.
- Click Create project to save and sync.
Step 4: Create Project Inventory and Add Hosts
After you’ve created a Project (which links to your playbooks from Git, etc.), the next step is to create an Inventory. An Inventory in AAP is a collection of hosts (nodes/servers) that Ansible will manage. Hence, on the AAP gateway server web UI:
- Navigate to Automation Execution (Automation Controller) > Infrastructure > Inventories.
- Click Create inventory > Create inventory.
- Fill out the form with the following info:
- Name: Provide a unique name for the inventory.
- Description (optional): Add a short description if needed.
- Organization: Select the appropriate organization e.g Default
- Fill out the rest of the details including any variables applicable to your inventory hosts.
- Click Create inventory to save.
Add Hosts to the Inventory
After creating the inventory, you can either manually add hosts or configure a dynamic inventory source if your environment already includes a host inventory file. In our Git project above, we include a host inventory, hence, we will simply import the hosts direct from the project inventory.
Therefore:
- Go back to Automation Execution (Automation Controller) > Infrastructure > Inventories
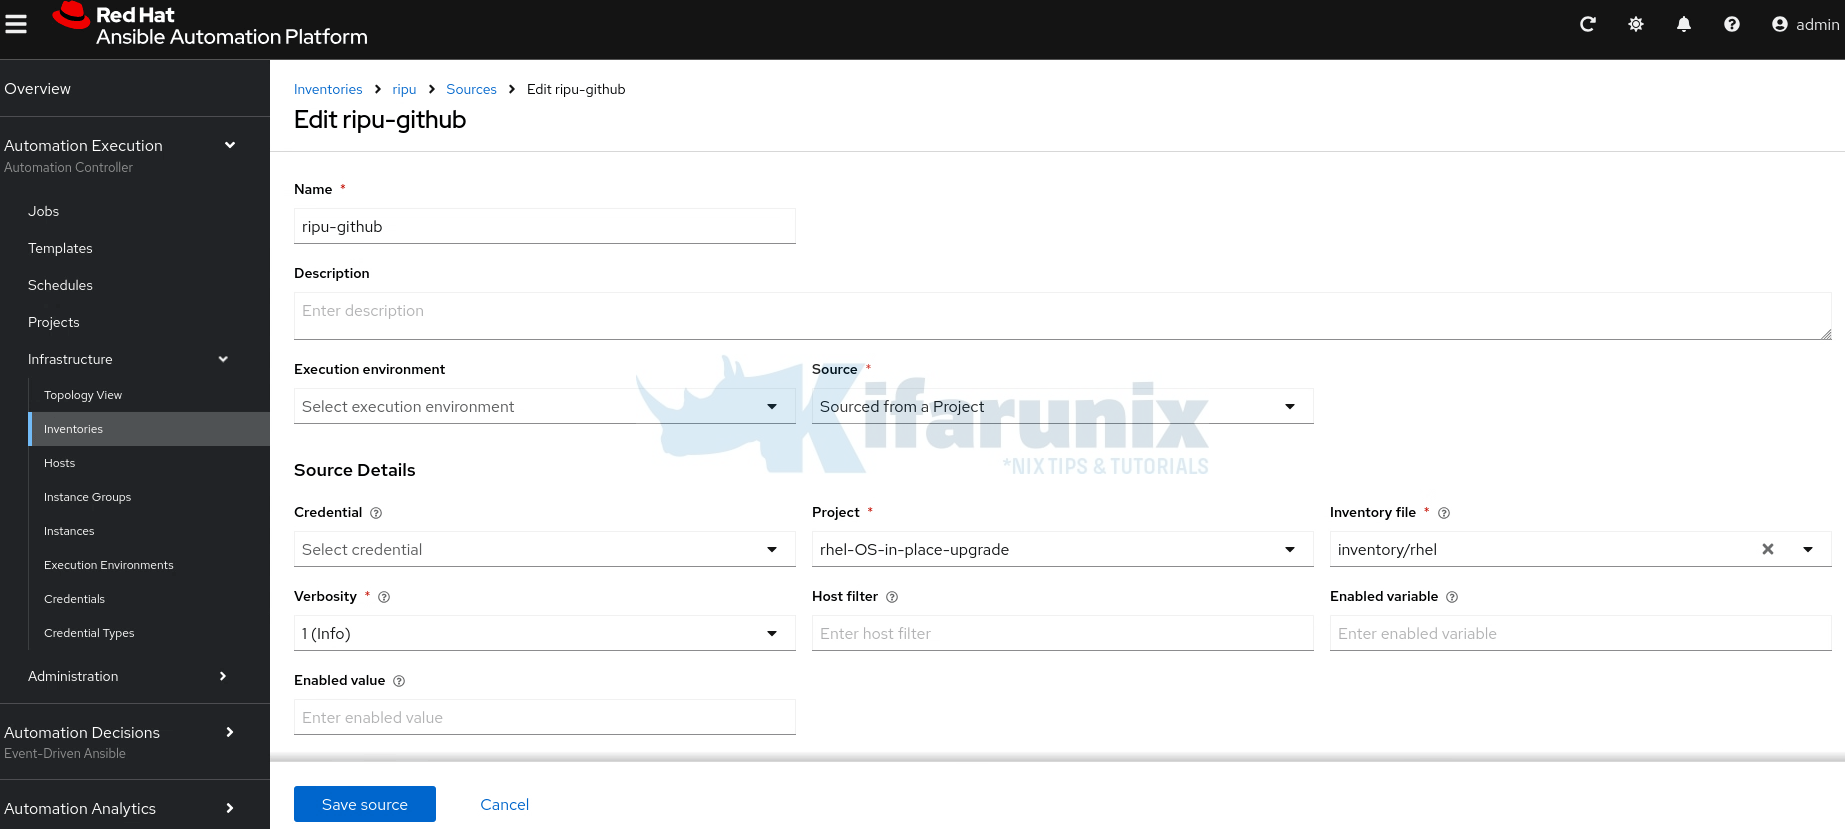
- Select your inventory and click the Sources option > Create source.
- Provide:
- The name of the source
- Optional description for your source
- Optional Execution Environment
- Source > Source from a Project.
- Once you select the source type, the Source Details section will appear with fields specific to that type. Select the project, the inventory file within the project…
- Once it is created, inventory source details page will open up. Click Sync Inventory Source to pull the hosts.

If you’re using a multi-node setup with execution nodes, and your inventory source sync job fails with an error like the one below:
/usr/bin/coreutils: error while loading shared libraries: librt.so.1: cannot change memory protectionsThis issue is typically caused by SELinux restrictions on the execution node.
Step 1: Check SELinux Audit Logs
Log in to the execution node where the sync is failing. Look for SELinux denials using ausearch:
ausearch -m avc -ts recent | grep -i coreutilsYou might see output similar to this:
type=SYSCALL msg=audit(1758636518.676:6874): arch=c000003e syscall=10 success=no exit=-13 a0=7fa79865d000 a1=1ff000 a2=0 a3=2 items=0 ppid=40529 pid=40531 auid=4294967295 uid=1001 gid=1001 euid=1001 suid=1001 fsuid=1001 egid=1001 sgid=1001 fsgid=1001 tty=pts0 ses=4294967295 comm="entrypoint" exe="/usr/bin/coreutils" subj=system_u:system_r:container_t:s0:c185,c752 key=(null) type=SYSCALL msg=audit(1758636550.927:6879): arch=c000003e syscall=10 success=no exit=-13 a0=7fe37bc4a000 a1=1ff000 a2=0 a3=2 items=0 ppid=40608 pid=40610 auid=4294967295 uid=1001 gid=1001 euid=1001 suid=1001 fsuid=1001 egid=1001 sgid=1001 fsgid=1001 tty=pts0 ses=4294967295 comm="entrypoint" exe="/usr/bin/coreutils" subj=system_u:system_r:container_t:s0:c188,c284 key=(null)This indicates that SELinux is denying memory operations required by coreutils, likely within the container context (container_t).
Step 2: Generate a Custom SELinux Policy
To allow this operation without disabling SELinux, generate a custom policy module:
ausearch -m avc -ts recent | audit2allow -M coreutils_fixStep 3: Review the Policy File
If you’re concerned about over-permissioning, you can review the .te file generated before applying it.
Inspect the .te file to confirm what permissions are being granted:
cat coreutils_fix.te
module coreutils_fix 1.0;

require {
	type container_config_t;
	type container_t;
	class file read;
}

#============= container_t ==============
allow container_t container_config_t:file read;
Ensure it only contains rules relevant to your observed denials (in this case, related to /usr/bin/coreutils and memory protections).
Step 4: Apply the Custom Policy
Once you’re satisfied with the contents, install the policy:
semodule -i coreutils_fix.ppThis loads the policy into SELinux without requiring a reboot or mode change.
Step 5: Re-run the Inventory Sync Job
Now return to Ansible Automation Platform and re-run the inventory source sync. It should succeed, with SELinux still in enforcing mode.
Manually Import Hosts into the Inventory on AAP
If the hosts you want to manage are not already included in your inventory source project, you can add them manually.
For small-scale use or scripting, one option is to add hosts directly through the AAP UI. However, if you have a host list in a local file (INI, YAML, JSON, etc.), you can import them using the awx-manage inventory_import command from the controller node.
Therefore, on the controller node CLI, switch to awx user:
sudo su - awxThen create your hosts file with your hosts IP addresses.
This is my hosts file on the controller node:
cat rhel-hosts192.168.200.10
192.168.200.11
192.168.200.12
192.168.200.13
192.168.200.14
192.168.200.15
192.168.200.16You can then import into your inventory. Note that you need to have already created an inventory in Ansible Automation Platform (AAP) before running this command.
awx-manage inventory_import --inventory-name test --source rhel-hostsSample command output;
    1.011 INFO     Updating inventory 3: test
    1.132 INFO     Reading Ansible inventory source: /var/lib/awx/rhel-hosts
    1.626 ERROR    ansible-inventory [core 2.16.14]
    1.627 ERROR      config file = /etc/ansible/ansible.cfg
    1.627 ERROR      configured module search path = ['/home/runner/.ansible/plugins/modules', '/usr/share/ansible/plugins/modules']
    1.627 ERROR      ansible python module location = /usr/lib/python3.11/site-packages/ansible
    1.627 ERROR      ansible collection location = /home/runner/.ansible/collections:/usr/share/ansible/collections
    1.627 ERROR      executable location = /usr/bin/ansible-inventory
    1.627 ERROR      python version = 3.11.13 (main, Jun 23 2025, 08:54:06) [GCC 8.5.0 20210514 (Red Hat 8.5.0-27)] (/usr/bin/python3.11)
    1.627 ERROR      jinja version = 3.1.6
    1.627 ERROR      libyaml = True
    1.627 ERROR    Using /etc/ansible/ansible.cfg as config file
    1.627 ERROR    host_list declined parsing /var/lib/awx/rhel-hosts as it did not pass its verify_file() method
    1.627 ERROR    script declined parsing /var/lib/awx/rhel-hosts as it did not pass its verify_file() method
    1.627 ERROR    auto declined parsing /var/lib/awx/rhel-hosts as it did not pass its verify_file() method
    1.627 ERROR    Parsed /var/lib/awx/rhel-hosts inventory source with ini plugin
    1.653 INFO     Processing JSON output...
    1.653 INFO     Loaded 0 groups, 7 hosts
    1.748 INFO     Inventory import completed for  (test - 11) in 0.1s
Well, the errors doesn’t seem critical! Your inventory hosts should now have been populated.
Read more on;
awx-manage inventory_import --helpStep 5: Create Inventory Hosts Credentials
In order for Ansible Automation Platform (AAP) to connect to the managed hosts, you need to create credentials that allow it to authenticate and communicate with those systems.
These are known as Machine credentials in Ansible Automation Platform. They are essential for accessing the hosts defined in your inventory, whether the hosts are added manually or sourced dynamically from a provider or SCM.
Machine credentials typically contain information such as the SSH username, private key, and optionally a sudo password or passphrase, depending on the target system’s access requirements.
Hence:
- Head over to Automation Execution (Automation Controller) > Infrastructure > Credentials.
- Click Create credential.
- Provide:
- Name: Enter a meaningful name for the credential.
- Description (optional): Add a description if needed.
- Organization: Choose an organization from the list, or use Default.
- Credential Type: Select Machine type from the drop-down list
- Provide the relevant machine credential details such as username/password.
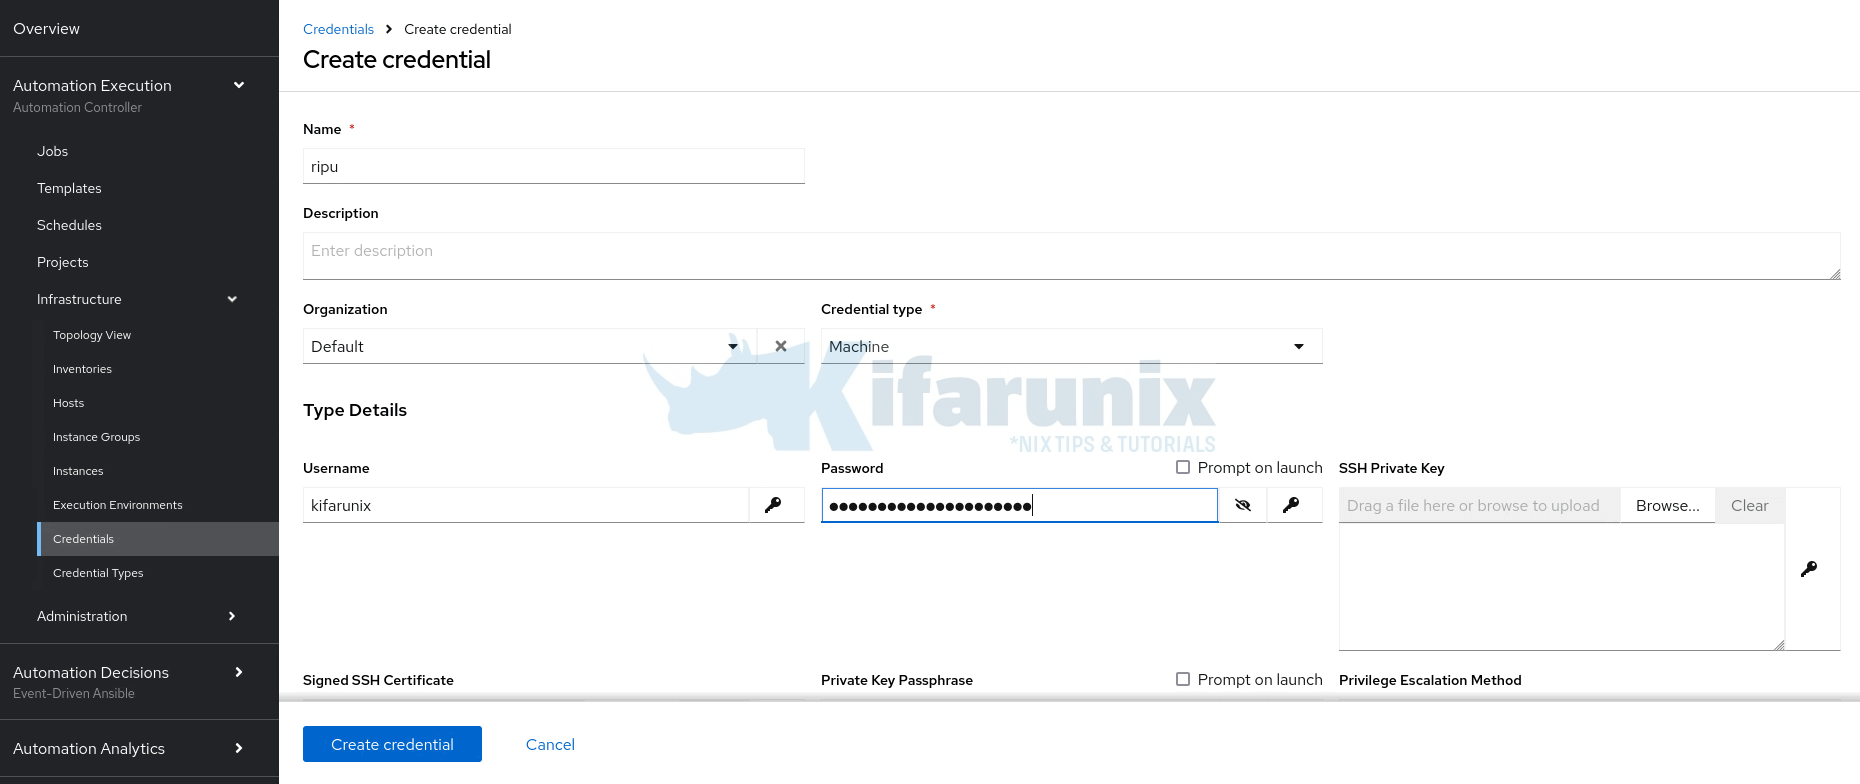
- If you are using non-root user, specify the privilege escalation method (sudo in this case), and if not using passwordless sudo, define the user password. Typically, if the user for connection has sudo rights, then no need to define seperate user for escalating the privileges.
Step 6: Create OS Upgrade Job Templates
Next, you’ll need to define one or more Job Templates. These templates control how your OS upgrade playbook is executed, specifying the inventory, credentials, project, playbook, and any required extra variables.
In our OS upgrade project, we have four playbooks:
- preflight.yml: prepares the system for upgrade
- analysis.yml: runs pre-upgrade analysis checks
- remediate.yml: applies fixes based on analysis results
- upgrade.yml: runs the actual upgrade process
Hence, we will create four job templates, one for each playbook.
To create job templates on AAP:
- Navigate to AAP web UI
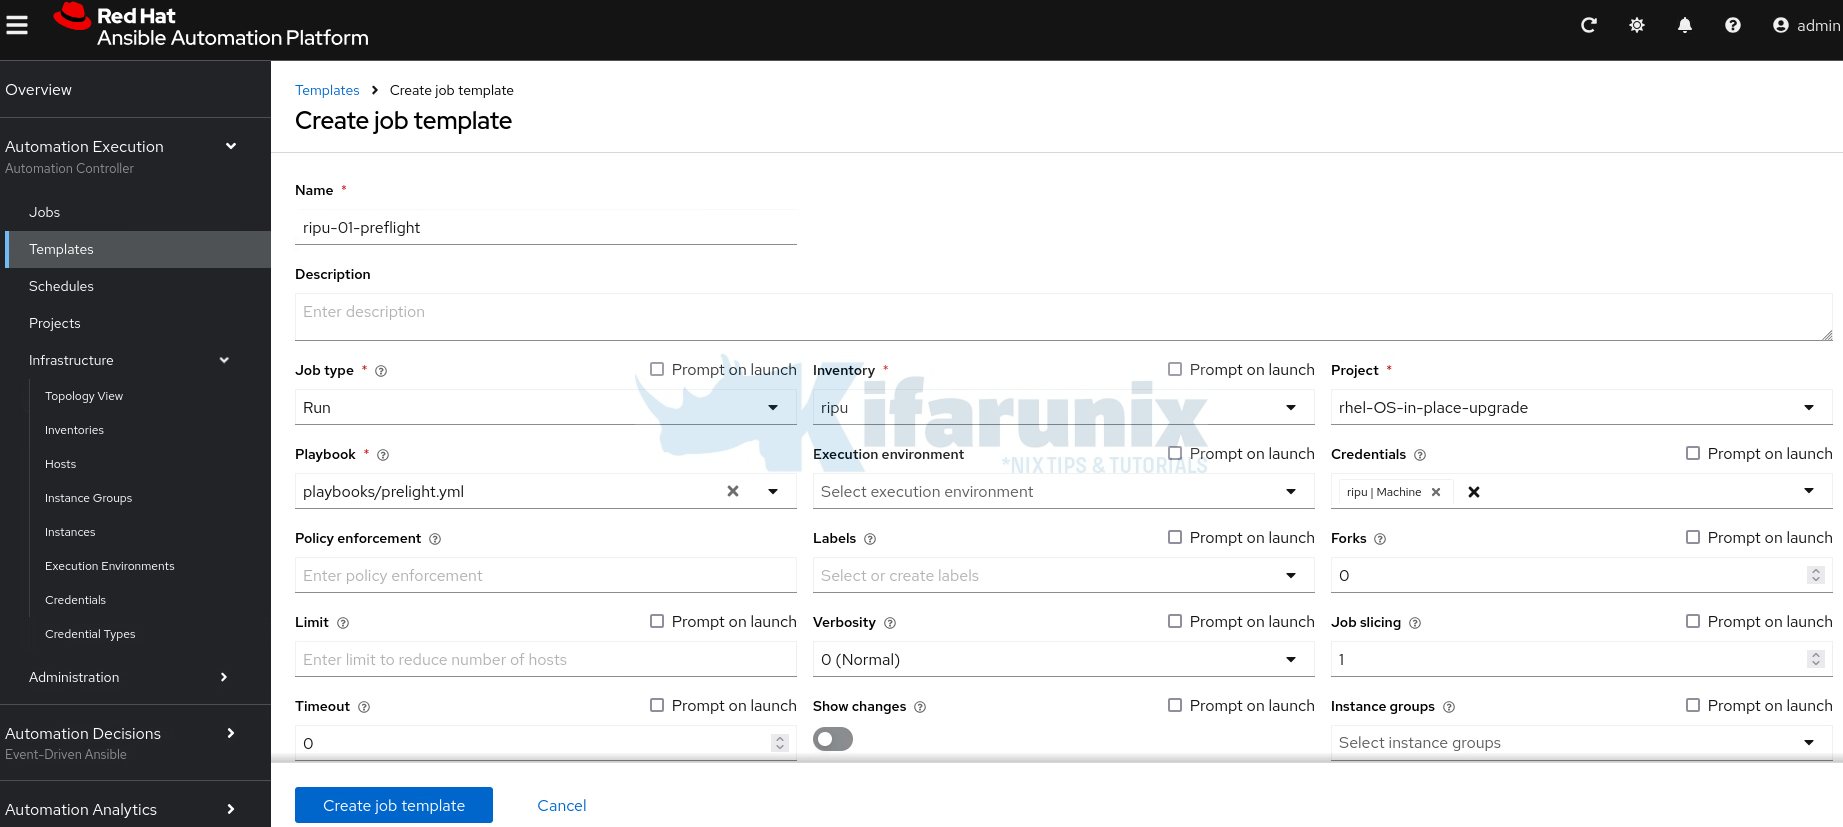
- Head over to Automation Execution (Automation Controller) > Templates > Create job template > Create job template.
- On the job template creation page, provide details like:
- Name of the job template
- Optional description
- Job type: Run
- Select your inventory
- Select the project
- Select the respective job template playbook
- Select the machine credentials for your inventory hosts
- Go through other options and provide relevant values.
- When done, click Create job template.
- If you want, you can launch the job immediately it is created or put it in a workflow template.
In the same way you created the first job template, go ahead and create the remaining ones as applicable to your environment.
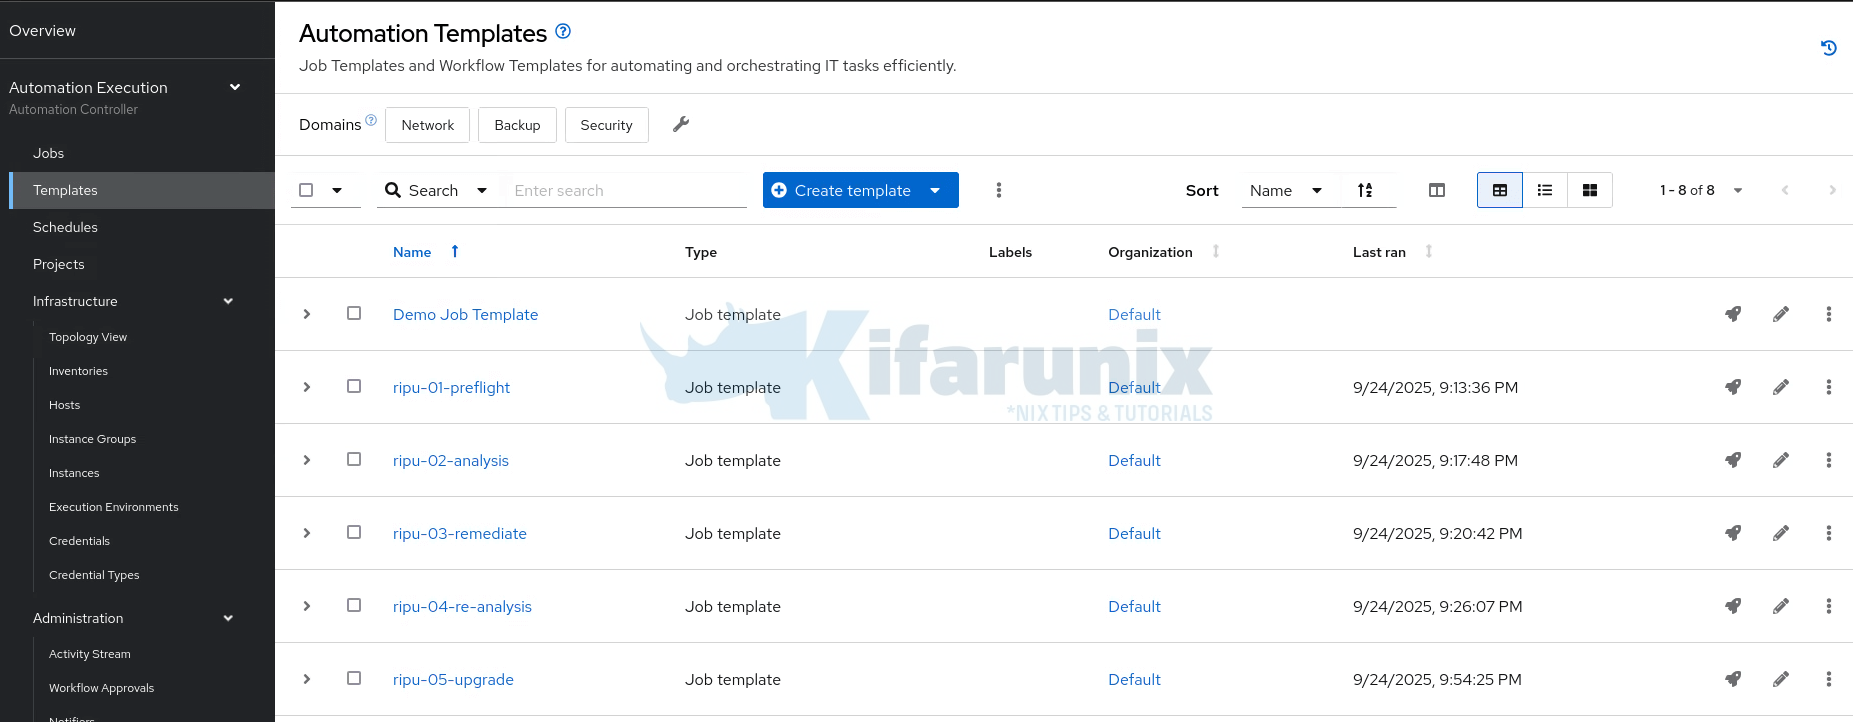
For our setup, we have created all five job templates:
- preflight: runs the preflight.yml playbook
- analysis: runs the analysis playbook
- remediate: runs the remediation playbook:
- re-analysis: re-runs the analysis to confirm that no more pending inhibitors
- upgrade: runs the upgrade playbook
Step 7: Run and Monitor the Upgrade
Once your job templates are created, you have two options for executing the OS upgrade process:
- You can launch each job template individually right after creation.
- Or, you can combine them into a workflow template for a streamlined, end-to-end execution.
In our setup, we will create a workflow template to manage the entire upgrade process from preflight checks to final upgrade in a single, coordinated run.
Hence, to create workflow template:
- Go to Automation Execution (Automation Controller) > Templates > Create job template > Create workflow job template.
- Simply enter the Name of the workflow template and click Create workflow job template.
- This opens up the visual workflow editor, where you can begin adding the previously created job templates (e.g.,
preflight,analysis,remediate, andupgrade) as individual nodes in the workflow. - Thus, click Add step to start adding the job templates into the workflow form the first one to the last one.
First step: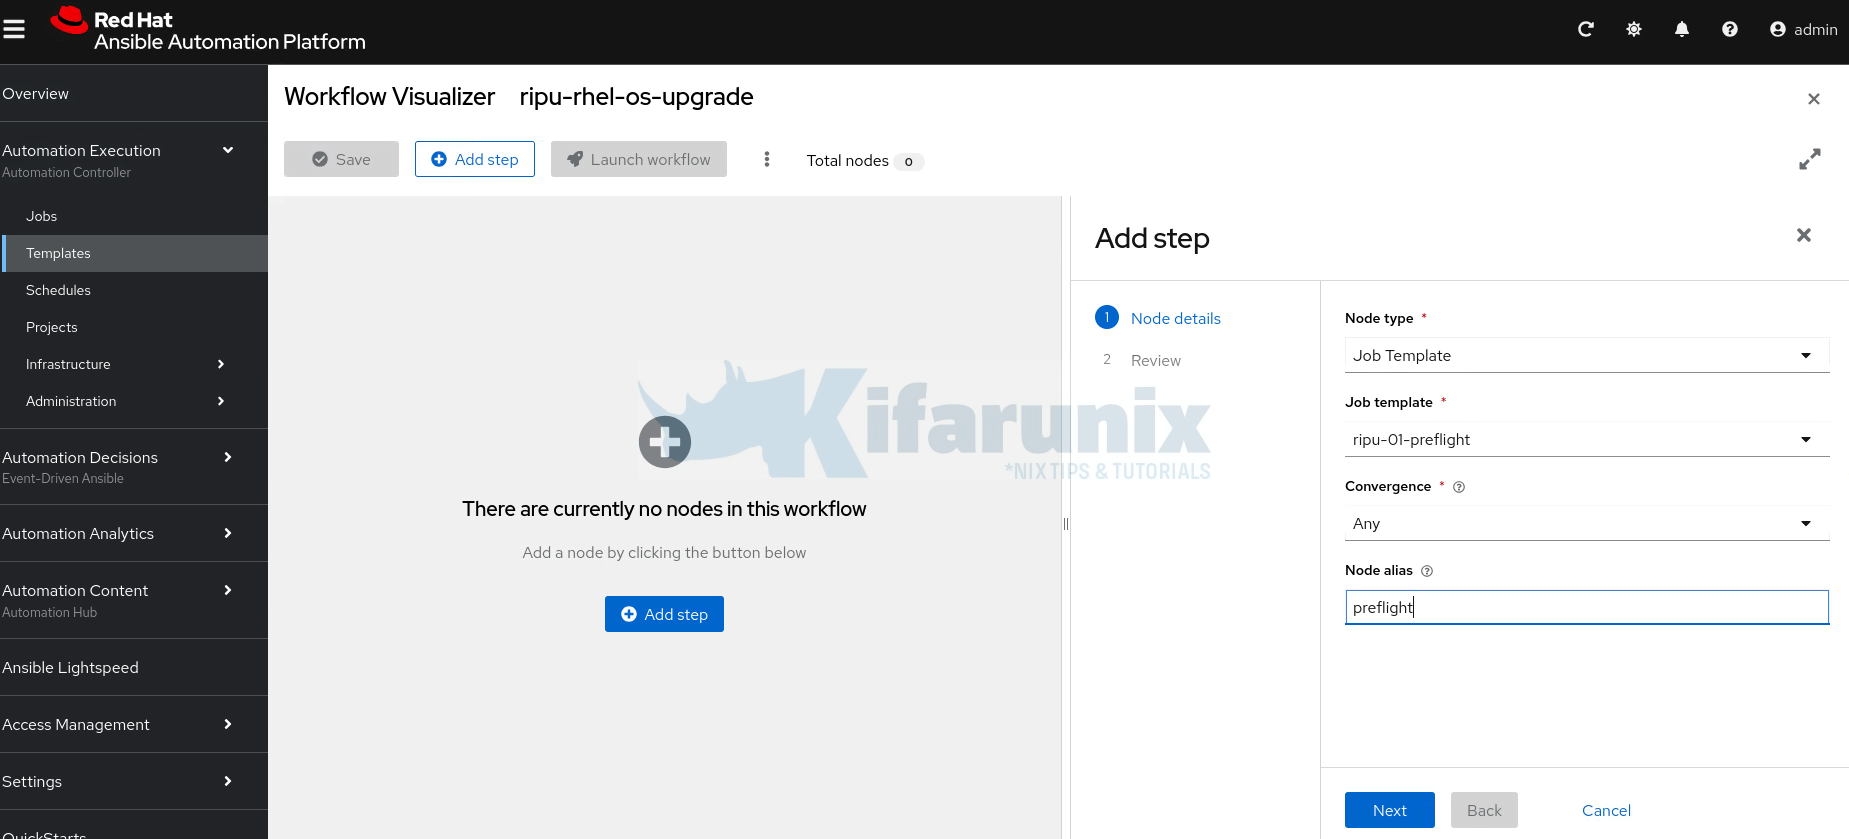
Click Next to review and create the first step. - Add the subsequent steps for the respective job templates. Hence, click the three dots on first step and Add step and link to add the second one.
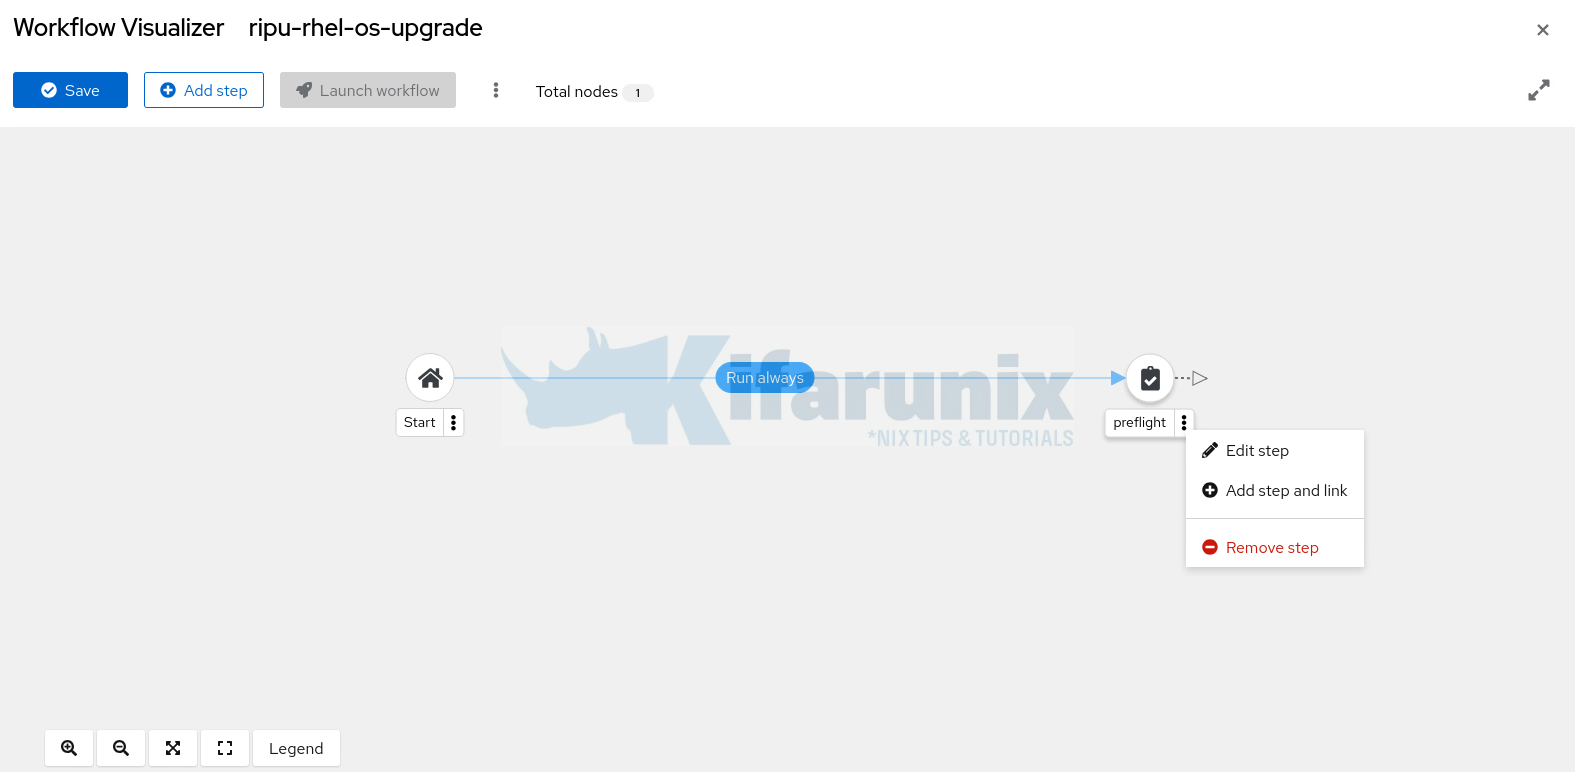
- Be sure to set the next step to Run on success of the previous step. For example, analysis can only run if the preflight job completes successfully.
- Do the same for the rest until you have added the last step of the workflow.
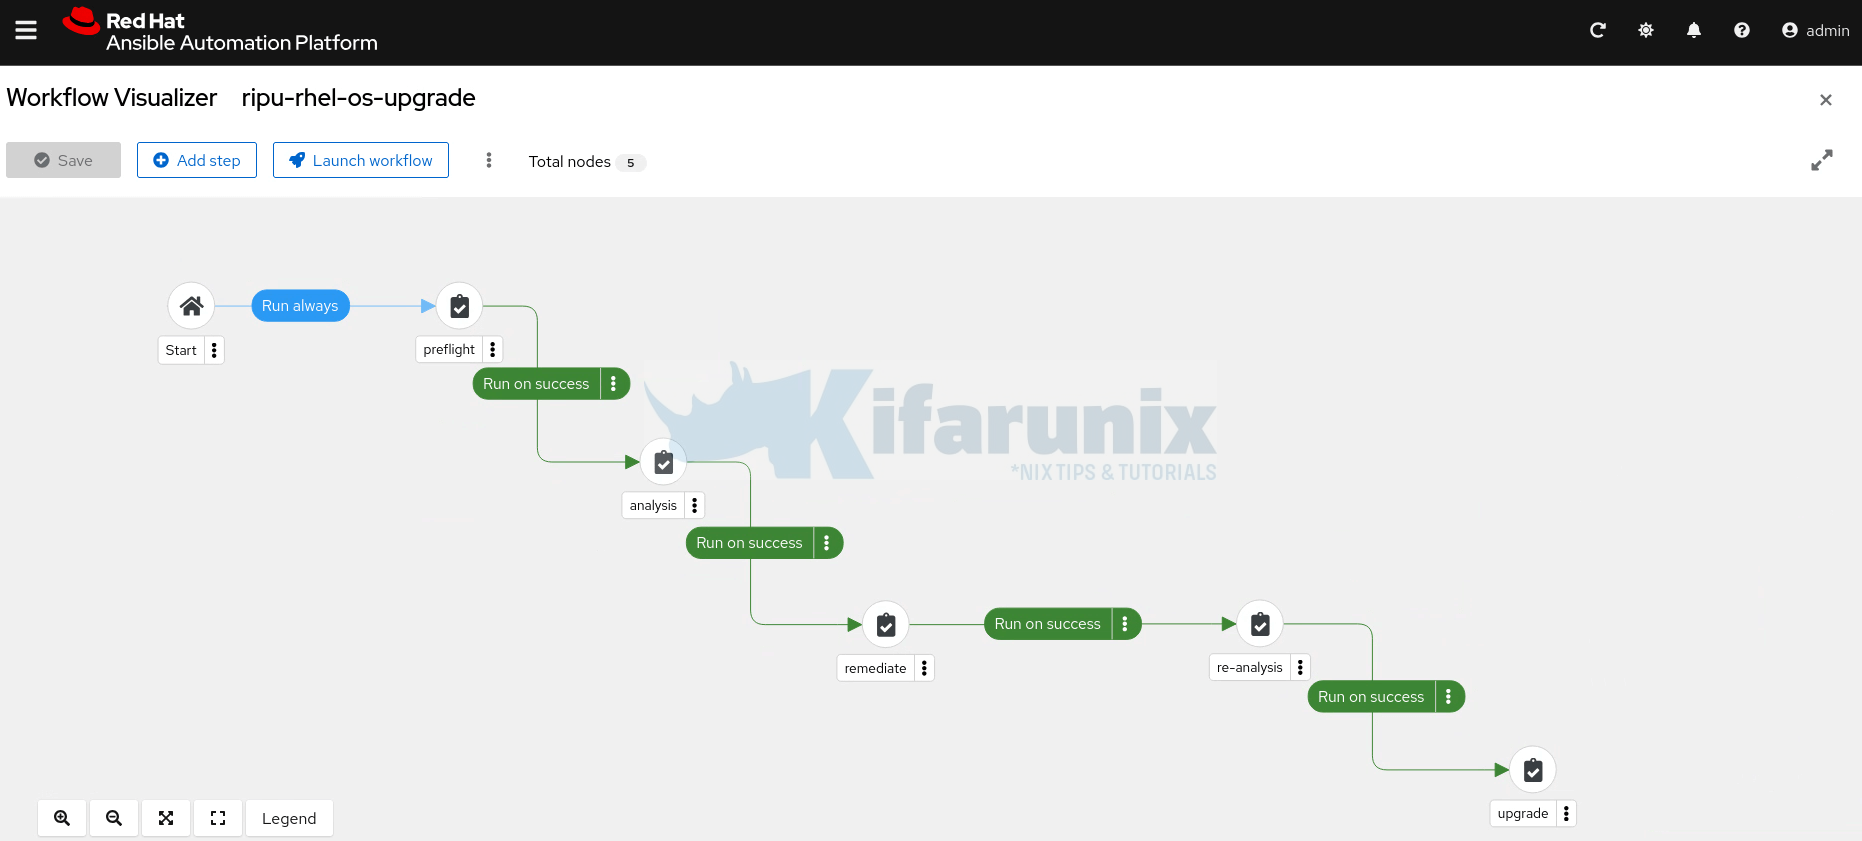
- When done creating the workflow, click Save.
You can now launch the workflow by clicking Launch Workflow.
You can also access the workflow from the templates menu. Simply open it and click Launch Template.
These are our oses before upgrade;
RHEL 7.9:
[kifarunix@db01 ~]$ cat /etc/redhat-release
Red Hat Enterprise Linux Server release 7.9 (Maipo)
[kifarunix@db01 ~]$
RHEL 8.10:
[kifarunix@app01 ~]$ cat /etc/redhat-release
Red Hat Enterprise Linux release 8.10 (Ootpa)
[kifarunix@app01 ~]$
RHEL 9.4
[kifarunix@lb01 ~]$ cat /etc/redhat-release
Red Hat Enterprise Linux release 9.4 (Plow)
[kifarunix@lb01 ~]$
First step running:
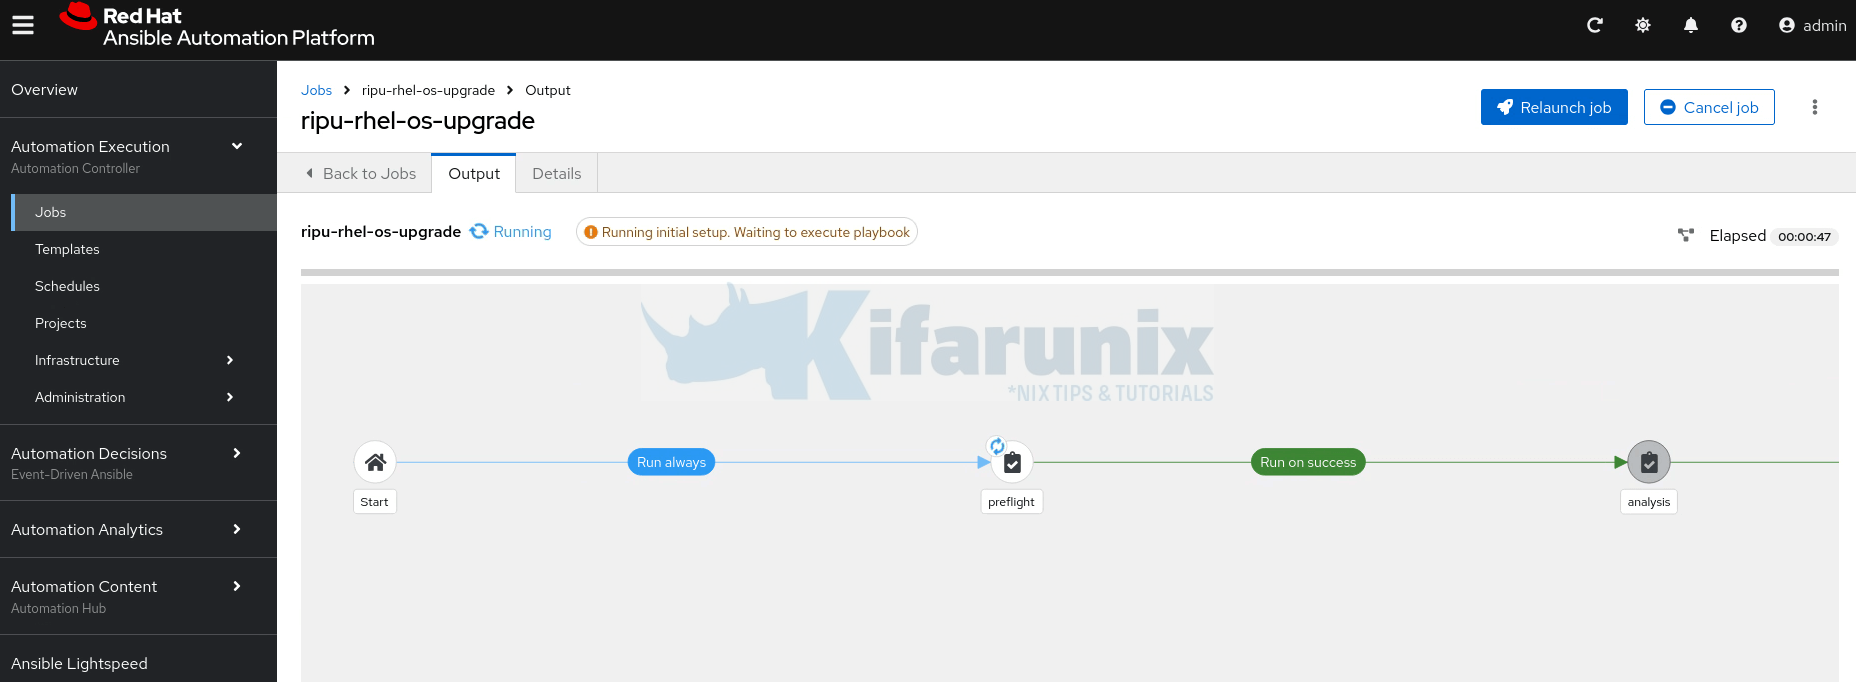
Click on the step to see the execution output;
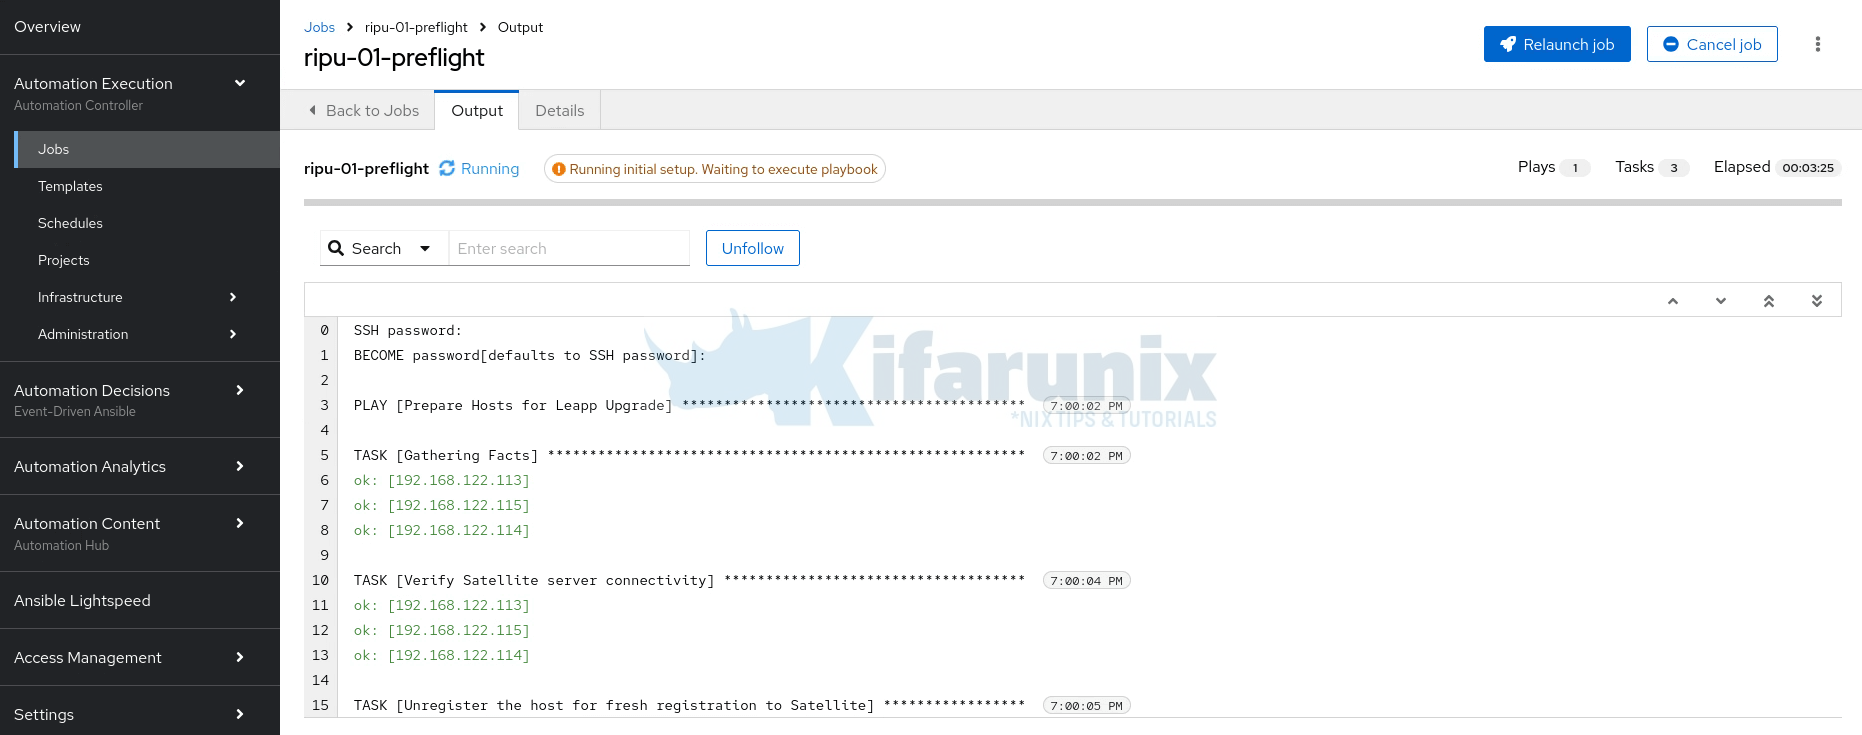
Once the preflight step completes successfully, pre-ugrade analysis step comes next and so on.
Successful workflow:
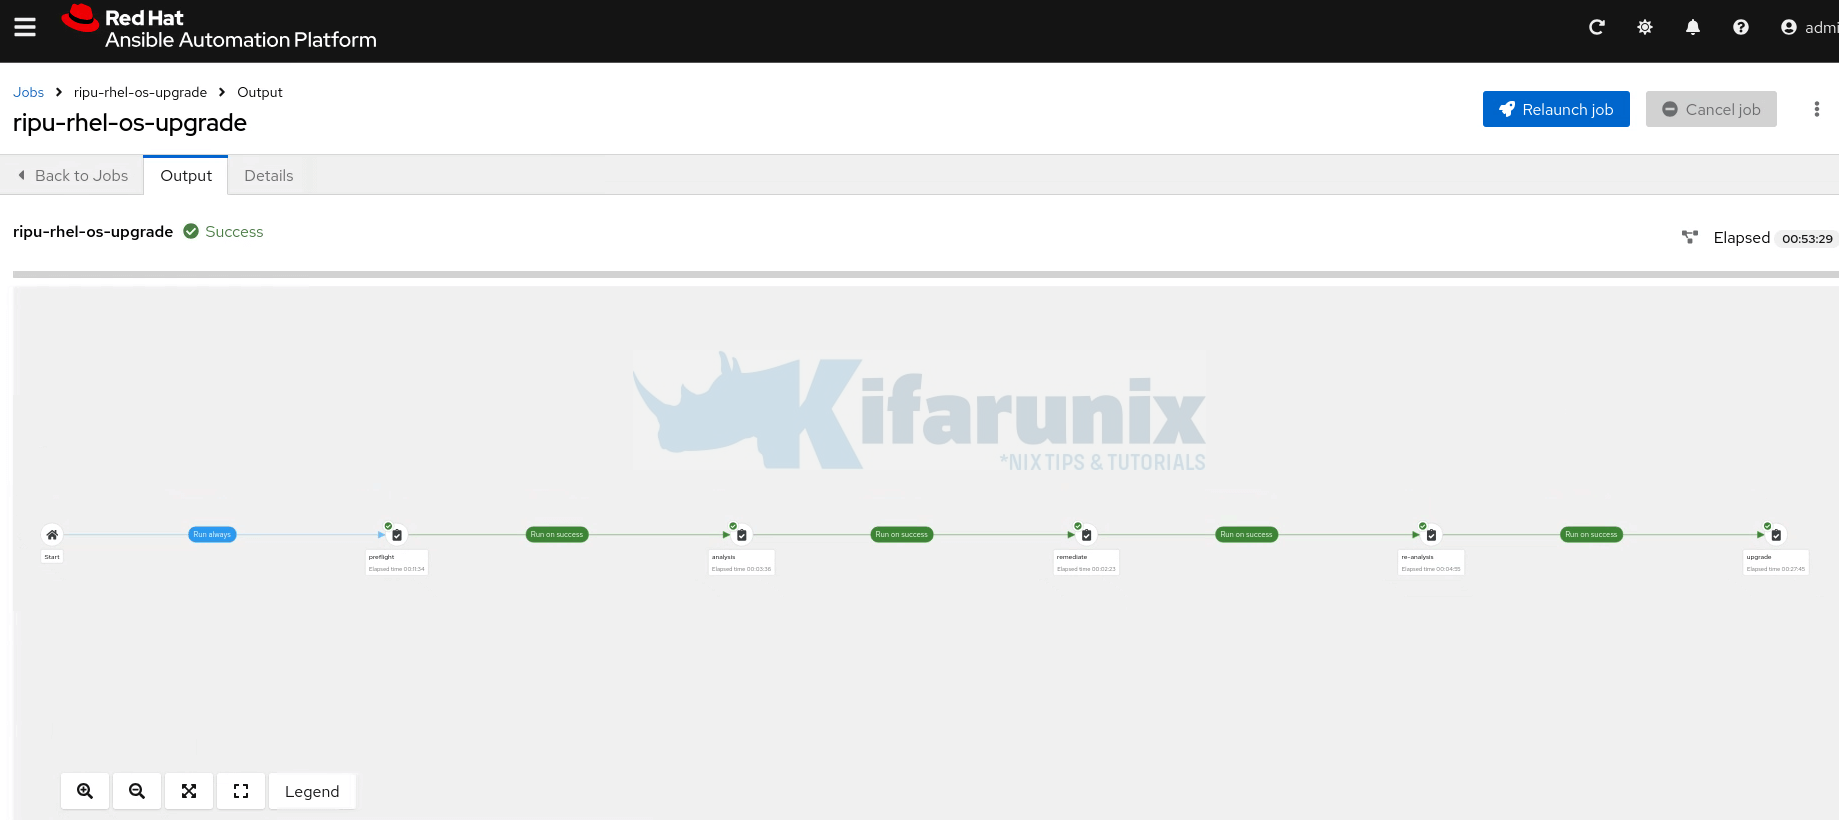
Last step output;
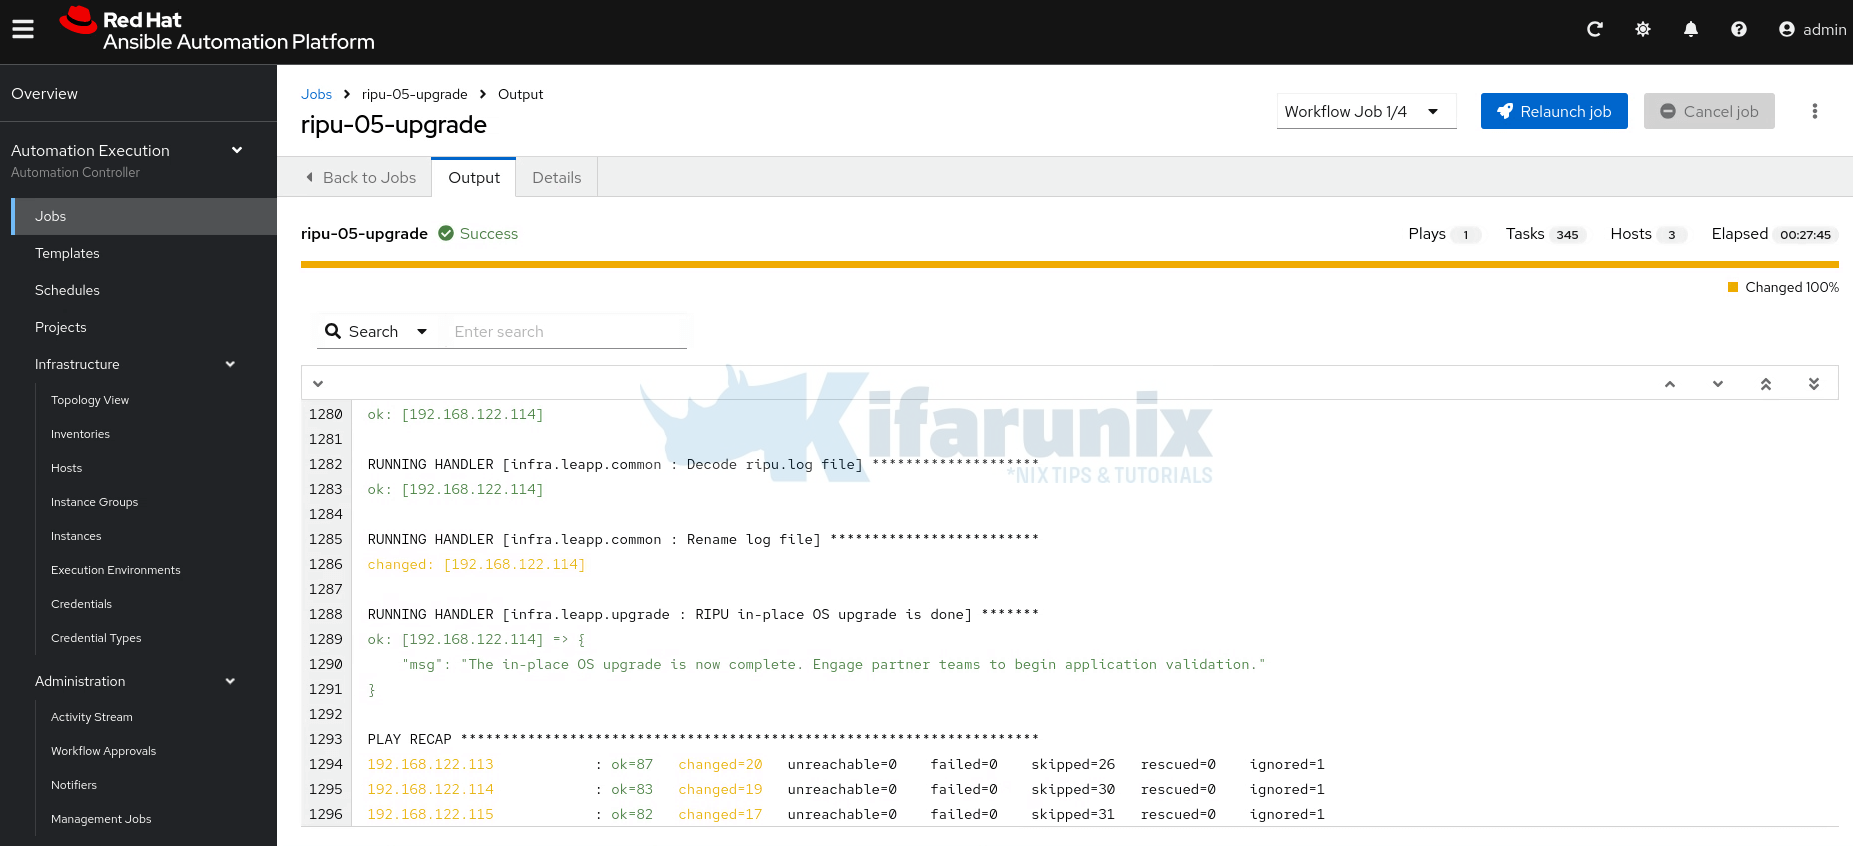
Huraay!! The workflow has completed successfully. In under an hour, 3 oses in our scope upgraded successfully.
Conclusion
And that marks the end of our guide on how to automate RHEL OS upgrades using Ansible Automation Platform.
Automating RHEL OS upgrades using Ansible Automation Platform represents a significant advancement in infrastructure management, transforming what was once a time-consuming, error-prone manual process into a streamlined, repeatable workflow. As enterprises continue to scale their Linux environments, leveraging AAP’s automation capabilities becomes not just a convenience, but a necessity for maintaining operational efficiency and system reliability while ensuring all systems remain current with the latest security patches and feature enhancements.
Further reading:

